Learning Design Studio User Guide
- 1. Preface
- 2. Learning Design Triangle (LDT)
- 2.1 Introduction
- 2.2 Intended Learning Outcomes (ILOs)
- 2.3 Disciplinary Practice (DP)
- 2.4 Pedagogical Approach
- 2.5 Curriculum Component Sequence
- 2.5.1 Curriculum Component Sequence Example - A STEAM Course
- 2.5.2 Curriculum Component Sequence Example - A Language Course
- 2.6 Task Taxonomy
- 2.7 Supplementary Learning Resources
- 3. Learning Design Studio (LDS)
- 3.1 UI Overview and Terminology
- 3.2 Learning Design Facilitator and Information Window
- 3.3 Pattern Library
- 4. Creating a New Design
- 5. Creating a New Design from Scratch
- 5.1 Entering the Course Information
- 5.2 Exploring with the Learning Design Triangle
- 5.2.1 Intended Learning Outcomes (ILOs)
- 5.2.2 Disciplinary Practice (DP)
- 5.2.3 Pedagogical Approach
- 5.3.1 Creating Curriculum Components (CCs) Part 1
- 5.3.2 Creating Curriculum Components (CCs) Part 2
- 6. Creating a New Design from Patterns
- 6.1 Entering the Course Information
- 6.2 Exploring with the Learning Design Triangle
- 6.2.1 Intended Learning Outcomes (ILOs)
- 6.2.2 Disciplinary Practice (DP)
- 6.2.3 Pedagogical Approach
- 6.3.1 Creating Curriculum Components (CCs) Part 1
- 6.3.2 Creating Curriculum Components (CCs) Part 2
- 6.3.3 Creating Curriculum Components (CCs) Part 3
- 7. Reviewing a Learning Design with Analytics
- 8. Confirming the iLAP Section Arrangement
- 9. Publishing the Design
- 10. Sharing and Collaboration
1. Preface
1.1 CITE Introduction
|
|
OverviewThe Centre for Information Technology in Education (CITE) was established in June 1998 to provide intellectual leadership and support to promote the use of information and communication technology (ICT) for quality education in Hong Kong.
CITE supports several quality academic programmes coordinated by the Faculty of Education. These programmes are offered to teachers, educators ,and education-related professionals to meet their increasing needs and interests in further pursuing their studies. It is hoped that these professionals can be equipped with necessary academic and professional knowledge about IT in education.
In addition, the Centre provides in-service professional development training to teachers and principals in the use of IT in teaching and learning. Besides, CITE is also committed to providing consultancy services to the community on various aspects of the development of the educational use of IT. The goal is to establish close connections with the education, technology ,and business sectors of the community at large. |

Vision
CITE carries a vision to become a Centre of Excellence in the area of IT in education.
Mission
- To stimulate and undertake research and development projects ,and to disseminate the research products and findings to the education community both locally and internationally.
- To provide quality in-service teacher/principal education programs for the upgrading and retraining of school teachers/principals so that they will be capable of integrating IT in their teaching practices and strategic school planning.
- To establish links and partnerships locally and internationally to further strengthen and enhance CITE's profile and image internationally.
1.2 IDEALS Introduction
Intelligent DEsign-Aware Learning analytics empowered 21C Learning & Teaching System (IDEALS) is an intelligent system designed to enhance learning and teaching experiences.
Watch this video to know more about IDEALS.
Starting September 2025, the IDEALS platform is available for public subscription, empowering educators—especially primary and secondary school teachers—to create structured, outcome-aligned learning experiences.
Click here to subscribe!
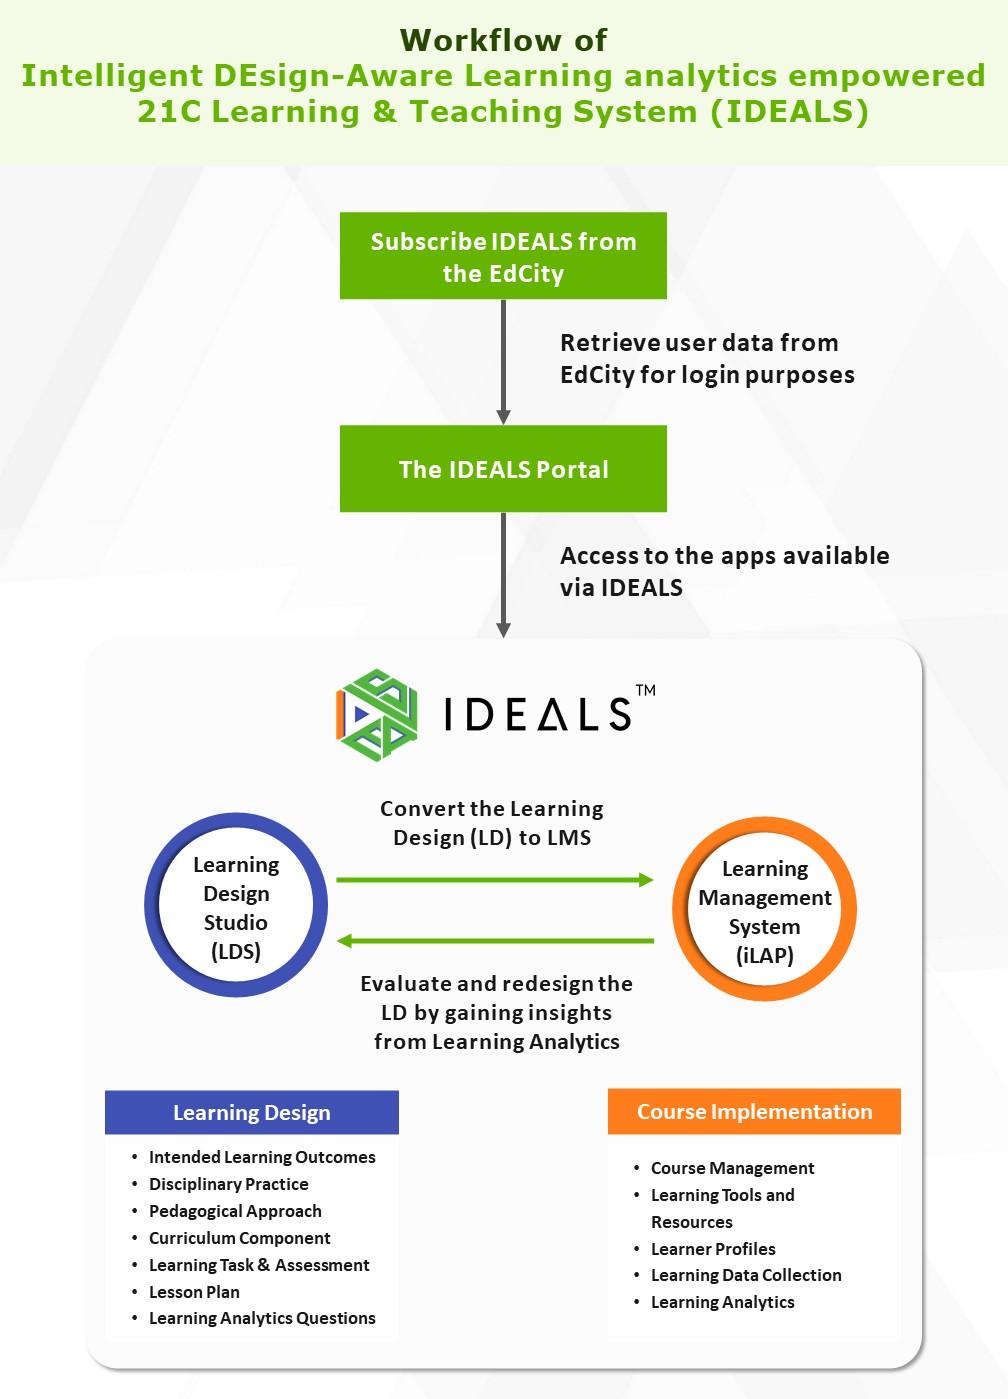
Figure 1.1 Workflow of IDEALS
Click here to subscribe!
Two main platforms of IDEALS have been well-known by our users: Learning Design System (LDS) and Interactive Learning and Assessment Platform (iLAP). The last part of the system is the Design-aware Learning Analytics and Visualization (DLAV). Through a suite of learning analytics plug-ins, it supports learning design evaluations and refinement recommendation for teachers.
|
|
Learning Design Studio (LDS) is a pedagogically grounded productivity and collaboration platform for professionals in the Learning Design (LD), Learning Analytics (LA), and Education communities (particularly those interested in using LD to support Teacher Inquiry of Student Learning (TISL)).
The platform provides users with easy-to-use learning design patterns for various subjects, supplemented by guidance on setting learning outcomes, curriculum components and visual analysis on learning design.
|
|
|
|

2. Learning Design Triangle (LDT)
2.1 Introduction
Introduction to the Learning Design Triangle (LDT)
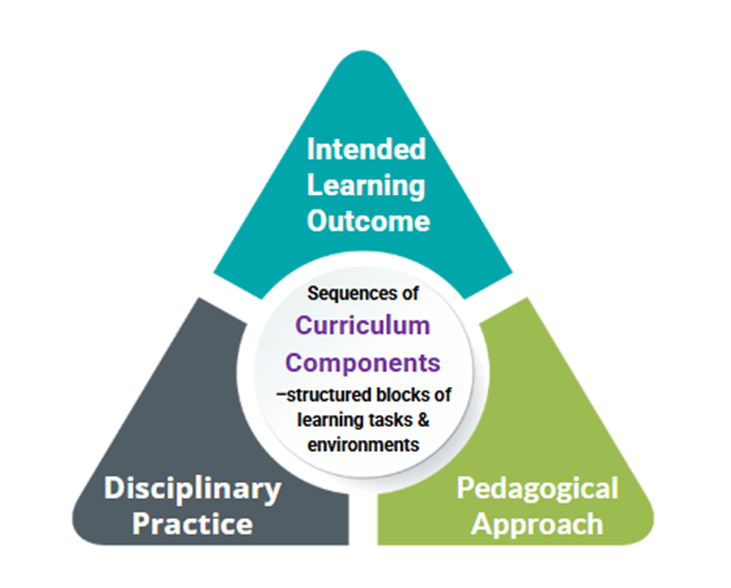
Figure 2.1: The Learning Design Triangle (LDT)
The Learning Design Triangle (LDT) is a conceptual framework developed to help educators create effective and coherent learning experiences of learners. It emphasizes the integration and alignment of three core elements:
- Intended Learning Outcomes
- Disciplinary Practice
- Pedagogical Approach
This alignment enables educators to
- Plan purposeful curriculum units
- Reflect on their teaching strategies
- Continuously improve student learning by connecting learning tasks with clear goals and real-world relevance
The details of the three core elements of LDT—Intended Learning Outcomes, Disciplinary Practice, and Pedagogical Approach—along with their application to Curriculum Components and Learning Tasks, will be explored in the following sections in this chapter.
Reference:
Law, N., & Liang, L. (2020). A multilevel framework and method for learning analytics integrated learning design. Journal of Learning Analytics, 7(3), 98-117.
2.2 Intended Learning Outcomes (ILOs)
Intended Learning Outcomes (ILOs)
Intended Learning Outcomes (ILOs) indicate what students are expected to achieve as a result of the learning process. They serve as a foundation for the entire learning design process, guiding the design of learning tasks and assessments.
Guide to Writing Intended Learning Outcomes
How to Write Effective Intended Learning Outcomes?
A well-written ILO is essential for effective learning and teaching. Key features include:
|
Feature |
Description |
Example |
|---|---|---|
| Student-centred | Describe what learners will achieve, not what the teacher will teach. |
❌ The teacher will introduce the main stages of the water cycle.
✅ Explain the main stages of the water cycle. |
| Measurable | Specify outcomes that can be observed and assessed. |
❌ Write a good essay.
✅ Write a persuasive essay with a clear thesis and supporting arguments. |
| Specific | Clearly define the knowledge, skills, values, or attitudes that learners are expected to achieve. |
❌ Understand the history of World War II.
✅ Identify the key causes of World War II. |
| Appropriate difficulty | Achievable but challenging for most target learners. |
❌Provide a summary of all the main arguments discussed in the debate.
✅ Summarize two key arguments presented during the debate. |
The Four Categories of Intended Learning Outcomes in the Learning Design Studio
|
Category |
Description |
Example |
|---|---|---|
| Disciplinary Knowledge | The core concepts, theories, facts, and frameworks that are recognized and developed within a particular field or area of study. |
Identify the simple past tense as verbs for past events. |
| Disciplinary Skills | The specific techniques, methods, and competencies associated with a particular field or area of study. |
Construct sentences about yesterday’s activities using the simple past tense. |
| Generic Skills | The broad abilities that help people succeed in education, work, and daily life, regardless of a particular field or area of study. | Apply effective communication strategies to share ideas with others. |
| Values and Attitudes | The beliefs, principles, and dispositions that guide a person's behavior, decision-making, and interactions with others. |
Demonstrate openness by considering new perspectives and adapting to challenges. |
Writing Cognitive Learning Outcomes using Bloom’s Taxonomy
When designing your Intended Learning Outcomes (ILOs), it is recommended to use Bloom’s Taxonomy, a widely recognized framework that aids educators in formulating clear and measurable learning outcomes. Bloom’s Taxonomy categorizes cognitive skills into different levels—such as remembering, understanding, applying, and analyzing—ensuring your ILOs comprehensively address key aspects of student learning.
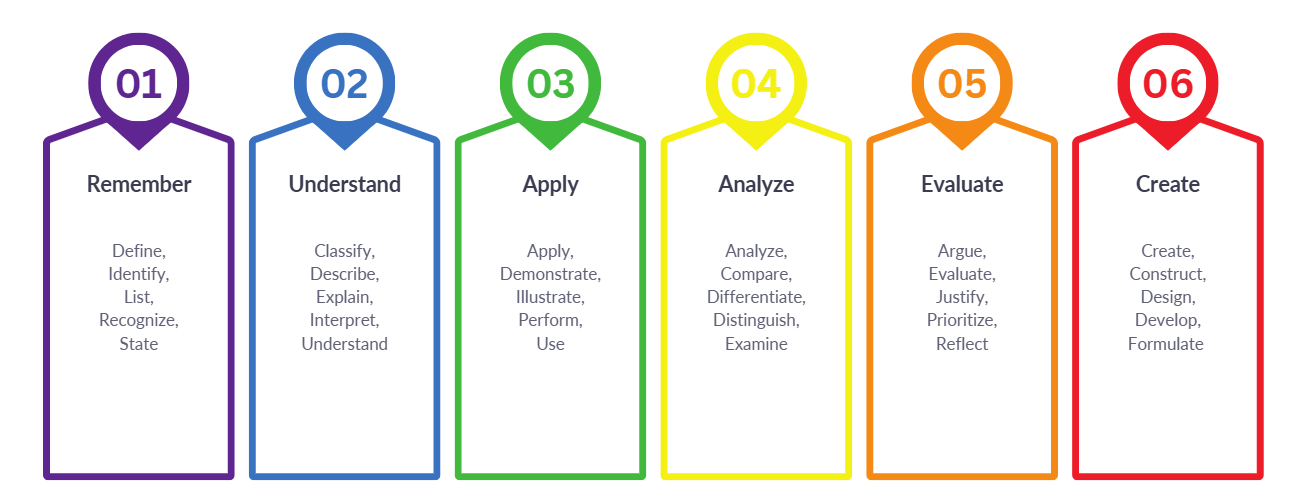
Figure 2.2: Bloom’s Taxonomy of the Cognitive Domain
Bloom’s Taxonomy breaks learning into six cognitive levels:
|
Bloom's Level |
Example of ILOs |
|---|---|
| 1. Remember - Recall facts |
List the main stages of the water cycle. |
| 2. Understand - Explain ideas |
Describe how water moves through each stage of the water cycle. |
| 3. Apply - Use knowledge in new situations |
Illustrate the water cycle by matching real-life weather events to each stage. |
| 4. Analyze - Draw connections among ideas |
Compare the processes of the water cycle in different climates and environments. |
| 5. Evaluate - Make judgments |
Evaluate the effects of pollution on the water cycle. |
| 6. Create - Produce original work | Design a simple model to demonstrate the water cycle. |
Reference
Arkansas State University. (n.d.). Bloom's revised taxonomy: Cognitive, affective, and psychomotor. https://www.astate.edu/a/assessment/assessment-resource-links/files/Revised-Bloom%20s-Taxonomy-All-Domains.pdf
2.3 Disciplinary Practice (DP)
Disciplinary Practice (DP)
Disciplinary Practice (DP) refers to the specific ways of thinking, doing, and creating that are characteristic of a particular field or profession. It situates learning within authentic contexts that reflect how knowledge and skills are applied in the real world. Within any discipline, there are explicit workflow steps that guide how professionals manage and complete tasks.
To integrate the DP into the K-12 learning context, we have simplified the workflows to create DP Patterns for use in the Learning Design Studio. Please see the examples below.
|
Disciplinary Practice |
Role of Learner |
Details |
|---|---|---|
| Engineering Design |
Engineer, Inventor |
Description The disciplinary practice of 'Engineering Design' supports our young learners to apply their knowledge and skills in developing effective solutions to real-world problems. Like engineers and inventors, learners will engage in identifying problems, then ideate, design, create, and optimize solutions to address those challenges.
Workflow steps
|
| Writing a News Report |
Journalist |
Description The disciplinary practice of ‘Writing a News Report’ supports our young learners in engaging with the inquiry-based process of writing. Like journalists, learners must collect and verify information, organize their findings logically, and write in an objective and impartial tone to create a timely, factual, and engaging report that helps audiences understand current events and issues.
Workflow steps
|
| Mock Legislative Procedure |
Legislator |
Description The disciplinary practice of 'Mock Legislative Procedure' supports our young learners in collaboratively drafting legislation that addresses specific issues. Like legislators, learners engage in researching background information, analyzing the interests and impacts of various parties, and drafting legislative proposals. Through constructive collaboration, they work to reach consensus and develop legislation that incorporates ideas from different stakeholders.
Workflow steps
|
| Performance Production |
Performer, Entertainer |
Description The disciplinary practice of 'Performance Production' supports our young learners in transforming literature into engaging performances. Like performers and entertainers, learners will engage in reading and analyzing literature, developing scripts, collaborating in rehearsals, and performing for audiences to produce a compelling and expressive performance that effectively communicates the themes and messages of the literature.
Workflow steps
|
| Scientific Investigation |
Scientist |
Description The disciplinary practice of 'Scientific Investigation' supports our young learners in exploring the natural world and developing evidence-based explanations. Like scientists, learners will engage in formulating inquiry questions, proposing hypotheses, designing and conducting experiments, and using logical reasoning to draw informed conclusions that deepen their understanding of scientific phenomena and processes.
Workflow steps
|
2.4 Pedagogical Approach
A pedagogical approach refers to the method or strategy that a teacher uses to deliver instruction and facilitate learning. It encompasses the underlying beliefs, techniques, and practices employed to help students acquire knowledge, skills, and values. One approach we promote is Self-directed Learning (SDL).
|
|
Self-Directed Learning (SDL) is recognized as an important approach for developing life and career skills that prepare students for further education and the workforce.
SDL has two key characteristics:
Personal Responsibility:
Social Interaction:
|

Key Components and Indicators of SDL
The operational framework of SDL includes five essential components: goal setting, self-planning, self-monitoring, self-evaluation and revision.
|
SDL Components |
Description |
|---|---|
| 1. Goal-setting |
|
| 2. Self-planning |
|
| 3. Self-monitoring |
|
| 4. Self-evaluation |
|
| 5. Revision |
|
Reference
Hew, K. F., Law, N., Wan, J., Lee, Y., & Kwok, A. (2016). Self-directed learning in science education: Explicating the enabling factors. In C.-K. Looi, J. Polman, U. Cress, & P. Reimann (Eds.), Transforming learning, empowering learners: ICLS conference proceeding (Vol. 2, pp. 761–768). Singapore: International Society of the Learning Sciences.
Knowles, M. S. (1975). Self-directed learning: A guide for learners and teachers. Chicago, IL: Follet.
2.5 Curriculum Component Sequence
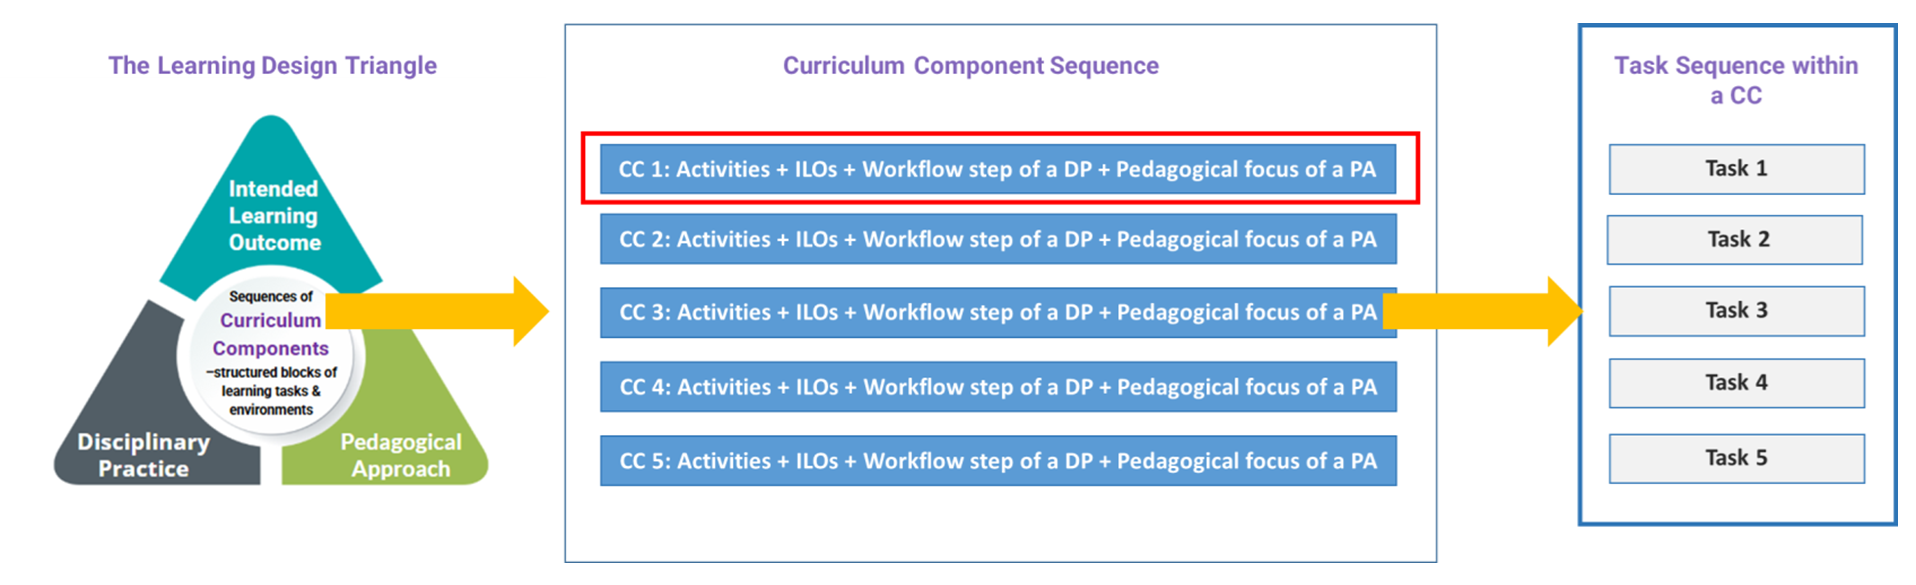
Figure: 2.4 An Illustration of the Learning Design Triangle and the Curriculum Component Sequence
From Sections 2.2 to 2.4, you have explored the three elements of the Learning Design Triangle, which together provide the contextual framework for anchoring the entire learning design. In this section, we will examine the Curriculum Component (CC) Sequence, which serves as a bridge between the abstract Learning Design Triangle and the concrete learning and assessment tasks. The CC Sequence guides learning designers in gradually transforming overarching design concepts into actionable teaching practices.
In the following section, we will explore examples of learning designs for both a STEAM subject and a language subject. This will help you gain a better understanding of what a Curriculum Component Sequence is and how it connects to the Learning Design Triangle.
2.5.1 Curriculum Component Sequence Example - A STEAM Course
In this section, we will explore how to transform the elements of the Learning Design Triangle (LDT) into a Curriculum Component (CC) Sequence for a STEAM course. Considering that we are designing a course titled "Factors affecting Rate of Photosynthesis: Learning through Scientific Investigation".
1. The Learning Design Triangle
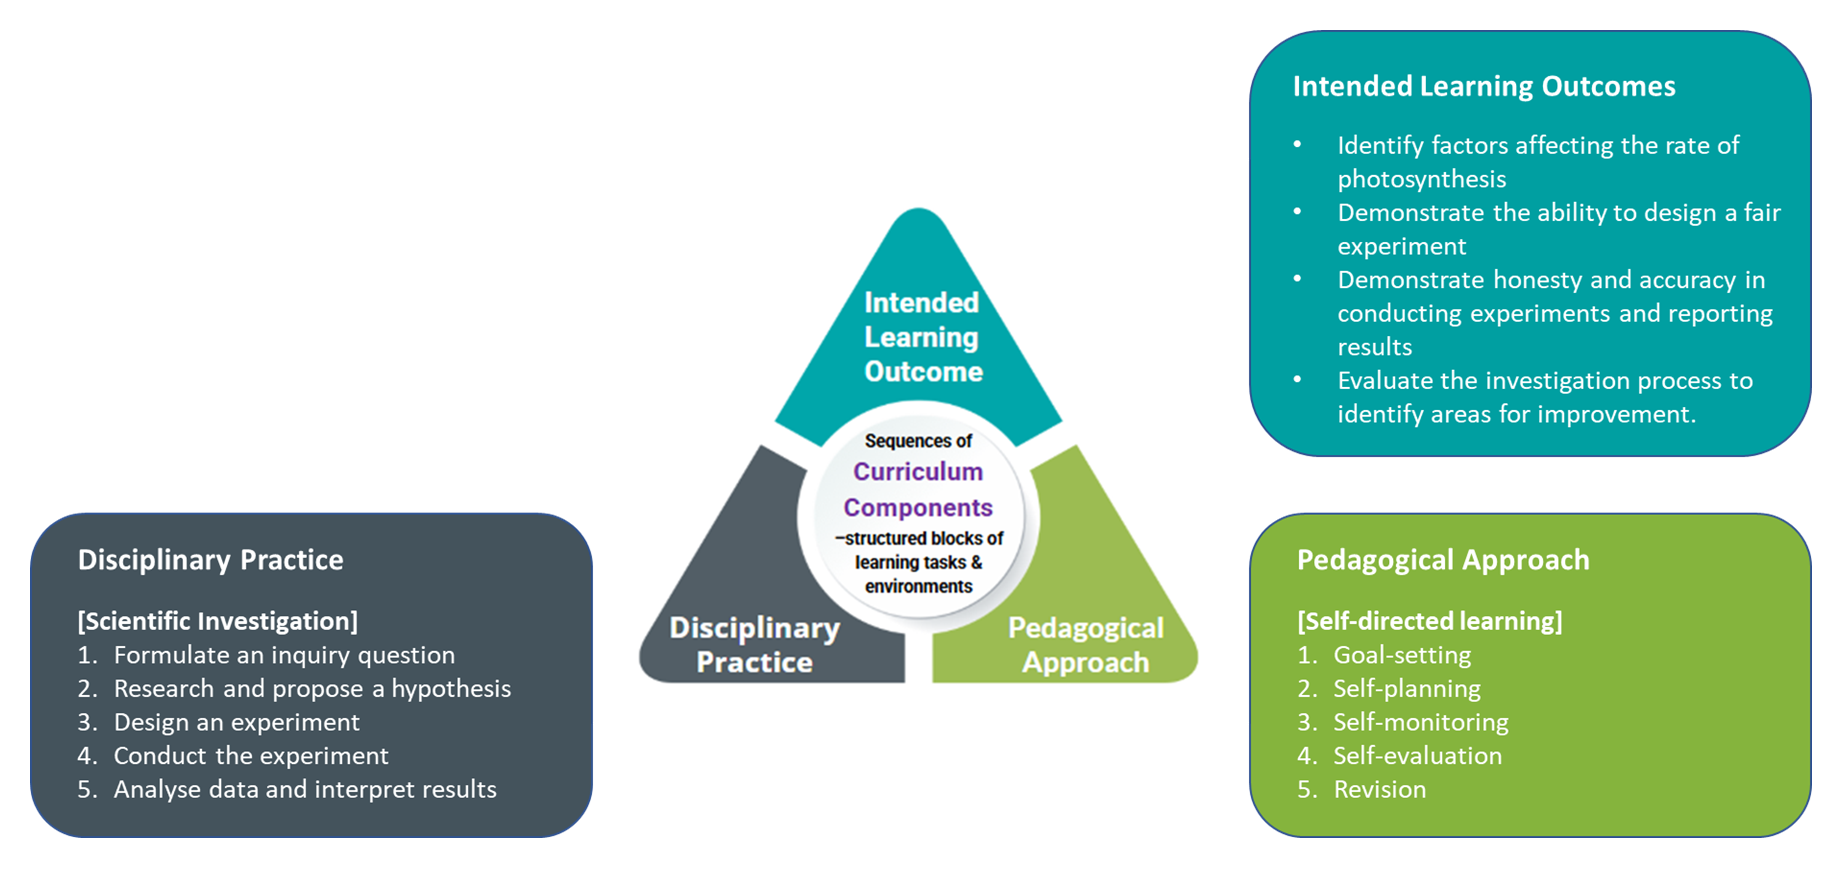
Figure 2.5: The Learning Design Triangle of "Factors affecting Rate of Photosynthesis: Learning through Scientific Investigation"
-
To anchor the learning design within a contextual framework, we will use the Learning Design Triangle to define the intended learning outcomes, disciplinary practices, and pedagogical approach.
2. The Curriculum Components Sequence
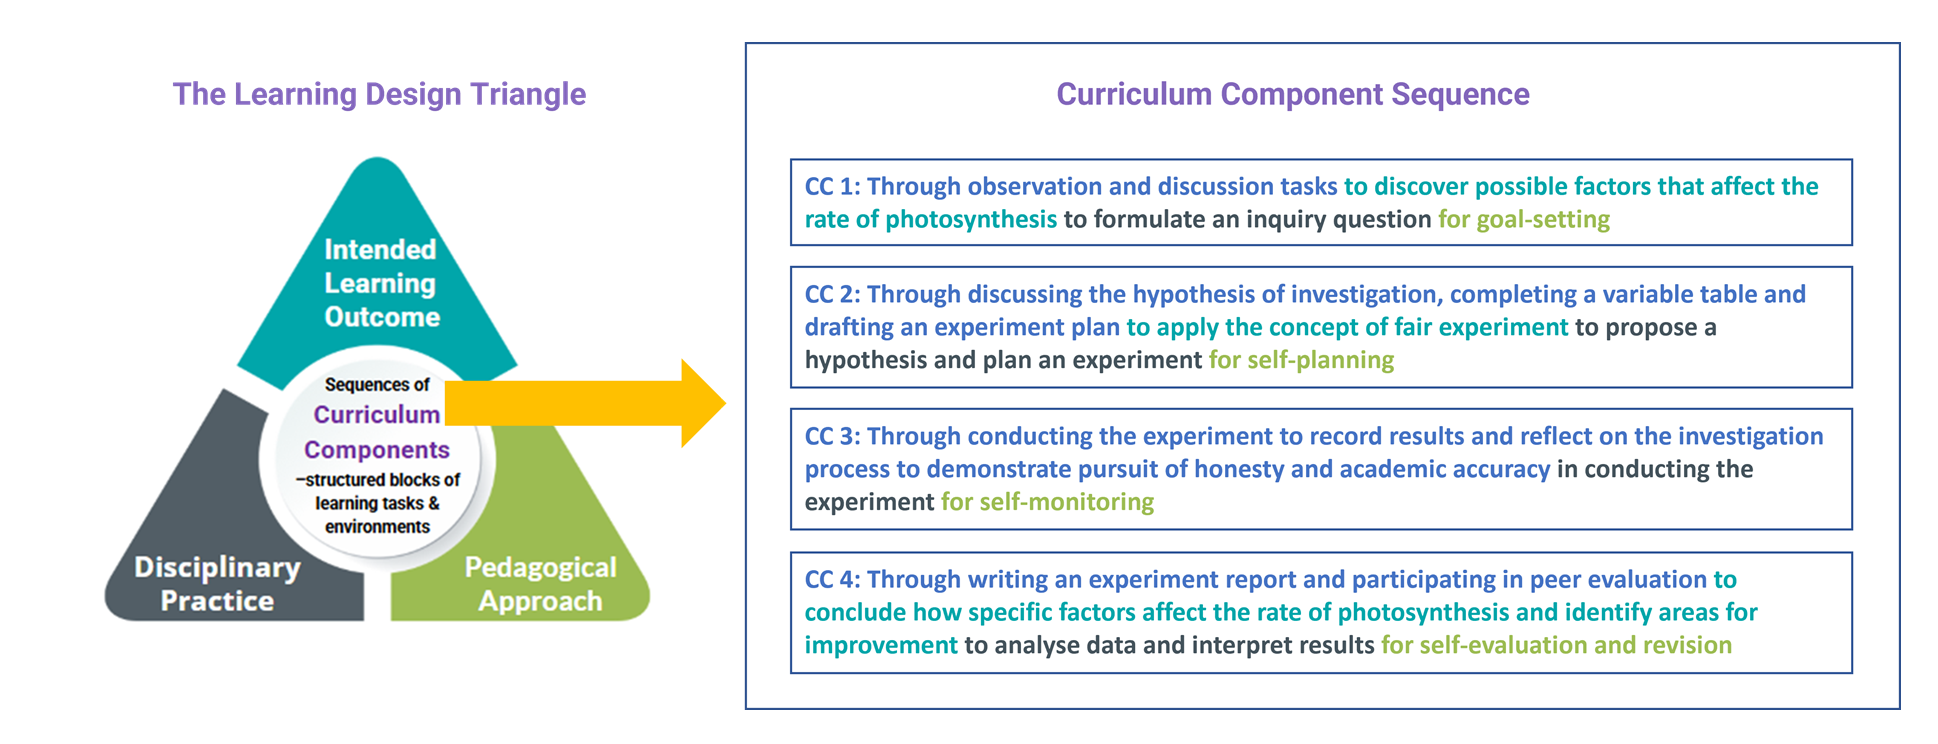 Figure 2.6: The Curriculum Component Sequence of "Factors affecting Rate of Photosynthesis: Learning through Scientific Investigation"
- To make the learning process more manageable, we divide it into distinct phases within the learning design, guided by the workflow steps of disciplinary practice. Each phase targets a specific set of learning outcomes and is supported by the pedagogical focus of the chosen approach, such as self-directed learning.
- In the Learning Design Triangle framework, we use Curriculum Component to structure and organize each phase of learning around targeted outcomes. The collection of curriculum components that represents all phases of learning in a course is called a Curriculum Component Sequence.
3. Assign learning tasks to each Curriculum Components
- To put the Curriculum Components into practice, we need to assign learning tasks and assessments to enhance and evaluate learners’ development in knowledge, skills, or values.
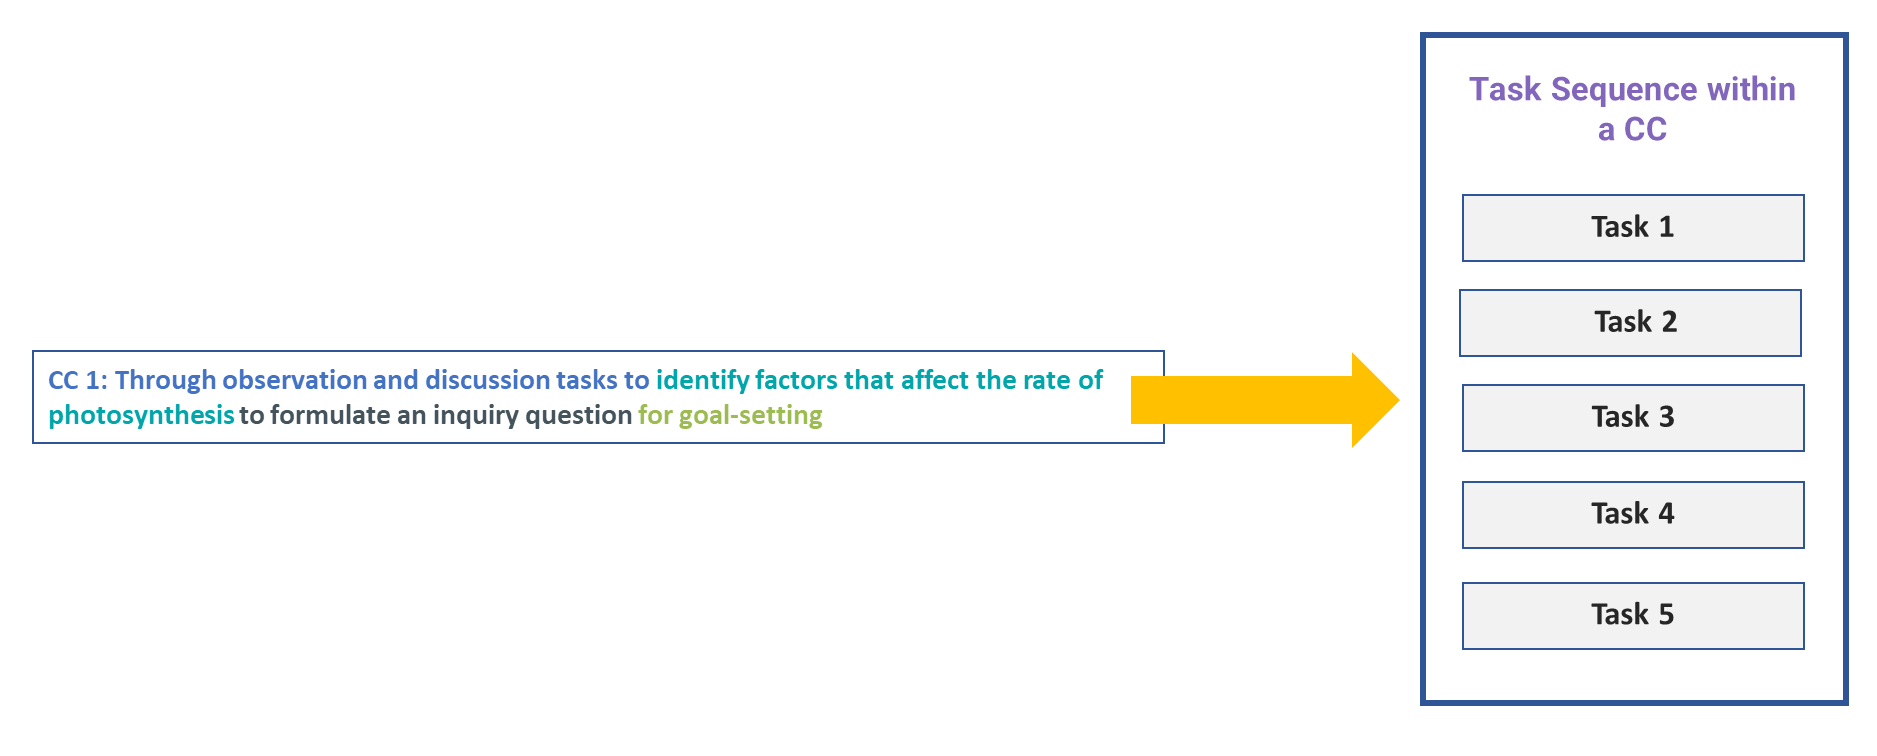
Figure: 2.7 Task Sequence within a Curriculum Component
- Now, we will explore an example of a Curriculum Component (CC) focused on the "goal-setting" phase.
| CC Name |
A CC name is formed by combining four components.
E.g. Through observation and discussion tasks to discover possible factors that affect the rate of photosynthesis to formulate an inquiry question for goal-setting |
||||||||||
| Linked Intended Learning Outcomes |
|
||||||||||
| Workflow Step of Disciplinary Practice | Scientific Investigation-Formulate an inquiry question | ||||||||||
| Pedagogical Focus | Self-directed Learning - Goal-setting | ||||||||||
| Learning Tasks |
* Each task type has a representative color.
|
The tasks in a CC:
- A task can be both a learning task and an assessment.
- A well-formulated task sequence helps build knowledge and skills step-by-step while enabling ongoing assessment of student understanding.
-
The introduction of the task types will be covered in Chapter 2.6 - Task Taxonomy.
🌟 The link to the learning design of this sample course.
2.5.2 Curriculum Component Sequence Example - A Language Course
In this section, we will explore how to transform the elements of the Learning Design Triangle (LDT) into a Curriculum Component (CC) Sequence for a language course. Considering that we are designing a course titled "Inquiry-based Curriculum Unit that Cultivates Students' Expository Skills and Creativity".
1. The Learning Design Triangle
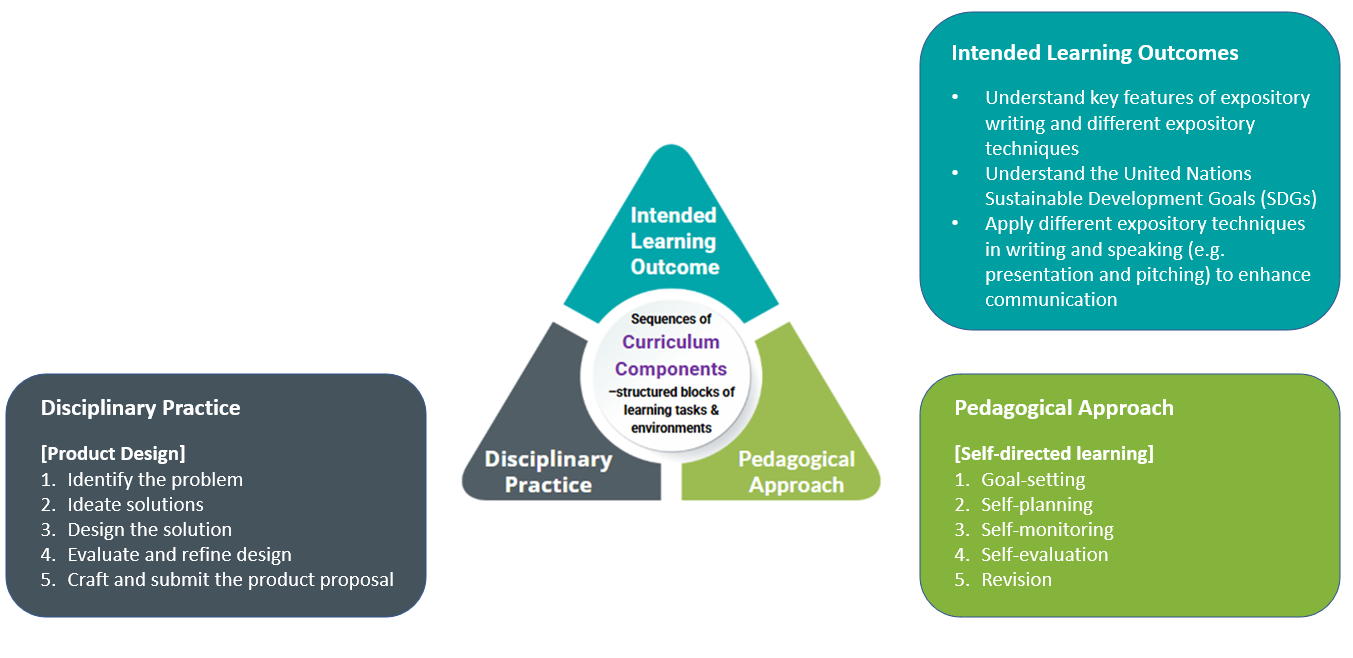
Figure 2.8: The Learning Design Triangle of "Inquiry-based Curriculum Unit that Cultivates Students' Expository Skills and Creativity"
-
To anchor the learning design within a contextual framework, we will use the Learning Design Triangle to define the intended learning outcomes, disciplinary practices, and pedagogical approach.
2. The Curriculum Components Sequence
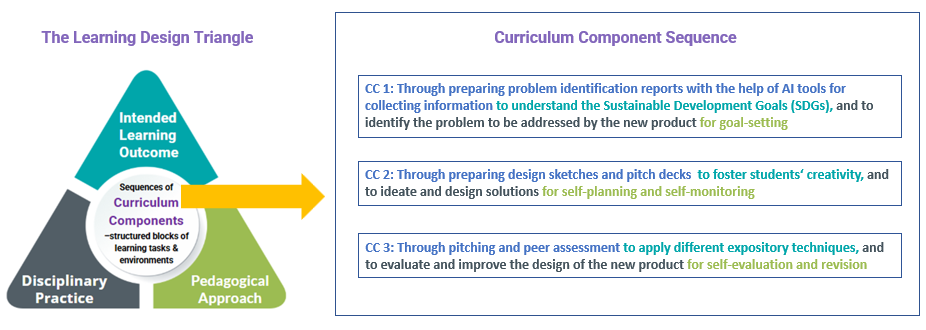
Figure 2.9: The Curriculum Component Sequence of "Inquiry-based Curriculum Unit that Cultivates Students' Expository Skills and Creativity"
- To make the learning process more manageable, we divide it into distinct phases within the learning design, guided by the workflow steps of disciplinary practice. Each phase targets a specific set of learning outcomes and is supported by the pedagogical focus of the chosen approach, such as self-directed learning.
- In the Learning Design Triangle framework, we use Curriculum Component to structure and organize each phase of learning around targeted outcomes. The collection of curriculum components that represents all phases of learning in a course is called a Curriculum Component Sequence.
3. Assign learning tasks to each Curriculum Components
- To put the Curriculum Components into practice, we need to assign learning tasks and assessments to enhance and evaluate learners’ development in knowledge, skills, or values.
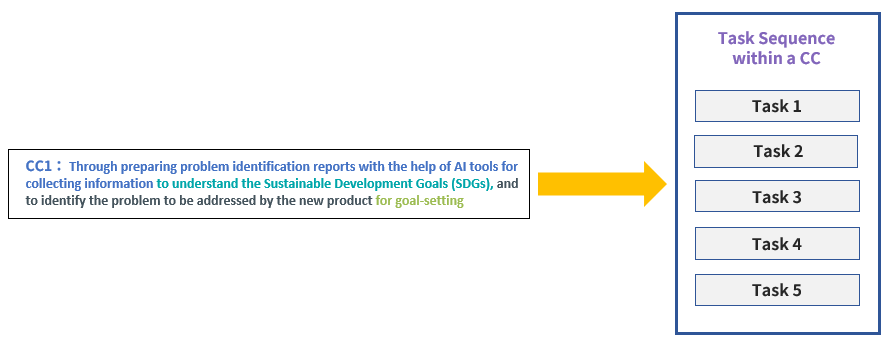
Figure: 2.10 The Task Sequence within a Curriculum Component
- Now, we will explore an example of a Curriculum Component (CC) focused on the "goal-setting" phase.
| CC Name |
A CC name is formed by combining four components.
E.g. Through preparing problem identification reports with the help of AI to understand the Sustainable Development Goals (SDGs), and to identify the problem to be addressed by the new product for goal-setting |
||||||||||||||||
| Linked Intended Learning Outcomes |
|
||||||||||||||||
| Workflow Step of Disciplinary Practice | Engineering Design-Identify the problem | ||||||||||||||||
| Pedagogical Focus | Self-directed Learning - Goal-setting | ||||||||||||||||
| Learning Tasks |
* Each task type has a representative color.
|
The tasks in a CC:
- A task can be both a learning task and an assessment.
- A well-formulated task sequence helps build knowledge and skills step-by-step while enabling ongoing assessment of student understanding.
-
The introduction of the task types will be covered in Chapter 2.6 - Task Taxonomy.
🌟 The link to the learning design of this sample course.
2.6 Task Taxonomy
The Learning Design Studio (LDS) provides a well-structured ontology of 12 task types, grouped under four categories: 1) Directed Learning, 2) Exploratory Learning, 3) Productive Learning, and 4) Reflective Learning. These task types help make explicit the nature and intent of the learning experiences planned for students, ensuring a balanced and purposeful approach to learning design.
| Directed Learning | ||
| Receiving & Interpreting Information
Students undertake prescribed activities to acquire information and develop an understanding of a topic.
STEAM Subject:
Language Subject:
|
||
|
Practice Students work through prescribed tasks to apply learnt content/ skills.
STEAM Subject:
Language Subject:
|
||
|
Test / Assessment Students take part in assessment activities.
STEAM Subject:
Language Subject:
|
||
| Exploratory Learning | ||
| Information Exploration Students seek out and gather existing information from various sources to deepen their understanding of a topic.
STEAM Subject:
Language Subject:
|
||
|
Explorations through Conversation Students engage in exploration of issues with others through conversations.
STEAM Subject:
Language Subject:
|
||
|
Tangible / Immersive Investigation Students conduct hands-on investigations in physical or virtual settings, generating new data through experiments, surveys, or direct observation.
STEAM Subject:
Language Subject:
|
||
| Productive Learning | ||
| Construction: Conceptual / Visual Artefacts Students work individually or together to construct a conceptual, visual artifact.
STEAM Subject:
Language Subject:
|
||
| Construction: Tangible / Manipulable Artefacts Students work individually or together to construct a tangible, manipulable artifact.
STEAM Subject:
Language Subject:
|
||
| Presentation, Performance and Illustration Students present, illustrate or perform individually or in group.
STEAM Subject:
Language Subject:
|
||
| Reflective Learning | ||
| Reflection Students engage in reflecting on the learning process & experience and making the thoughts explicit.
STEAM Subject:
Language Subject:
|
||
| Revision Students are given an opportunity to re-submit a piece of work, hence giving them a chance to reflect and improve.
STEAM Subject:
Language Subject:
|
||
| Self- / Peer- assessment Students engage in peer- and/ or self- assessment (using self-generated or teacher-provided rubric)
STEAM Subject:
Language Subject:
|
||
2.7 Supplementary Learning Resources
Publications
Chen, D., Liang, L., & Law, N. (2022). Navigating Multilevel Challenges in Learning Design: An Investigation of Novice Designer Teams’ Learning Trajectory International Journal of Mobile Learning and Organisation. Retrieved from https://www.inderscience.com/admin/ospeers/getInProduction.php?id=106381&fid=15028&fromonsusy=yes
Li, Herrera, L.F., Liang, L. & Law, N. (2022). An outcome-oriented pattern-based model to support teaching as a design science. Instructional Science, 50, 111-142. doi:10.1007/s11251-021-09563-4. Retrieved from https://link.springer.com/article/10.1007/s11251-021-09563-4
Law, N., & Liang, L. (2020). A Multilevel Framework and Method for Learning Analytics Integrated Learning Design. JOurnal of learning analytics, 1(1). Retrieved from https://learning-analytics.info/index.php/JLA/article/download/6828/7535
Law, N., Li, L., Herrera, L. F., Chan, A., & Pong, T. C. (2017). A pattern language based learning design studio for an analytics informed inter-professional design community. Interaction Design & Architecture(s), (33), 92-112. Retrieved from http://www.mifav.uniroma2.it/inevent/events/idea2010/doc/33_5.pdf
3. Learning Design Studio (LDS)
3.1 UI Overview and Terminology
Welcome to the Learning Design Studio (LDS)! Starting with this chapter, you will begin exploring the LDS interface and features to create your own learning design.
Main User Interface Overview
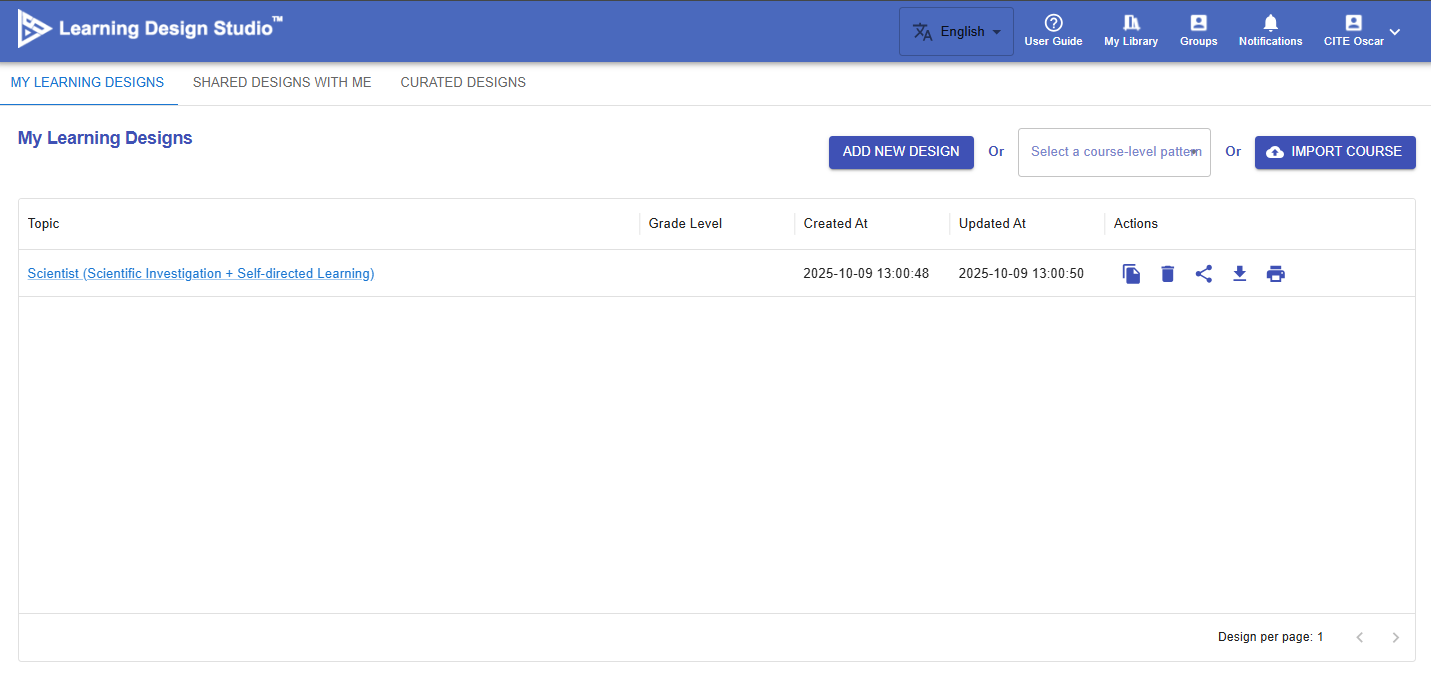
Figure 3.1: Main User Interface

|
Item |
Description |
Tutorial |
|---|---|---|
| 1. Languages |
The LDS currently supports English, Traditional Chinese, and Simplified Chinese. |
N/A |
| 2. User Guide |
A simple navigation to the LDS. |
N/A |
| 3. My Library |
You can access and manage your learning designs in one place. Create new designs, edit existing ones, and easily view designs shared with you by others. |
Ch 4-9 |
| 4. Groups |
You can create groups for your school or organization, invite members to join, and collaboratively share and co-create learning designs. |
Ch 10 |
| 5. Notifications |
You will receive a notification when there are important updates or invitations from the group. |
N/A |
| 6. Profile |
You can update your email address and display name in the LDS. |
N/A |
Learning Design Interface Overview
When you enter the Learning Design section, the user interface is divided into three panels:
 Figure 3.3 Panel-Based Interface
You can drag the edge of a panel to resize it, or click the ![]() button to collapse or expand the panel.
button to collapse or expand the panel.
3.2 Learning Design Facilitator and Information Window
What is Learning Design Facilitator (LDF)?
To help you create your learning design, the IDEALS team has developed the Learning Design Facilitator (LDF), which includes both the LDS Assistant and Chatbot.
The table below provides an overview of the LDF’s user interface.
|
Figure 3.4: Interface of Learning Design Facilitator (1) |
LDS ASSISTANT When creating a learning design in the LDS, you will work through multiple phases: course level, curriculum component level, and task level. The LDS Assistant provides instructions and tips tailored to your current phase and acts as an interface for accessing the LDS Pattern Library, which offers well-defined templates for you to use in each phase. Further details about the LDS Pattern Library will be introduced in the next section. |
|
Figure 3.5: Interface of Learning Design Facilitator (2) |
CHATBOT
Figure 3.6: Access to Learning Design Facilitator
|


 button in different locations, such as next to the Intended Learning Outcomes. Please feel free to click on it to request feedback .
What is Information Window?
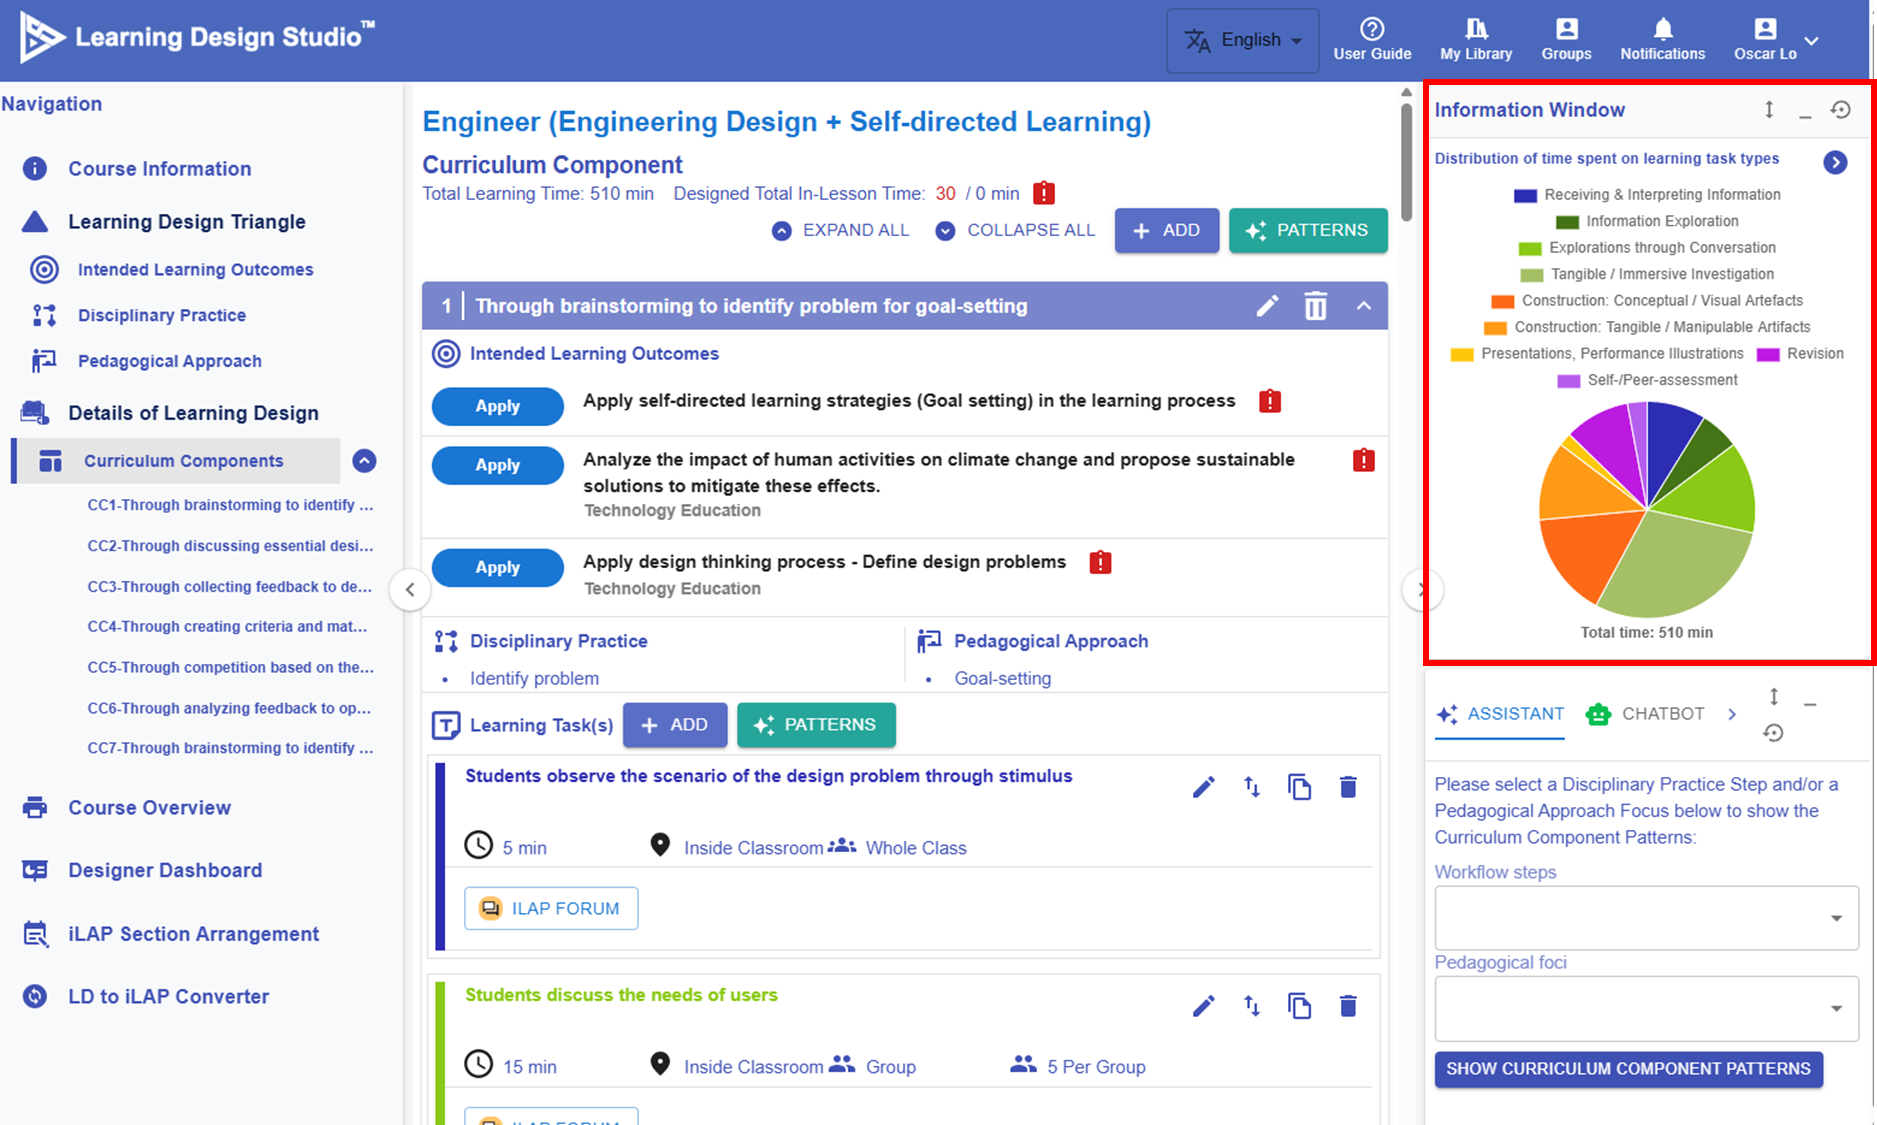
Figure 3.7: Interface of Information Window
The Information Window is located in the top right corner. It displays the key information you have inputted or visualizes your learning design. When your learning design becomes more complex, this feature becomes especially valuable, helping you review existing elements and make informed decisions throughout the design process.
3.3 Pattern Library
🌟 For guidance on using the Pattern Library, refer to Chapter 6 - Create a New Design from Patterns
To better support creating a learning design, the IDEALS team developed the Pattern Library, which provides pre-defined, hands-on resources for IDEALS users.
Please be aware of this  button. When you see it, the Learning Design Studio can offer patterns for you to use.
1. Course-level Patterns

Figure 3.8: Course-level Patterns
The LDS provides course-level patterns that offer most of the information needed to complete the learning design for a specific topic, such as engineering design. Each course-level pattern includes intended learning outcomes, a disciplinary practice and a pedagogical approach, a curriculum component sequence, and learning tasks.
2. Curriculum Component Patterns
 |
 |
| Figure 3.9: Curriculum Component Patterns | |
The LDS provides curriculum component patterns. Each pattern recommends a sequence of tasks for a specific phase of learning, designed to scaffold student learning.
3. Task Patterns
 |
 |
| Figure 3.10: Task Patterns | |
The LDS provides task patterns. Each pattern specify the details of each task—such as task type, delivery mode, e-learning tool, and learning resources.
4. Intended Learning Outcomes (ILOs) Patterns
 |
 |
| Figure 3.11: Intended Learning Outcomes Patterns | |
The LDS provides intended learning outcome patterns for all four categories of ILOs across different subjects.
5. Disciplinary Practice (DP) Patterns

Figure 3.12: Disciplinary Practice Patterns
The LDS provides disciplinary practice patterns such as Engineering Design and Scientific Investigation.
6. Pedagogical Approach (PA) Patterns

Figure 3.13: Pedagogical Approach Patterns
The LDS provides pedagogical approach patterns such as Self-directed Learning.
4. Creating a New Design
4.1 Creating a Learning Design
In the LDS, there are three ways to create a learning design:
|
Figure 4.1: My Library |
|

5. Creating a New Design from Scratch
5.1 Entering the Course Information
In this chapter, we will use "Designing for the Wise", a STEAM course developed by our partner school, as an example to demonstrate how to apply the Learning Design Triangle (LDT) framework introduced in Chapter 2 to create a learning design in the Learning Design Studio (LDS).
At the beginning, the LDS guides you to consider some basic course information such as topic, key learning area(s), grade level and lesson time.
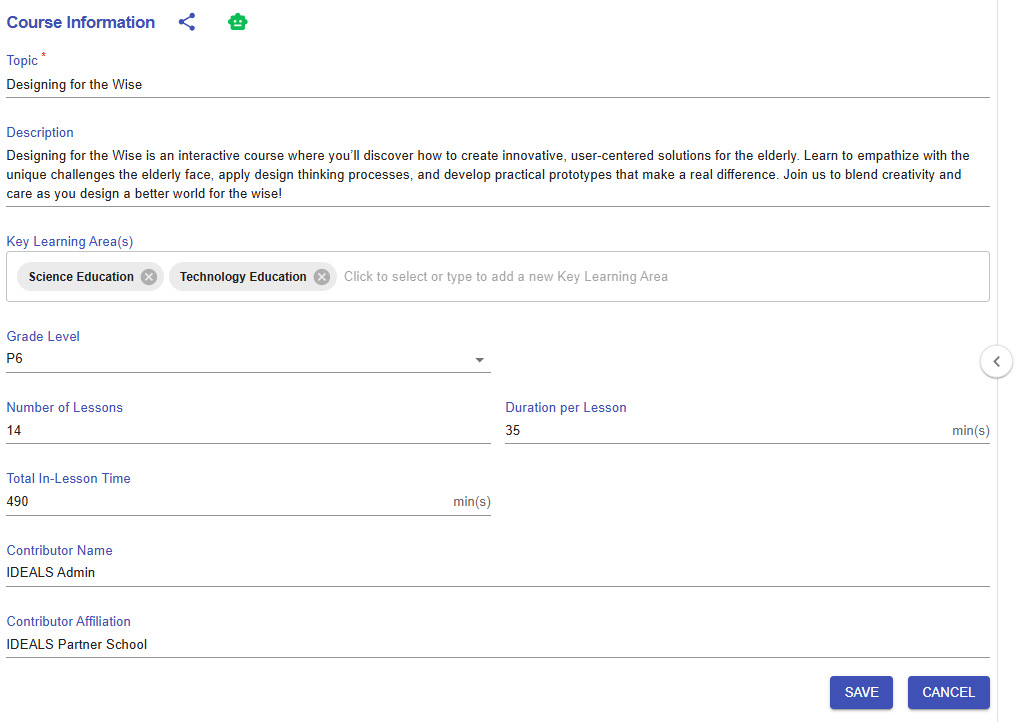
Figure 5.1: Course Information Section
|
Item |
Content |
|---|---|
| Title |
Designing for the Wise
|
| Description |
Designing for the Wise is an interactive course where you’ll discover how to create innovative, user-centered solutions for older adults. Learn to empathize with the unique challenges seniors face, apply design thinking processes, and develop practical prototypes that make a real difference. Join us to blend creativity and care as you design a better world for the wise! |
| Key Learning Area(s) |
Science Education, Technology Education |
| Grade Level |
P6 |
| No. of Lesson |
14 |
| Duration per Lesson |
35 mins |
| Total In-Lesson Time |
490mins |
| Contributor Name |
IDEALS Admin |
| Contributor Affiliation |
IDEALS Partner School |
5.2 Exploring with the Learning Design Triangle
Once you have filled out the course information section, you will use the Learning Design Triangle framework to design contextual framework for the entire learning design. This involves specifying the 1) intended learning outcomes, 2) disciplinary practice, and 3) pedagogical approach.
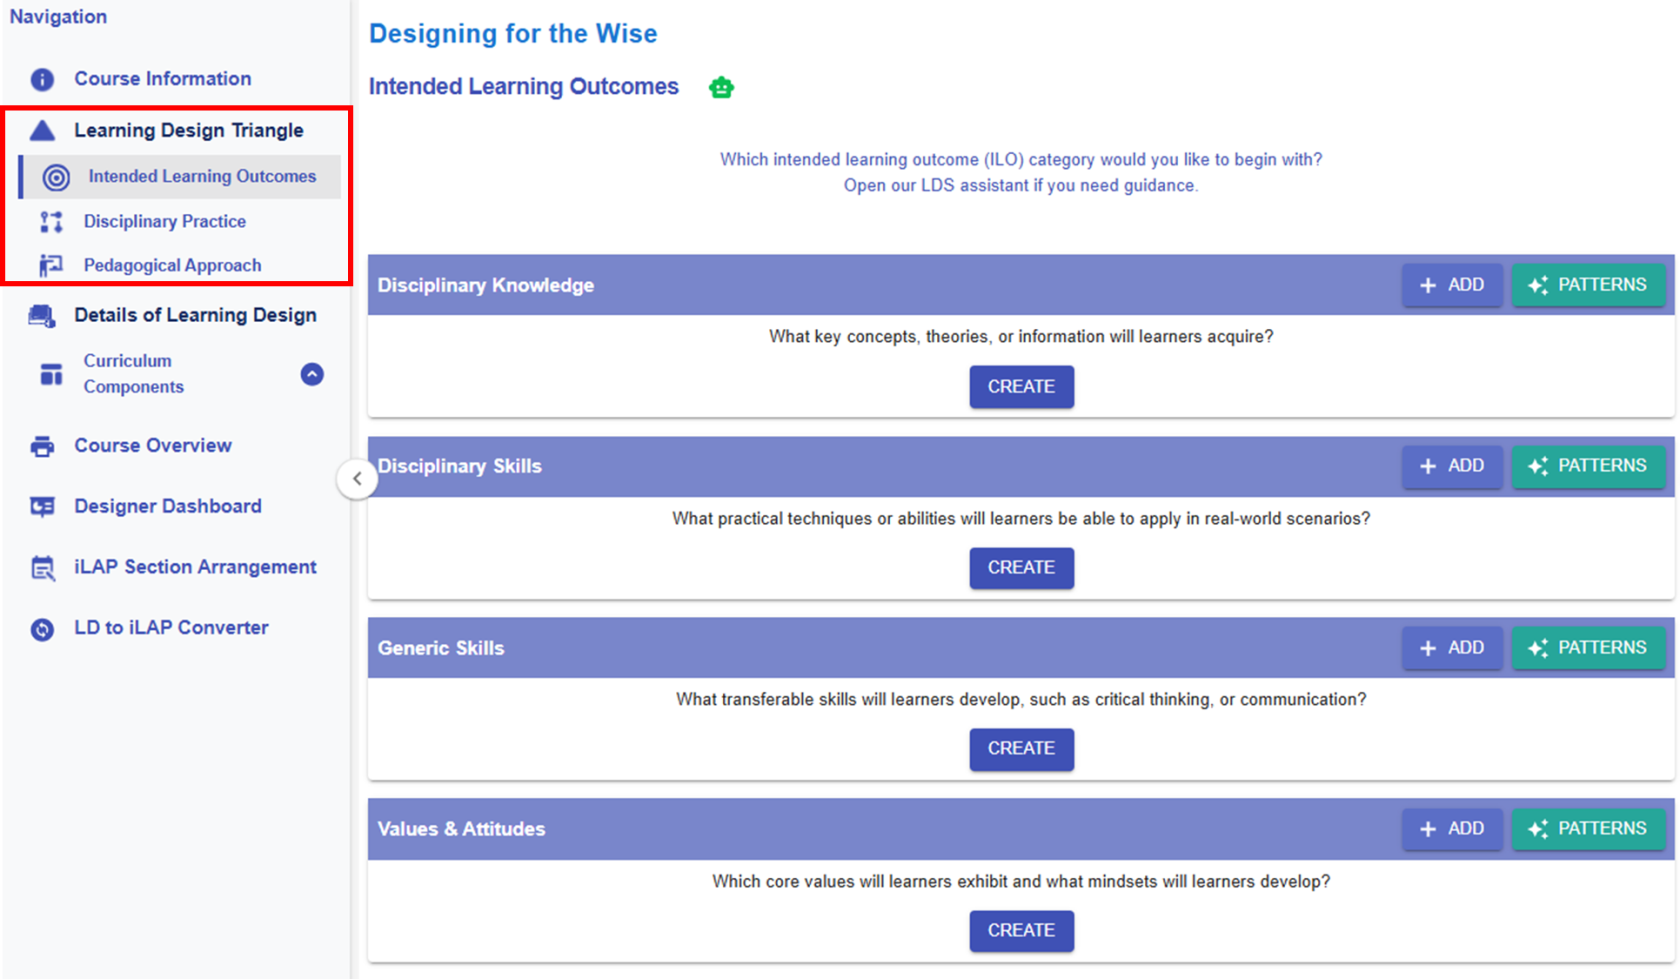
Figure 5.2: Learning Design Triangle Section
5.2.1 Intended Learning Outcomes (ILOs)
🌟 For guidance on developing strong ILOs, refer to Chapter 2.2 - Intended Learning Outcomes (ILOs)
In the Learning Design Studio (LDS), there are four categories of Intended Learning Outcomes (ILOs):
- Disciplinary Knowledge: The core concepts, theories, facts, and frameworks that are recognized and developed within a particular field or area of study.
- Disciplinary Skills: The specific techniques, methods, and competencies associated with a particular field or area of study.
- Generic Skills: The broad abilities that help people succeed in education, work, and daily life, regardless of a particular field or area of study.
- Values & Attitudes: The beliefs, principles, and dispositions that guide a person's behavior, decision-making, and interactions with others.
Adding a New ILO
There are two ways to add a new ILO: (1) writing it yourself, or (2) using the ILO patterns.
1. Adding a New ILO - Writing it Yourself
- You will write the full ILO to indicate what students is expected to achieve as a result of the learning process.

Figure 5.3: Adding a New ILO
- If you have not added any ILOs before, you can click the
 or
or  button to add a new ILO.

Figure 5.4: Interface of the ILO Builder (1)
- We will review each field in the ILO Builder below.
|
1. Subject/Discipline(s)
Figure 5.5: Interface of the ILO Builder (2)
|
|
2. Category
Figure 5.6: Interface of the ILO Builder (3)
|
|
3. Bloom's Taxonomy Level
Figure 5.7: Interface of the ILO Builder (4)
Figure 5.8: Writing a ILO with the Learning Design Facilitator
|
|
4. ILO and Learning Design Facilitator
Figure 5.9: Interface of the ILO Builder (5)
Figure 5.10: Evaluating a ILO with the Chatbot
|
|
5. Sub-ILO(s)
Figure 5.11: Interface of the ILO Builder (6)
|


2. Adding a New ILO - Use the ILO Pattern
- In addition to writing your own ILO, you may use our pre-defined pattern.

Figure 5.12: Intended Learning Outcomes - Values & Attitude
-
For example, if you want to create an ILO for the Values & Attitude category, we can create one by using the ILO patterns.
|
|
|
|
Figure 5.13: The ILOs Patterns in the LDS Facilitator
Figure 5.14: Details of the Targeted ILO Pattern (1)
Figure 5.15: Details of the Targeted ILO Pattern (2)
|
|
 button to instantly activate the pattern list.


Figure 5.16: An example of a completed ILO section
5.2.2 Disciplinary Practice (DP)
🌟 For guidance on choosing disciplinary practice, refer to Chapter 2.3 - Disciplinary Practice (DP)
Adding a New DP

Figure 5.17: Adding a New DP
If you have not added any DP before, please click the ![]() or
or ![]() button to add a new DP. However, creating a DP from scratch can be challenging. We highly recommend starting with our DP patterns available in the Learning Design Facilitator.
button to add a new DP. However, creating a DP from scratch can be challenging. We highly recommend starting with our DP patterns available in the Learning Design Facilitator.
|
Figure 5.20: An Example of a Completed DP |
||||


5.2.3 Pedagogical Approach
🌟 For guidance on choosing pedagogical approach, refer to Chapter 2.4 - Pedagogical Approach
Adding a New Pedagogical Approach

Figure 5.22: Adding a New Pedagogical Approach
If you have not added any pedagogical approach before, please click the  or
or ![]() button to add a new pedagogical approach. Please read the introduction below to guide you in completing the Pedagogical Approach section.
button to add a new pedagogical approach. Please read the introduction below to guide you in completing the Pedagogical Approach section.
In general, we highly recommend starting with the Learning Design Facilitator. You can use the pedagogical approach patterns we have designed for you to copy and use in your own design.
Figure 5.25: An Example of a Completed Pedagogical Approach |
||||


5.3.1 Creating Curriculum Components (CCs) Part 1
After completing the Learning Design Triangle (LDT) to establish the contextual framework for the entire learning design, we will explore how to develop Curriculum Components (CCs) and learning tasks that align with these elements, transforming overarching design concepts into actionable teaching practices. For a detailed theoretical explanation of Curriculum Components (CC), see Chapter 2.5 – Curriculum Component Sequence.
The following instructions will guide you in creating the first CC for your learning design.
Creating the First CC
The first Curriculum Component (CC) marks the beginning of the course, "Designing for the Wise." It is designed to help learners get started and build a strong foundation for subsequent learning. CC1 prepares students by developing their skills in identifying problems and goal-setting for the inquiry.
Step 1: Adding a New CC

Figure 5.27: Adding a New CC
- By clicking the
 button , you can open the CC builder.
Step 2: Mapping the LDT Elements to the CC

Figure 5.28: The Interface of the CC builder
- Please read the introduction below to guide you in creating a CC.
|
2.1 CC Name
💡Formula of naming a CC Through the 1) focal task(s) to 2) achieve the intended learning outcome to 3) implement the workflow step(s) of a disciplinary practice for 4) applying the focus or foci of the pedagogical approach.
|
|
2.2 Workflow steps
Figure 5.29: The Workflow Steps of Engineering Design
|
|
2.3 Pedagogical foci
Figure 5.30: The Pedagogical Foci of Self-directed Learning
|
|
2.4 Linked Intended Learning Outcomes (ILOs)
2.4.1. The Link Button
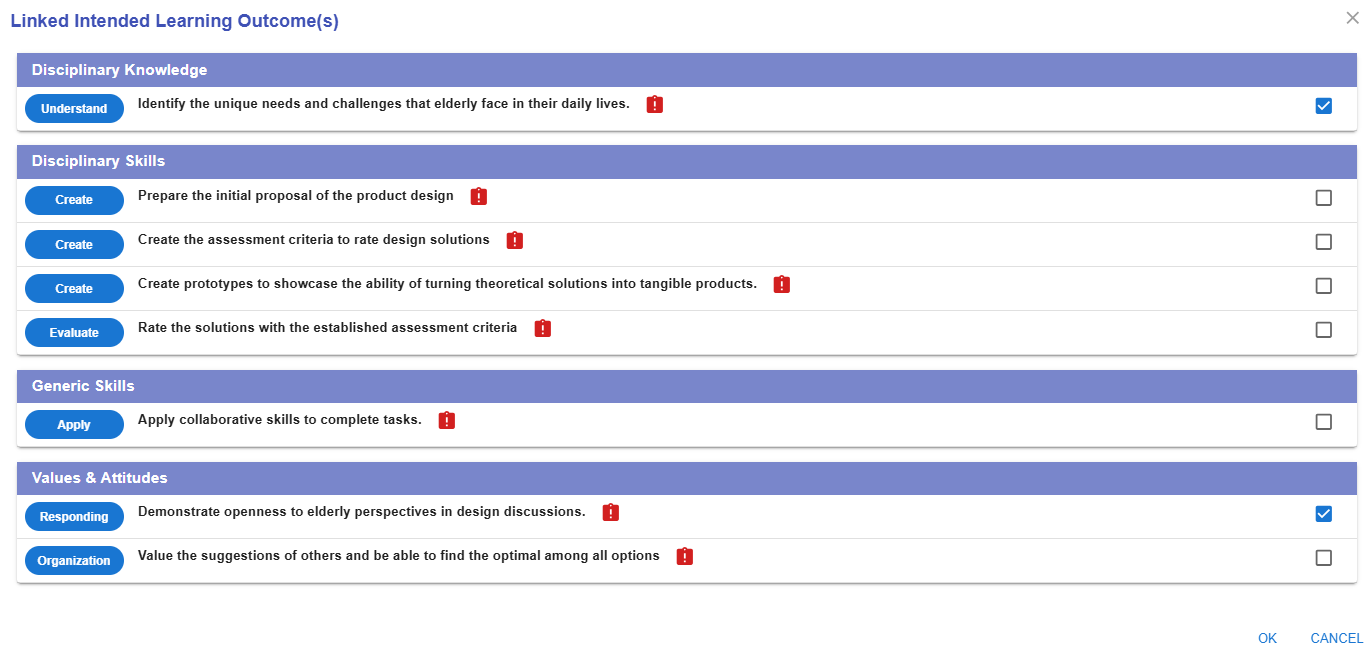
2.4.2 Selecting the Appropriate ILOs
Figure 5.32: Linking the ILOs to a CC (2)
E.g.
2.4.3 The Alert Icon and Complete Icon
Figure 5.33: Unassessed ILOs in a CC
2.4.4 The Unlink Button
Figure 5.34: Dissociating the ILOs from the CC
|


5.3.2 Creating Curriculum Components (CCs) Part 2
Creating the First CC (Cont.)
Step 3: Creating the Task Sequence for the CC
- After deciding on the intended learning outcomes, workflow steps, and pedagogical focus of the CC, the next step is to assign and sequence the learning tasks and assessments.
- Below is an example of a completed CC with well-sequenced tasks and assessments, which we will examine in this section.
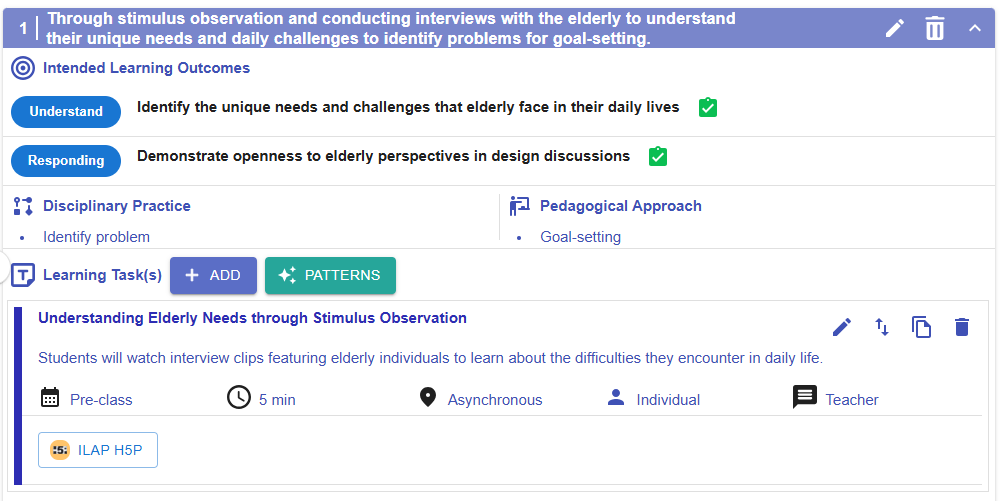
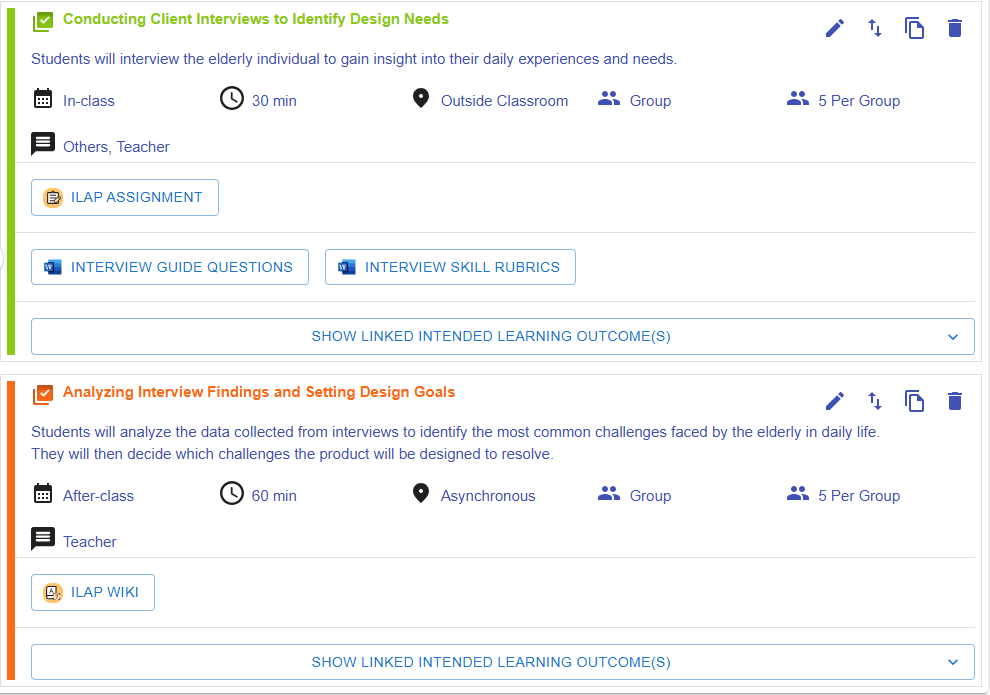
Figure 5.35: An Example of a Completed CC
3.1 Creating a Task
- We will use the "Conducting Client Interviews to Identify Design Needs" task to demonstrate how to add a task
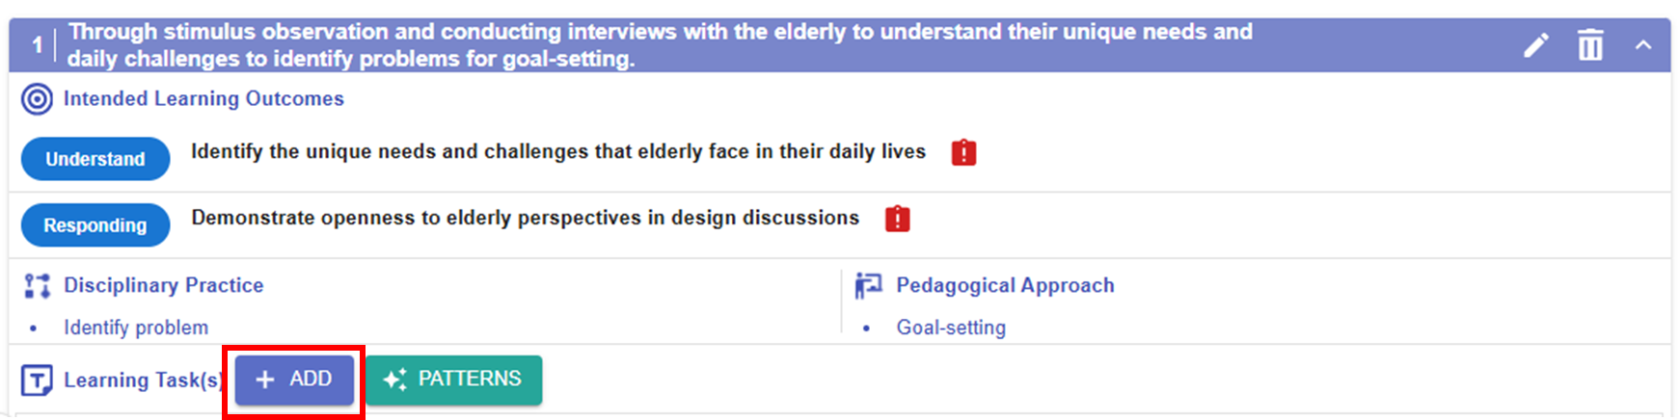
Figure 5.36: Adding New Learning Task(s)
- By clicking the
 button , you can open the Task builder.
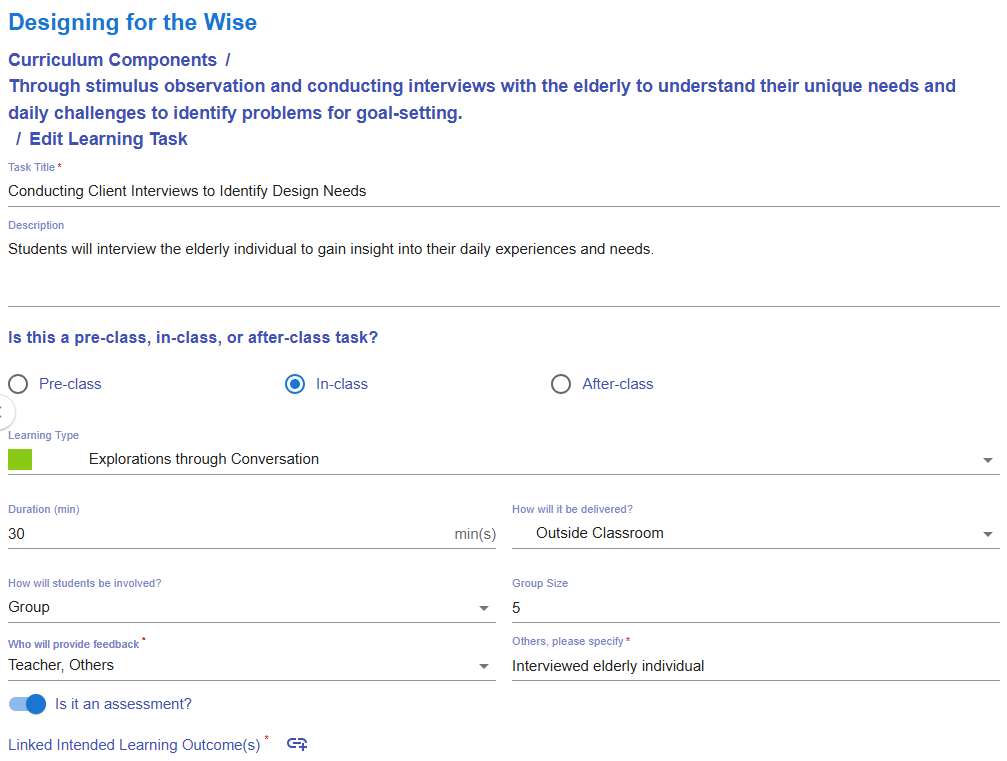
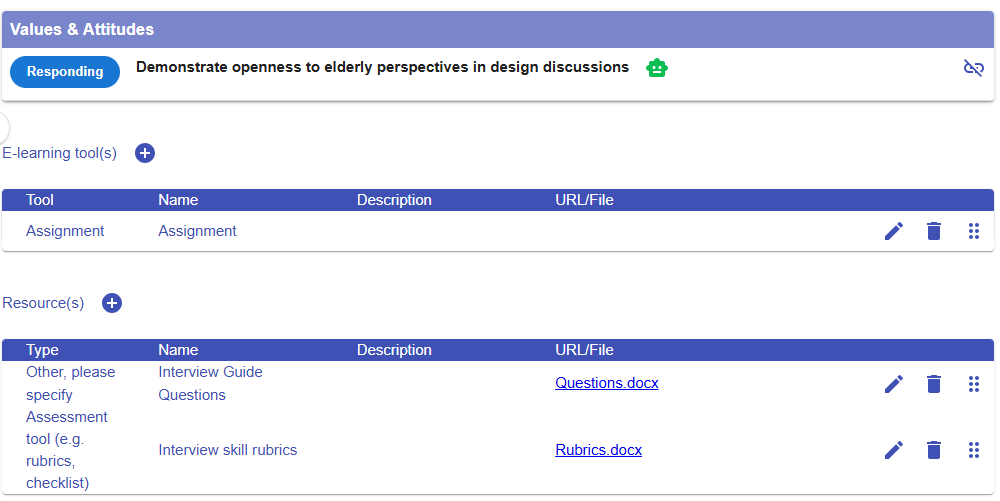
Figure 5.37: Interface of the Task Builder
- Please read the introduction below to guide you in creating a task.
|
Item |
Example of this CC |
|---|---|
|
1. Task Information
Figure 5.38: Task Information |
Task title: Conducting Client Interviews to Identify Design Needs
Description: Students will interview the elderly individual to gain insight into their daily experiences and needs. |
|
2. Stage
Figure 5.39: Stage |
In-class |
|
3. Task Type
Figure 5.40: Task Type
|
Explorations through Conversation |
|
4. Duration
Figure 5.41: Duration |
30 mins |
|
5. Delivery Mode
Figure 5.42: Delivery Mode |
Outside Classroom |
|
6. Social Organization
Figure 5.43: Social Organization |
Group, Size: 5 |
|
7. Feedback Provider
Figure 5.44: Feedback Provider |
Teacher |
|
8. Assessment
Figure 5.45: Triggering the Assessment Option in a Task |
A learning task can also serve as an assessment.
If you select the assessment option, you will need to
|
|
9. E-learning Tool
Figure 5.46: Interface for Adding E-learning Tool(s) to a Task |
The e-learning tools section allows you to select the type of tool you want to use to implement the task.
For example, if you want to create a space for students to submit their homework, you can choose the Assignment tool, as demonstrated here. |
|
10. Resources
Figure 5.47: Interface for Adding Resource(s) to a Task |
The resource section allows you to select the type of resource or tool you want to use to support the learning process.
For example, you can upload the interview guiding questions and the interview skills rubric for use in the course.
|


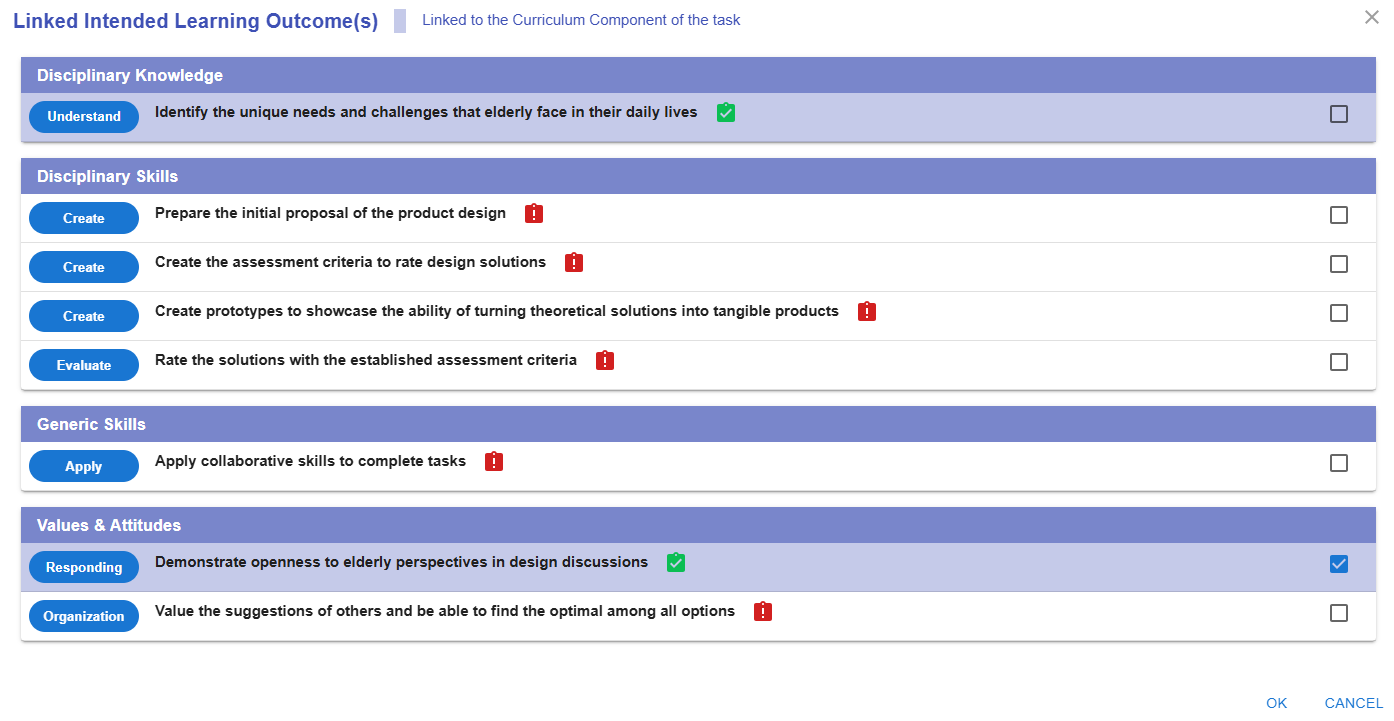


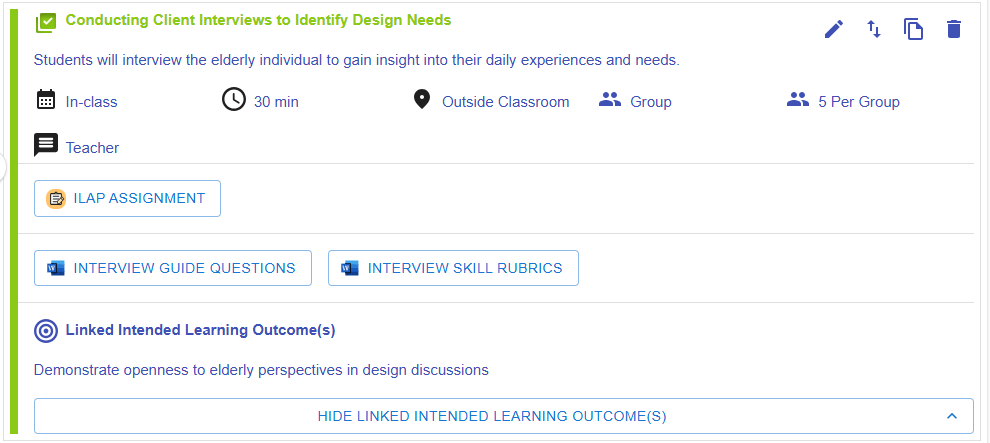 Figure 5.48: Preview of a Learning Task
- The task appears in the CC page.
3.2 A Quick Reminder
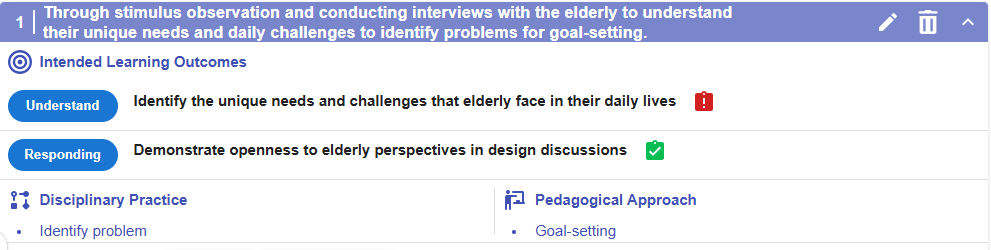
Figure 5.49: Preview of a CC
-
The LDS will remind you to assign assessments to any unassessed learning outcomes within the CC.
- * You can continue adding more tasks to complete your Curriculum Component (CC), and add additional CCs to finalize your learning design by repeating the steps mentioned above.
3.3 Moving a Task
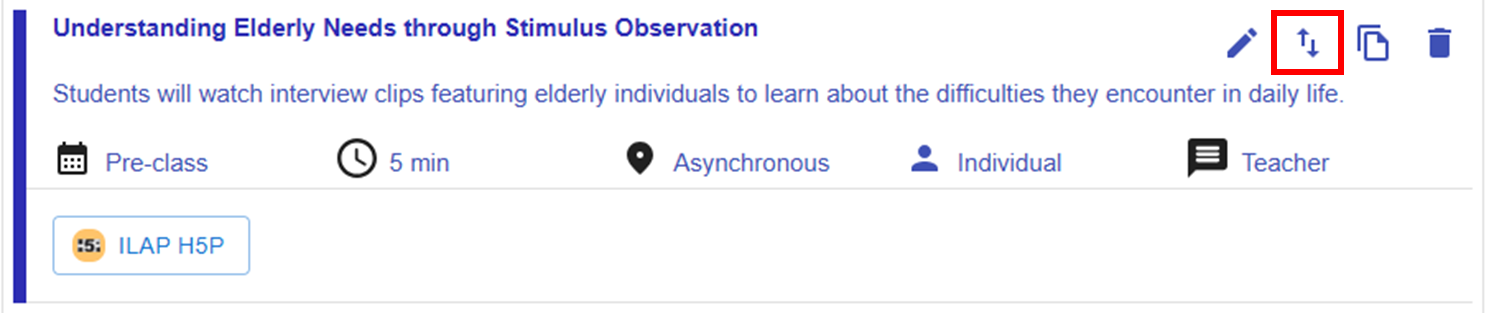 Figure 5.50: Moving a Task (1)
- By clicking the
 button, you will see a list of tasks for each CC.
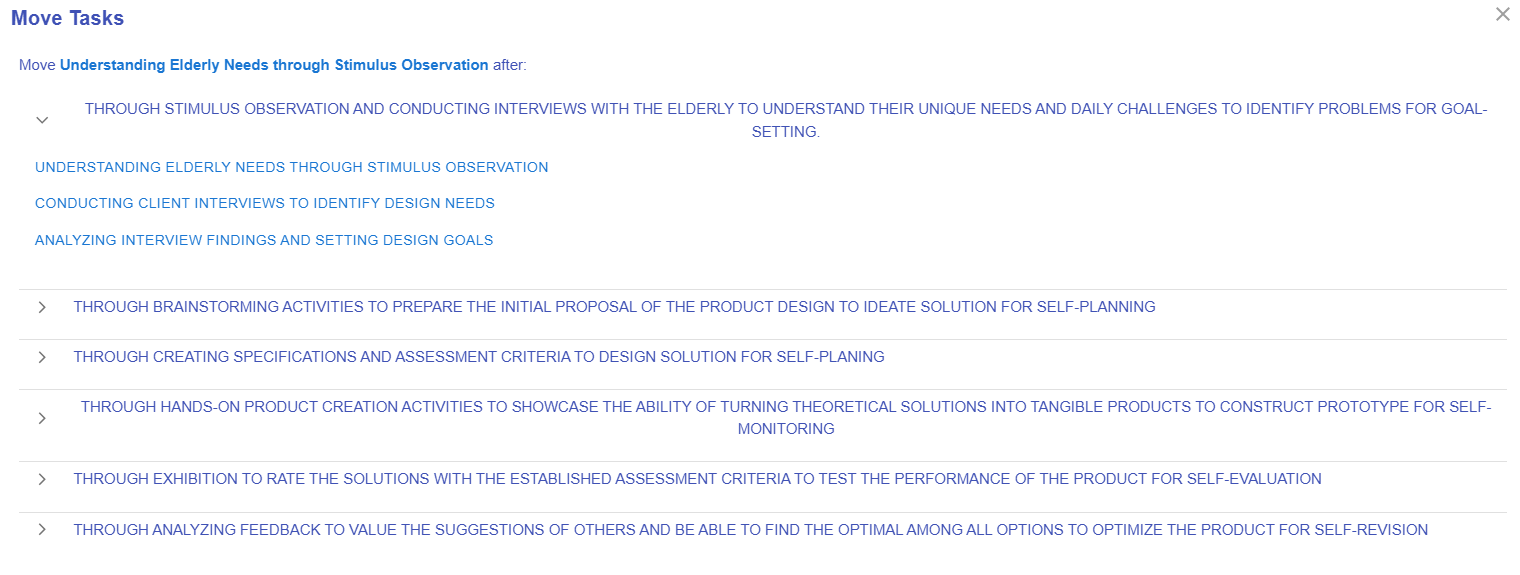
Figure 5.51: Moving a Task (2)
-
You can click any of the tasks to reallocate the current task to a position after it.
Additional: Information Window, and Header
- There is some additional information to help you analyze the learning design.
|
Item |
Description |
Example |
|---|---|---|
| 1. Information Window |
Figure 5.52: Information Window in the CC Section |
In the CC section, the information window will visualise your overall CC design with the pie chart
|
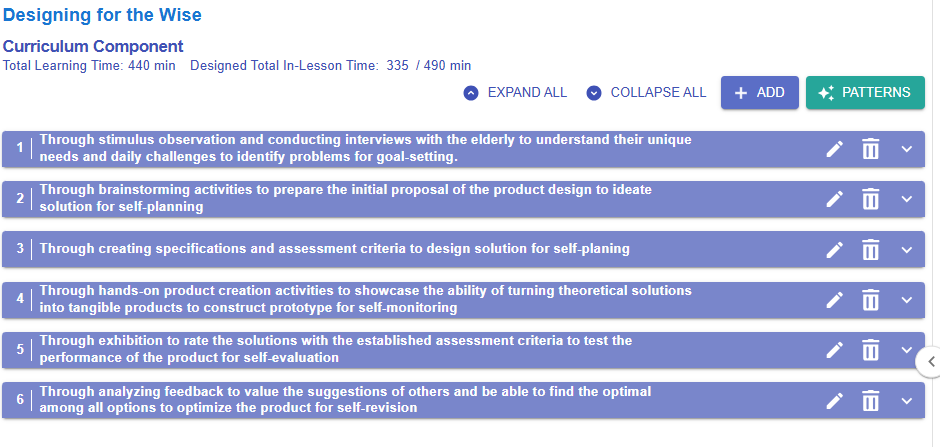
| 2. Header |
Figure 5.53: An Example of a Curriculum Component Sequence
Total Learning Time: 440 min
Designed Total In-Lesson Time: 335 / 490 min
Expand all
Collapse all
|
|

6. Creating a New Design from Patterns
6.1 Entering the Course Information
In this chapter, we will explore how to create a new learning design about developing a product for the elderly, similar to what we demonstrated in Chapter 5. However, this time we will use the Pattern Library, beginning with the course-level pattern.
Choosing a Course-level Pattern
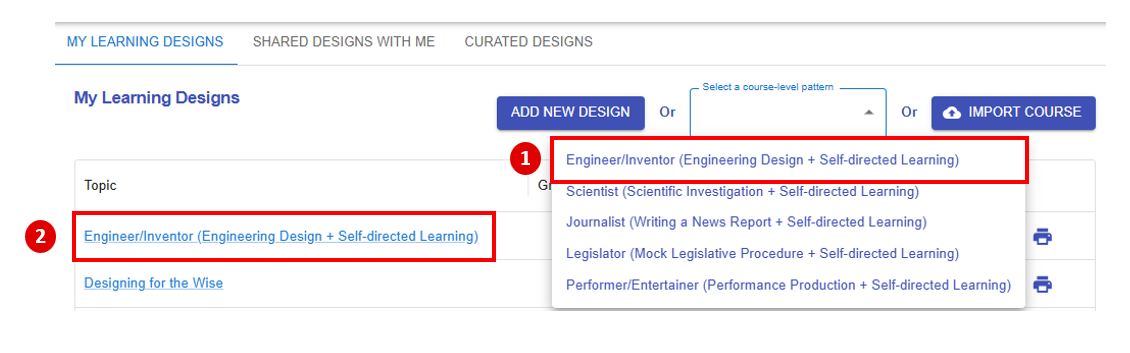 Figure 6.1: The Course-level Pattern Library
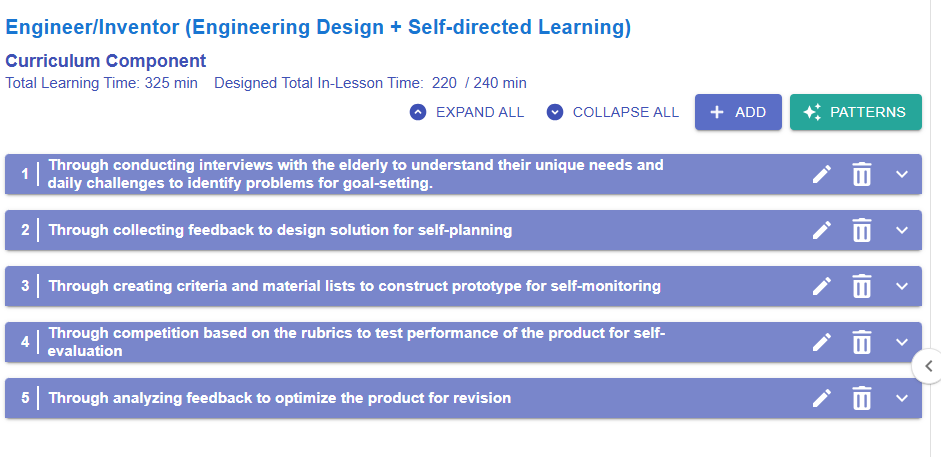
After selecting the pattern 1) "Engineer/Inventor (Engineering Design + Self-directed Learning)" , a new learning design will 2) appear in "My Library".
Entering the Course Information
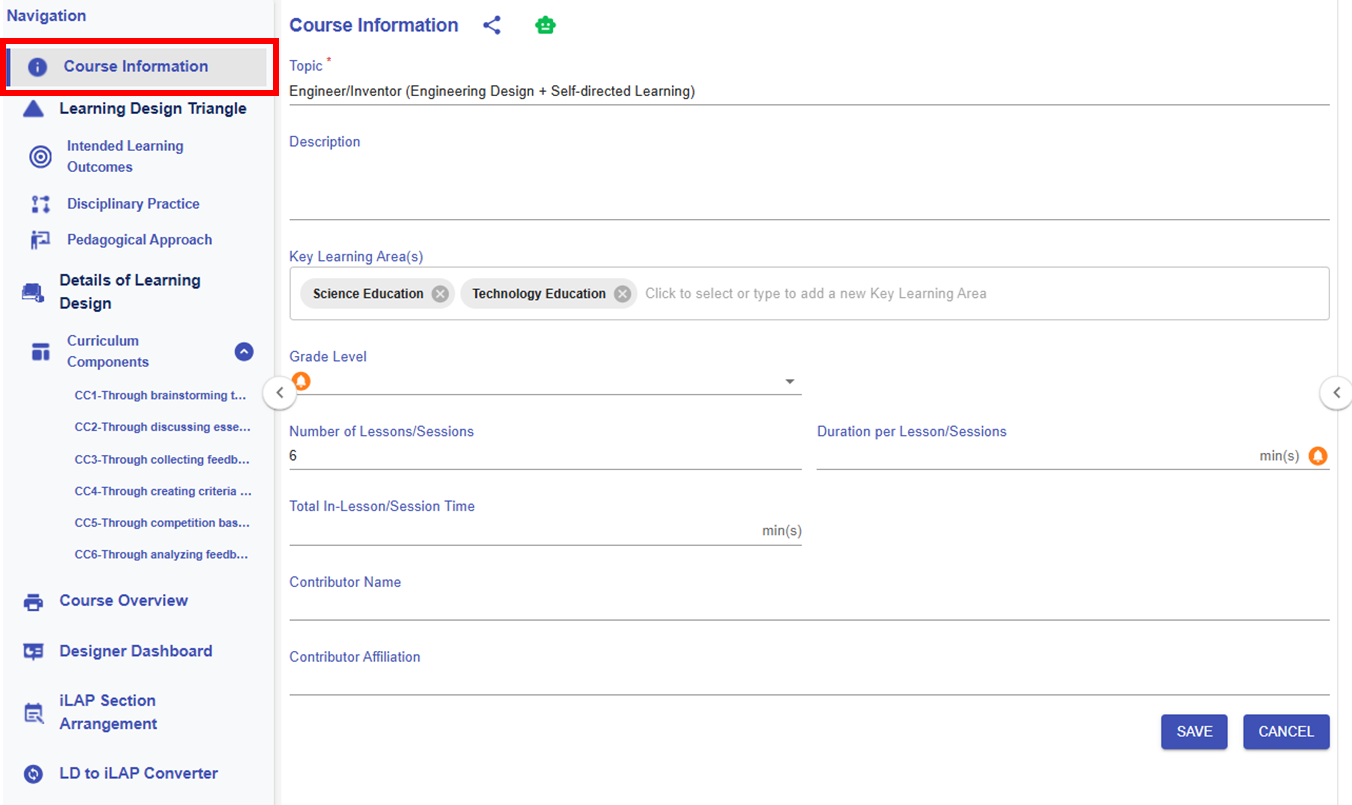
Figure 6.2: The Course Information Section of the Engineering Designer Pattern
After choosing "Engineer/Inventor (Engineering Design + Self-directed Learning)", the pattern have already provided some course information. You can adapt or modify the provided information and fill in the remaining details as needed.
* The customised item will be highlighted in red.
|
Item |
Content |
|---|---|
| Title |
Designing for the Wise
|
| Description |
Designing for the Wise is an interactive course where you’ll discover how to create innovative, user-centered solutions for the elderly. Learn to empathize with the unique challenges the elderly face, apply design thinking processes, and develop practical prototypes that make a real difference. Join us to blend creativity and care as you design a better world for the wise! |
| Key Learning Area(s) |
Science Education, Technology Education |
| Grade Level |
P6 |
| No. of Lesson |
6 |
| Duration per Lesson |
35 |
| Total In-Lesson Time |
210 |
| Contributor Name |
- |
| Contributor Affiliation |
- |
6.2 Exploring with the Learning Design Triangle
Once you have filled out the course information section, you will use the Learning Design Triangle framework to design contextual framework for the entire learning design. Unlike creating a course from scratch, using the course-level pattern provides you with the foundational elements of the LDT, streamlining the design process.
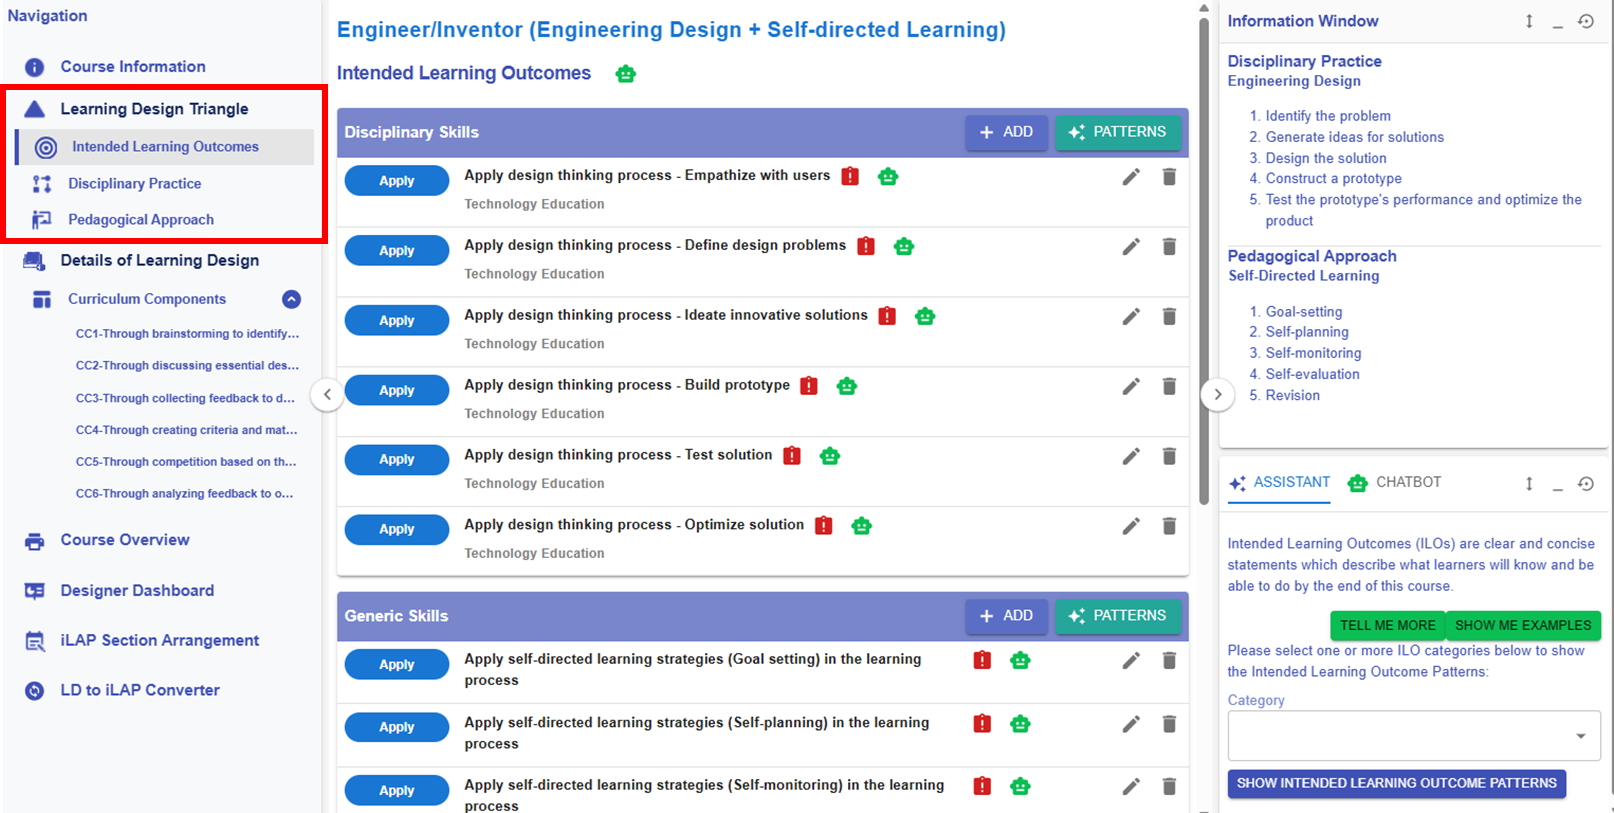
Figure 6.3: Learning Design Triangle Section
6.2.1 Intended Learning Outcomes (ILOs)
The course-level pattern Engineer/Inventor (Engineering Design + Self-directed Learning) has provided some intended learning outcome patterns for you. However, you still need to customise the patterns or add new ILOs to complete your learning design.
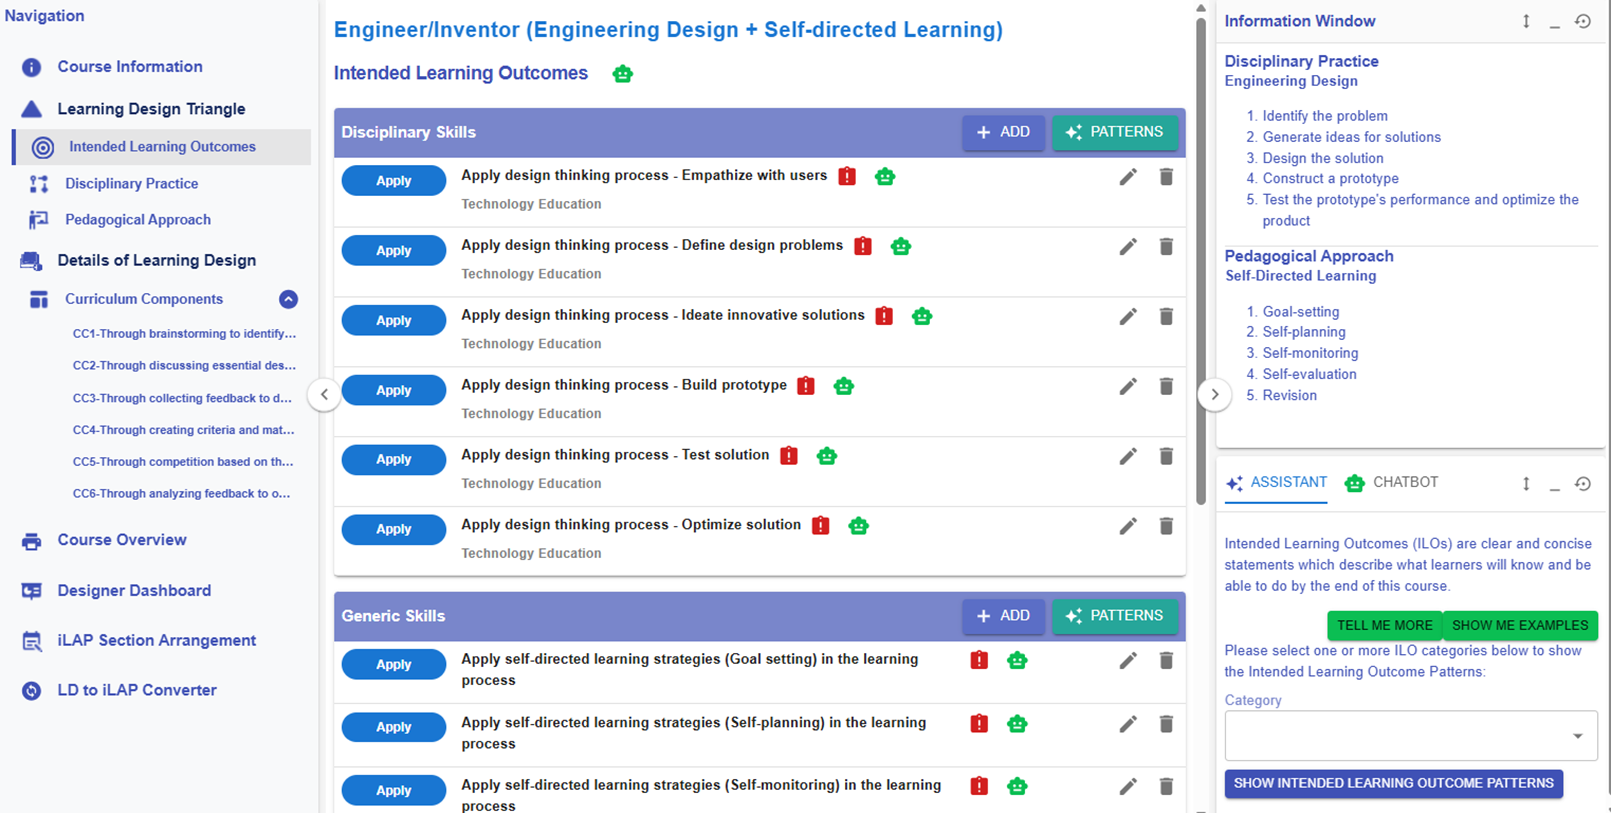
Figure 6.4: Learning Design Triangle Section - Intended Learning Outcomes
For the following part, you will explore how to add the new ILOs to the design.
🌟 For guidance on developing strong ILOs, refer to Chapter 2.2 - Intended Learning Outcomes (ILOs)
In the LDS, there are four categories of Intended Learning Outcomes (ILOs):
- Disciplinary Knowledge: The core concepts, theories, facts, and frameworks that are recognized and developed within a particular field or area of study.
- Disciplinary Skills: The specific techniques, methods, and competencies associated with a particular field or area of study.
- Generic Skills: The broad abilities that help people succeed in education, work, and daily life, regardless of a particular field or area of study.
- Values & Attitudes: The beliefs, principles, and dispositions that guide a person's behavior, decision-making, and interactions with others.
Adding a New ILO
There are two ways to add a new ILO: (1) using the ILO patterns or (2) writing it yourself.
1. Use the ILO Patterns
- You will use our pre-defined pattern to indicate what students is expected to achieve as a result of the learning process.

Figure 6.5: Intended Learning Outcomes - Values & Attitude
- For example, if you want to create an ILO for the Values & Attitude category, we can create one by using the ILO patterns.
 |
 |
|
Figure 6.6: The ILOs Patterns in the LDS Facilitator
Figure 6.7: Details of the Targeted ILO Pattern (1)
|
|
2. Writing it Yourself
- In addition to using patterns, you may write a full ILO yourself.
Figure 6.9: Adding a New ILO
- If you have not added any ILOs before, you can click the or button to add a new ILO.
Figure 6.10: Interface of the ILO Builder (1)
- We will review each field in the ILO Builder below.
|
1. Subject/Discipline(s)
Figure 6.11: Interface of the ILO Builder (2)
|
|
2. Category
Figure 6.12: Interface of the ILO Builder (3)
|
|
3. Bloom's Taxonomy Level
Figure 6.13: Interface of the ILO Builder (4)
 Figure 6.14: Writing a ILO with the Learning Design Facilitator
|
|
4. ILO and Learning Design Facilitator
Figure 6.15: Interface of the ILO Builder (5)
Figure 6.16: Writing a ILO with the Chatbot
|
|
5. Sub-ILO(s)
Figure 6.17: Interface of the ILO Builder (6)
|

6.2.2 Disciplinary Practice (DP)
🌟 For guidance on choosing disciplinary practice, refer to Chapter 2.3 - Disciplinary Practice (DP)
The course-level pattern Engineer/Inventor (Engineering Design + Self-directed Learning) has provided the the disciplinary practice details for you.
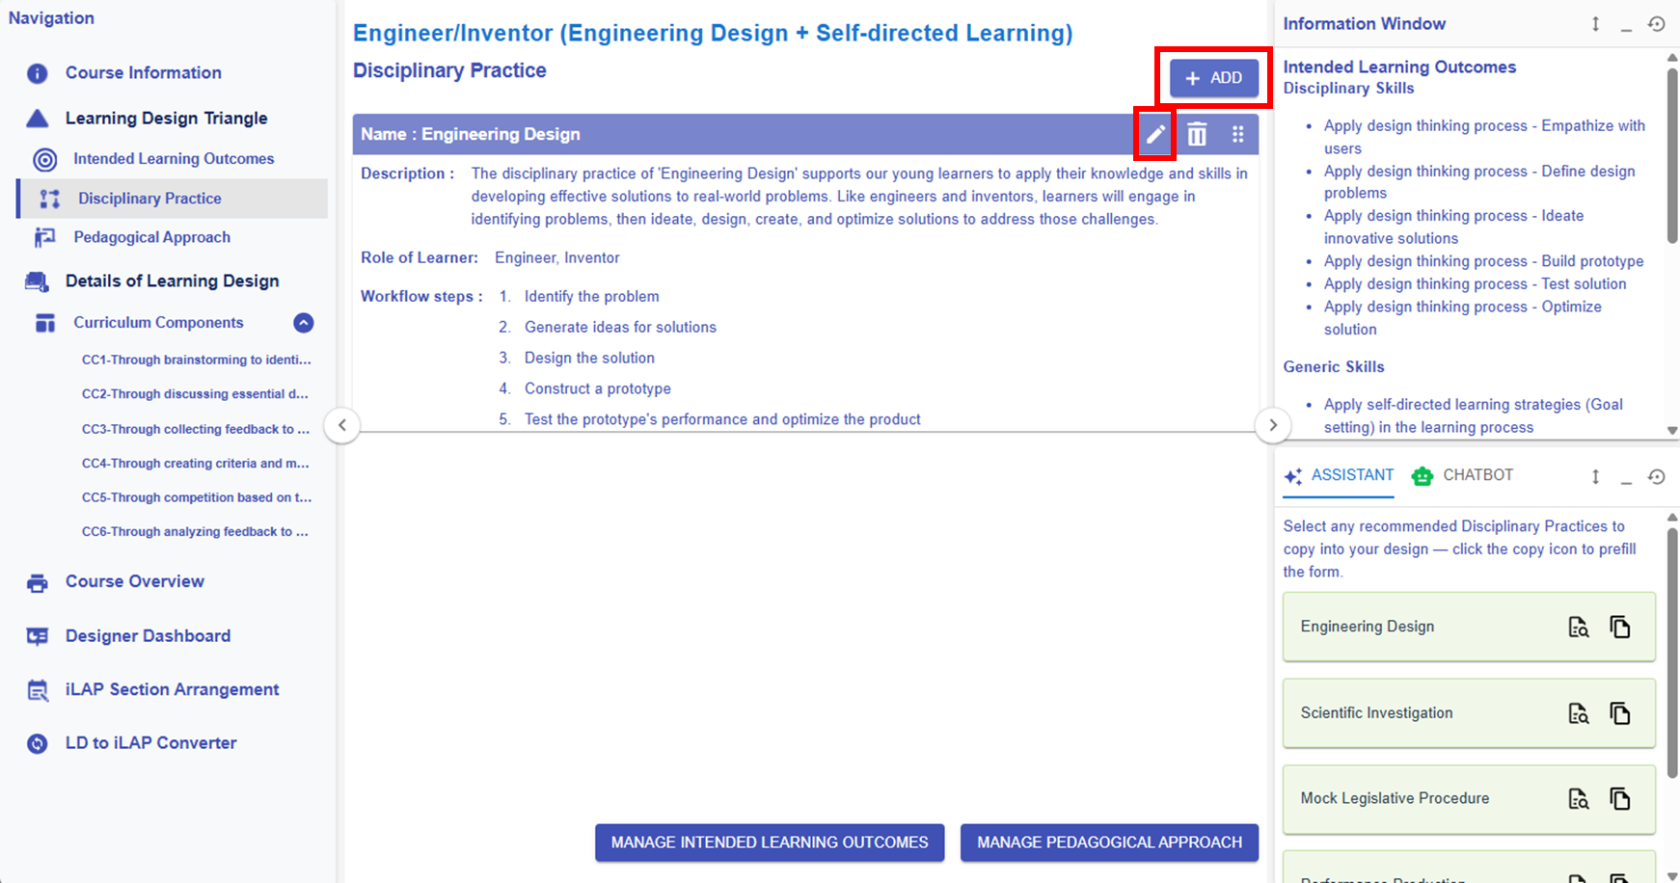
Figure 6.19 Learning Design Triangle Section - Disciplinary Practice
|
1. Editing or Creating a DP
Figure 6.20: Editing/Creating a DP
|
||||
|
2. Learning Design Facilitator
|
||||


6.2.3 Pedagogical Approach
🌟 For guidance on choosing pedagogical approach, refer to Chapter 2.4 - Pedagogical Approach
The course-level pattern Engineer/Inventor (Engineering Design + Self-directed Learning) has provided the the pedagogical approach details for you.
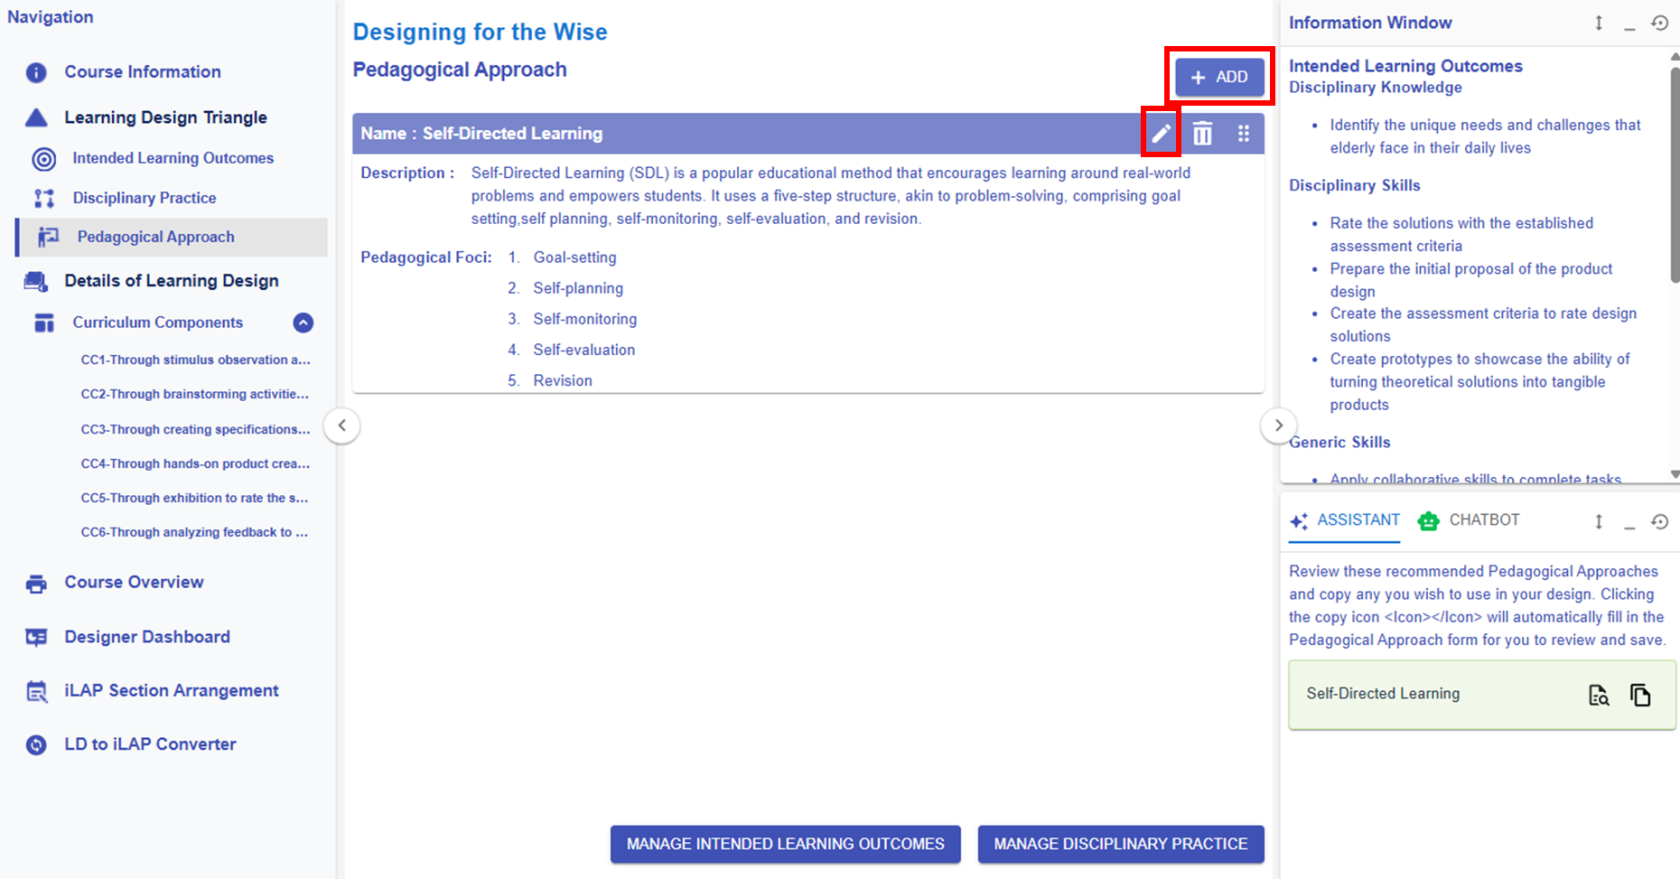
Figure 6.24 Learning Design Triangle Section - Pedagogical Approach
Please see the introduction below on how to interact with the LDS to edit/create the pedagogical approach.
|
1. Editing or Creating a pedagogical approach
Figure 6.25: Editing/Creating the Pedagogical Approach
|
||||
|
2. Learning Design Facilitator
|

6.3.1 Creating Curriculum Components (CCs) Part 1
After completing the Learning Design Triangle (LDT) to establish the contextual framework for the entire learning design, we will explore how to develop Curriculum Components (CCs) and learning tasks that align with these elements, transforming overarching design concepts into actionable teaching practices. For a detailed theoretical explanation of Curriculum Components (CC), see Chapter 2.5 – Curriculum Component Sequence.
By using a course-level pattern, the Learning Design Studio (LDS) will recommend and assign relevant CC patterns and the task patterns for you. Next, we’ll take a closer look at how they work.
Reviewing and Revising the Existing CCs
1. How to Name a CC?
💡Formula of naming a CC
Through the 1) focal task(s) to 2) achieve the intended learning outcome to 3) implement the workflow step(s) of a disciplinary practice for 4) applying the focus or foci of the pedagogical approach.
- Below are the 6 CC patterns provided by the course-level pattern.
- Through 1) brainstorming to 3) identify problem for 4) goal-setting
- Through 1) discussing essential design elements to 3) ideate solution for 4) self-planning
- Through 1) collecting feedback to 3) design solution for 4) self-planning
- Through 1) creating criteria and material lists to 3) construct prototype for 4) self-monitoring
- Through 1) competition based on the rubrics to 3) test performance of the product for 4) self-evaluation
- Through 1) analyzing feedback to 3) optimize the product for 4) revision
- We recommend adding an intended learning outcome to the title of the CC to specify what you aim to achieve in that particular CC.
- For example,
- Through 1) brainstorming to 2) identify the unique needs and challenges of the elderly to 3) identify problem for 4) goal-setting
- Through 1) brainstorming to 2) identify the unique needs and challenges of the elderly to 3) identify problem for 4) goal-setting
6.3.2 Creating Curriculum Components (CCs) Part 2
Reviewing and Revising the Existing CCs
2. Reviewing the CC Patterns and Task Patterns
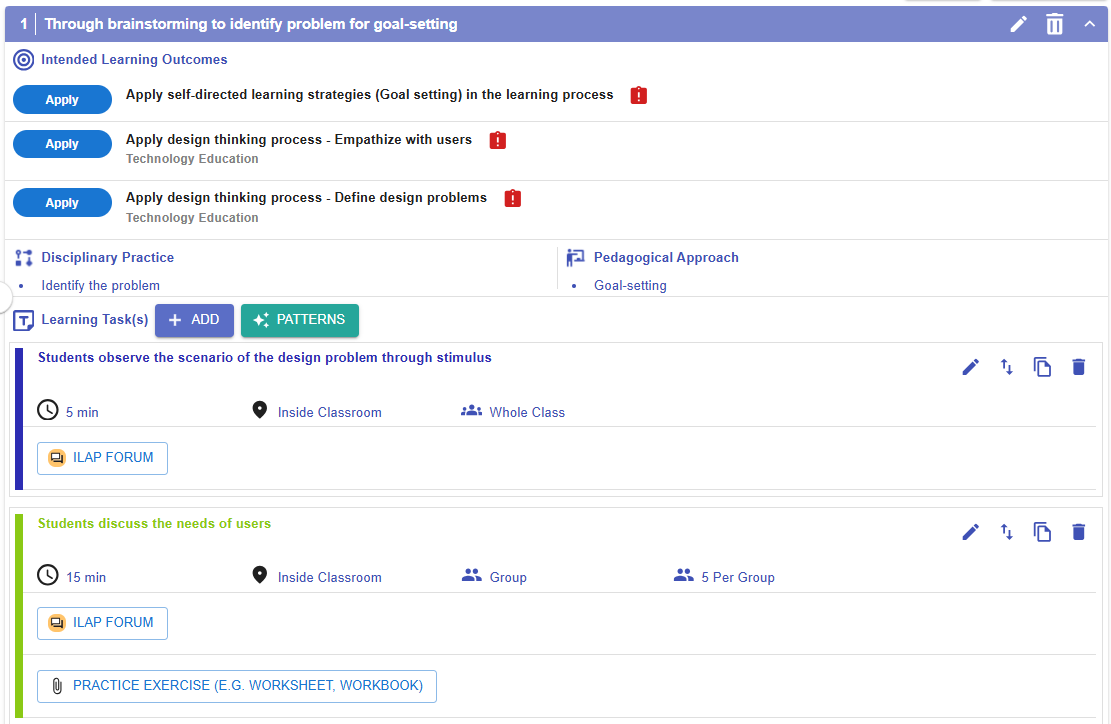
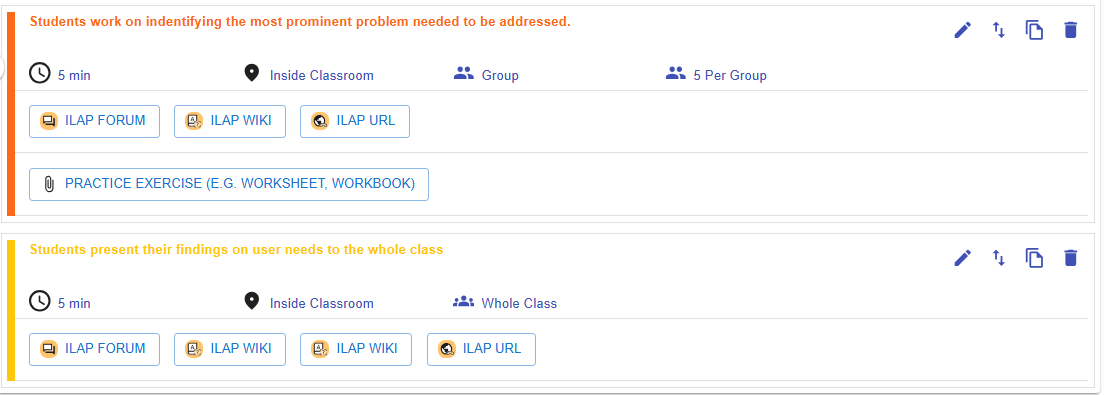
Figure 6.29: Example of a CC Pattern
| Name | Through brainstorming to identify problem for goal-setting |
| Intended Learning Outcomes |
|
|
Disciplinary Practice / Pedagogical Approach
|
Identify problem / Goal-setting |
| Learning Task(s) |
|
- This CC pattern has already provided the backbone of a CC. We now need to modify it to fit our own design by following below steps:
-
- Update the name of the CC to include the key intended learning outcome: "Identify the unique needs and challenges of the elderly".
- Link the intended learning outcomes "Identify the unique needs and challenges of the elderly" to the CC.
- Edit and Add the learning task(s) to fit the design.
- Update the name of the CC to include the key intended learning outcome: "Identify the unique needs and challenges of the elderly".
2.1 Editing a CC

Figure 6.30: Editing a CC
- By clicking the
 button, you can open the CC builder to update the CC details. Please refer to the introduction below for guidance on updating a CC.
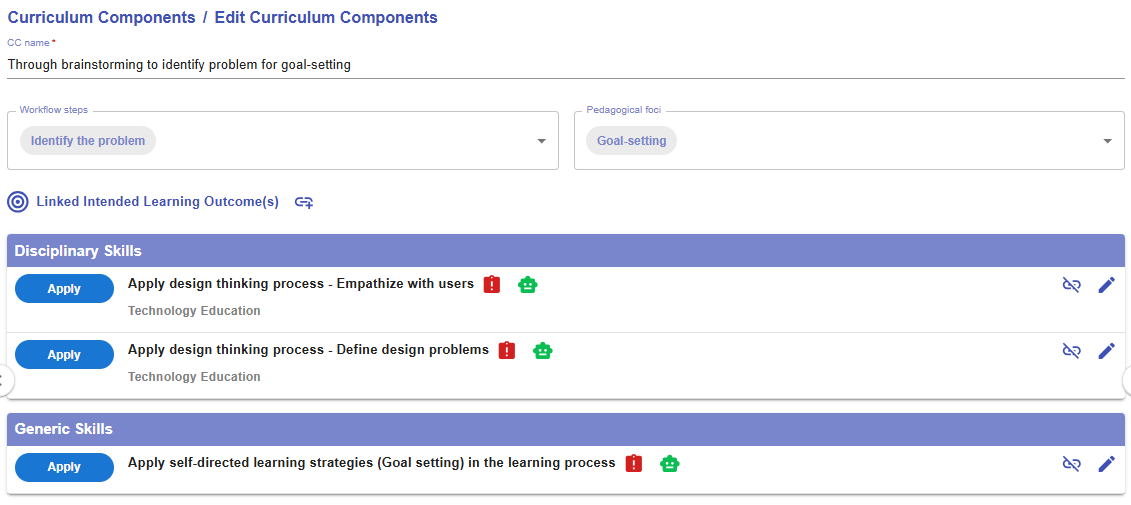 Figure 6.31: The Interface of CC Builder
|
1. CC Name
|
|
2. Workflow steps
Figure 6.32: The Workflow Steps of Engineering Design
|
|
3. Pedagogical foci
Figure 6.33: The Pedagogical Foci of Self-directed Learning
|
|
4. Linked Intended Learning Outcomes (ILOs)
4.1. The Link Button
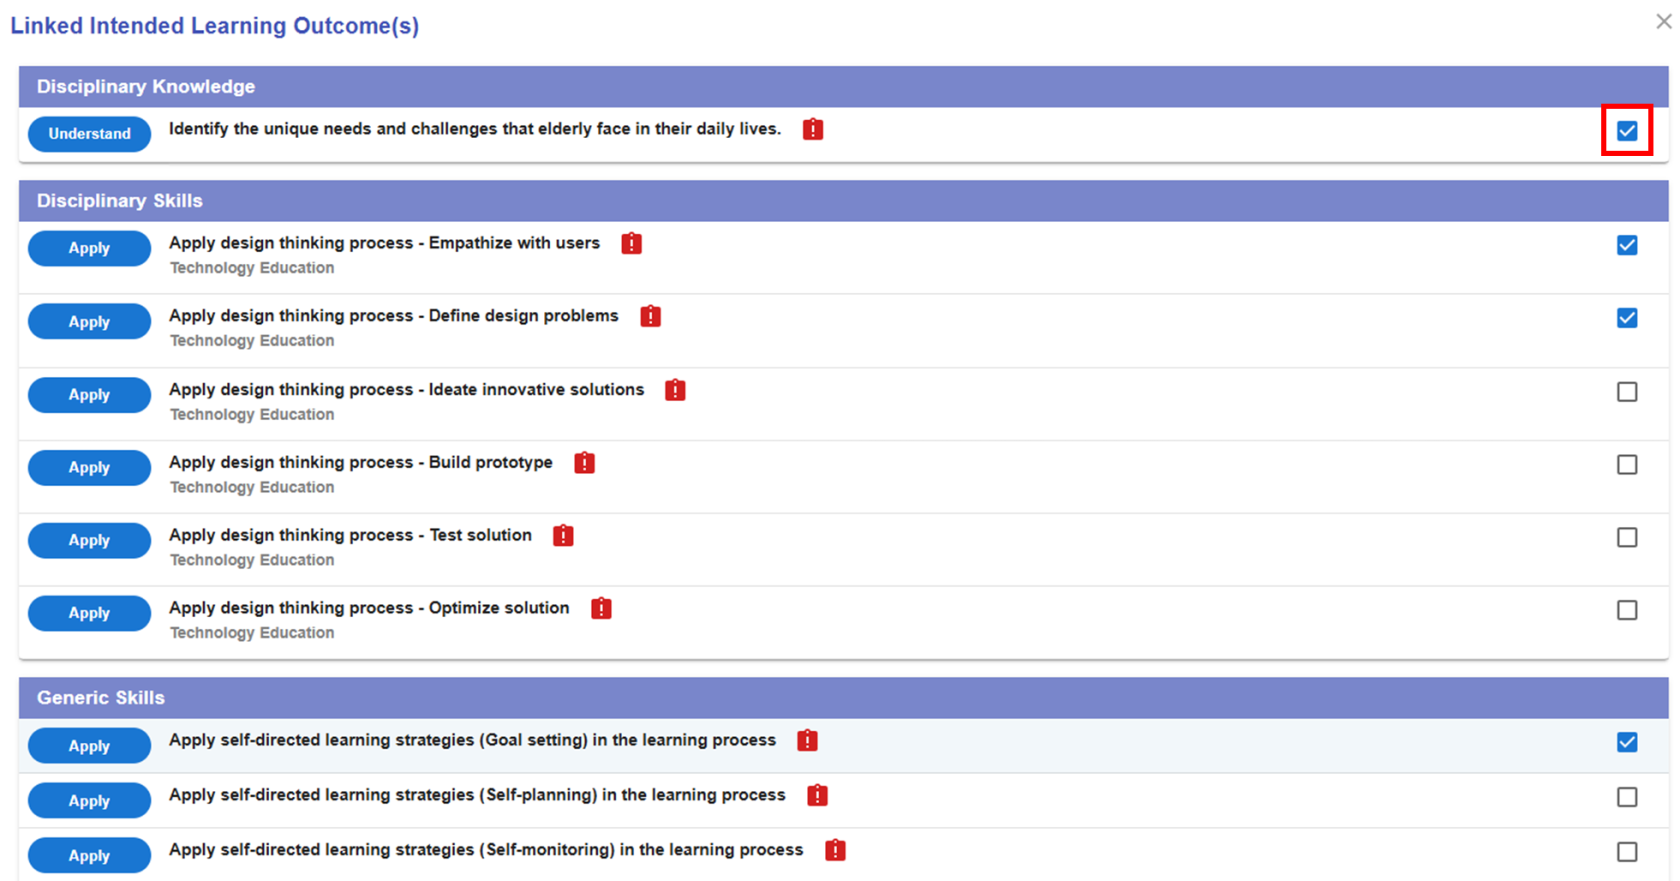
4.2 Selecting the Appropriate ILOs
Figure 6.35: Linking the ILOs to a CC (2)
4.3 The Alert Icon and Complete Icon
Figure 6.36: Unassessed ILOs in a CC
4.4 The Unlink Button
Figure 6.37: Dissociating the ILOs from the CC
|


2.2 Updating the Tasks
- You can either add or edit tasks to fit your needs. There are two ways to add a new task: one is by 1) adding a new task from scratch, and the other is by 2) using task patterns. In this section, we will focus on how to use a task pattern to create a task.

Figure 6.38: Adding a New Task with Task Patterns (1)
|
|
|


Figure 6.39: Adding a New Task with Task Patterns (2)
- By clicking the button, you can view a list of task patterns provided by the Learning Design Facilitator. These suggestions are based on your selected workflow step(s) from the disciplinary practice and the selected pedagogical foci from the pedagogical approach.
- By clicking the
 button, you can explore the details of the targeted task pattern.
 - You can use the targeted task pattern directly by clicking "COPY" button in the pop-up window, or by clicking the
 button in the LDS Facilitator. The task pattern details will be auto-filled into the LDS.
 Figure 6.40: A Newly Added Task Using Task Pattern
- The newly added task will appear at the bottom of the CC. You can click the
 button to edit the task details. We will use this example to explore the task builder.
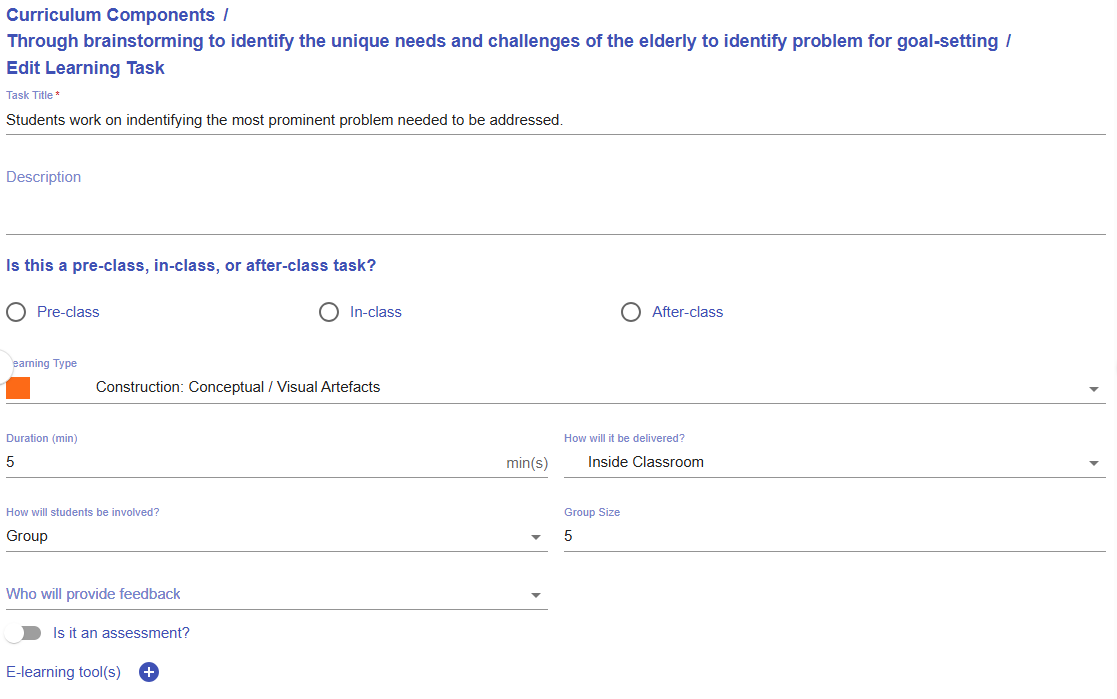
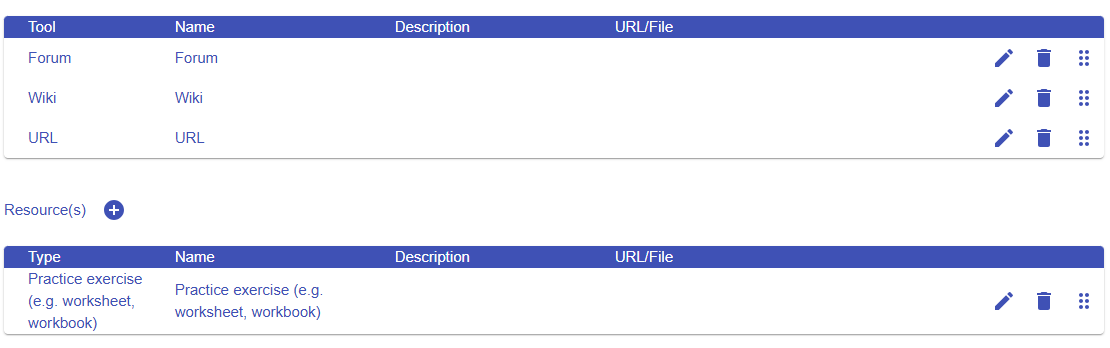
Figure 6.41: Interface of the Task Builder
- Please read the introduction below to guide you in setting up a task.
|
Item |
Example |
|---|---|
|
1. Task Information
Figure 6.42: Task Information |
Task title: Students work on identifying the most prominent problem needed to be addressed.
Description:
You may update the task information to make it more meaningful for the learning design.
Students work on identifying the most prominent problem faced by the elderly that needs to be addressed.
Description: Students will analyse the needs of the elderly based on the previous brainstorming learning tasks. |
|
2. Stage
Figure 6.43: Stage |
Select In-class |
|
3. Task Type
Figure 6.44: Task Type
|
Construction: Conceptual / Visual Artefacts |
|
4. Duration
Figure 6.45: Duration |
Update to an appropriate duration, such as 30 minutes.
|
|
5. Delivery Mode
Figure 6.46: Delivery Mode |
Inside Classroom |
|
6. Social Organization
Figure 6.47: Social Organization |
Group, Size: 5 |
|
7. Feedback Provider
Figure 6.48: Feedback Provider |
Select Teacher |
|
8. Assessment
Figure 6.49: Triggering the Assessment Option in a Task |
A learning task can also serve as an assessment.
If you select the assessment option, you will need to
|
|
9. E-learning Tool
Figure 6.50: Interface for Adding E-learning Tool(s) to a Task |
The e-learning tools section allows you to select the type of tool you want to use to implement the task.
For example, to encourage idea sharing in class, you can use the Forum tool.
You can remove the suggested e-learning tools that are not appropriate for your use. |
|
10. Resources
Figure 6.51: Interface for Adding Resource(s) to a Task |
The resource section allows you to select the type of resource or tool you want to use to support the learning process.
For example, you can upload rubrics for grading the assessment.
You can remove the suggested resources that are not appropriate for your use.
|


Figure 6.52: Preview of the Updated Task
-
You can see that the updates have taken effect in the task preview.

Figure 6.53: Preview of the CC
- The LDS will remind you to assign assessments to any unassessed learning outcomes within the CC.
- After an assessment is assigned to a specific learning outcome, the alert icon
 will change to complete icon
  .
. - Please remember to ensure that all linked intended learning outcomes are assessed in each curriculum component.
2.3 Moving a Task

Figure 6.54: Moving a Task (1)
- By clicking the button, you will see a list of tasks for each CC.

Figure 6.55: Moving a Task (2)
-
You can click any of the tasks to reallocate the current task to a position after it.
6.3.3 Creating Curriculum Components (CCs) Part 3
Reviewing and Revising the Existing CCs
3. Creating a New CC from CC Patterns
|
|
|
| Figure 6.56: Adding a New CC from the CC Patterns (1) | |


- Since this learning design focuses on creating a product for the elderly, your colleague may argue that brainstorming alone is insufficient. They might recommend adding an interview section to foster a user-centered mindset. In this case, CC Patterns can offer a quick and practical solution.
-
To retrieve the task pattern related to conducting client interviews, you can select "Identify problem" for the workflow steps and "Goal-setting" for the pedagogical focus in the Learning Design Facilitator. It will then recommend relevant task patterns for you. You can click the
button to explore the details of the task pattern "Interviewing client for goal-setting".
Figure 6.57: Adding a New CC from the CC Patterns (2)
- You can use the targeted CC pattern directly by clicking "COPY" button in the pop-up window, or by clicking the button in the Learning Design Facilitator. The CC pattern details will be auto-filled into the LDS.
-
Please refer to the instructions under 2. Reviewing the CC Patterns and Task Patterns to update your newly created CC.
* You can continue adding more tasks to complete your Curriculum Component (CC), and add additional CCs to finalize your course design by repeating the steps mentioned above.
Additional: Information Window, and Header
- There is some additional information to help you analyse the learning design.
|
Item |
Description |
Example |
|---|---|---|
| 1. Information Window |
Figure 6.58: Information Window in the CC Section |
In the CC section, the information window will visualise your overall CC design with the pie chart
|
| 2. Header |
Figure 6.59: Example of a Curriculum Component Sequence
Total Learning Time: 325 min
Designed Total In-Lesson Time: 220 / 240 min
Expand all
Collapse all
|
|

7. Reviewing a Learning Design with Analytics
7.1 Reviewing the Course Overview
The Course Overview section provides a one-page summary of your learning design.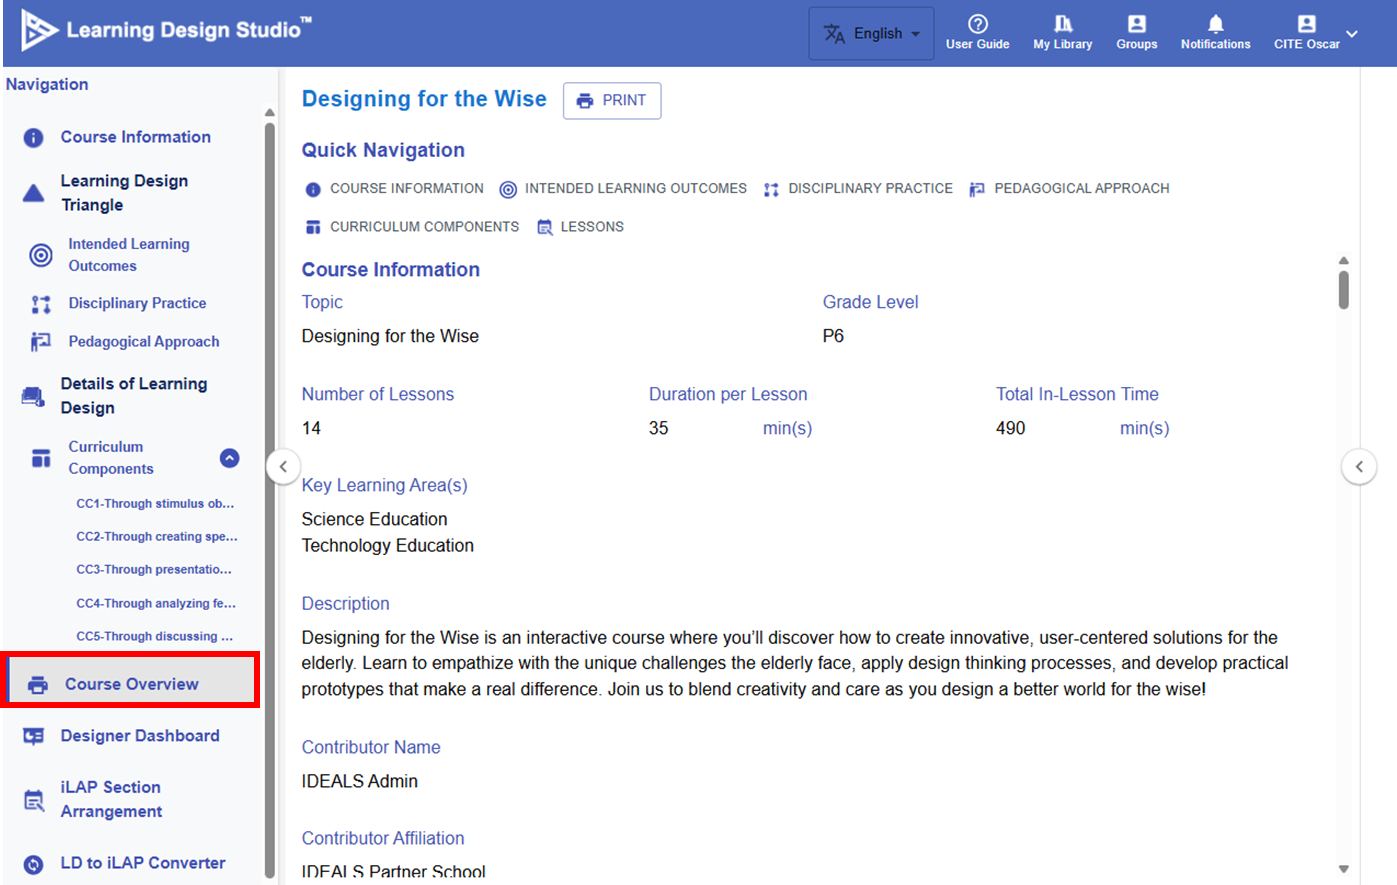
Figure 7.1 Course Overview Section
You can click the buttons under the "Quick Navigation" to review the content of course information, intended learning outcomes, disciplinary practice, pedagogical approach, curriculum components, and lessons. You can also print this summary for easy reference.
7.2 Visiting the Designer Dashboard
To support the analysis of your learning design, the Learning Design Studio (LDS) provided the Designer Dashboard featuring visualisations such as pie charts and heatmaps to illustrate how learning tasks interact with the overall design. It offers summary statistics to help users quickly identify patterns and imbalances in their design. Building on these insights, the dashboard will provide targeted feedback to guide further enhancements.
🌟 For guidance on the learning tasks, refer to Chapter 2.6 - Task Taxonomy.
A quick recap about the 4 types of task categories:
Directed Learning, Exploratory Learning, Productive Learning, Reflective Learning
| How can we ensure that students engage with different types of learning tasks to optimize their learning experience? |
|
|
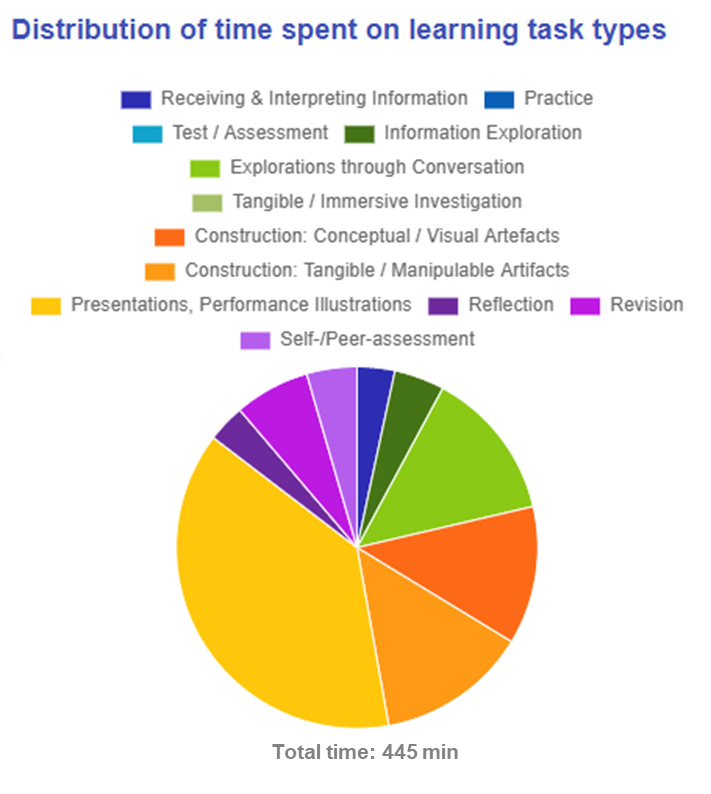
Figure 7.2: Designer Dashboard (1) |
Distribution of time spent on learning task types:
This analysis focus on the time spent on learning task types. It shows the ratio of in-class to out-of-class activities. It also highlights the top task types through both text descriptions and color-coded segments in the pie chart, helping you quickly understand the overall distribution of learning tasks.
|
| How can we ensure a comprehensive student learning experience by providing a balanced range and frequency of different learning tasks? | |
|
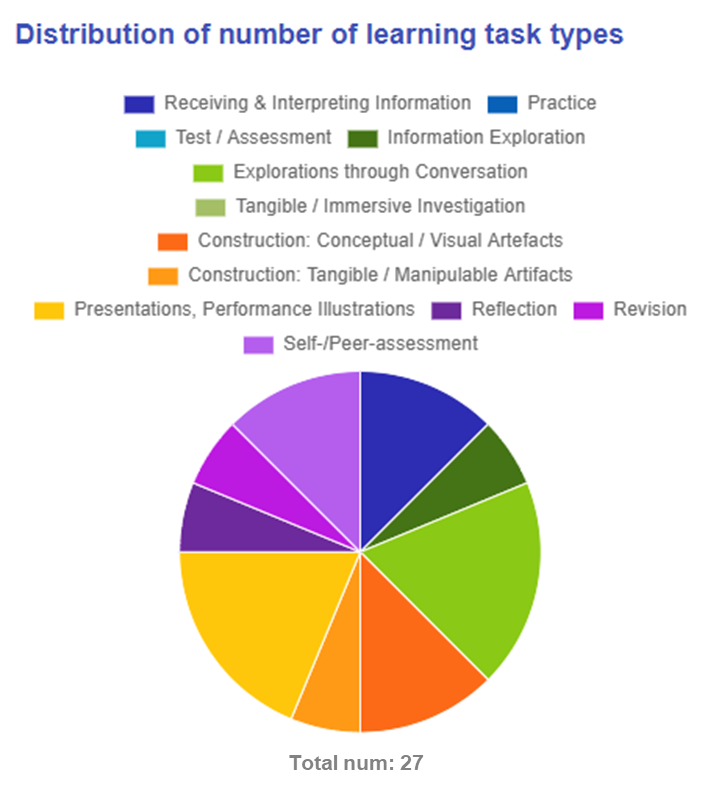
Figure 7.3: Designer Dashboard (2) |
Distribution of number of learning task types:
Suggestion:
|
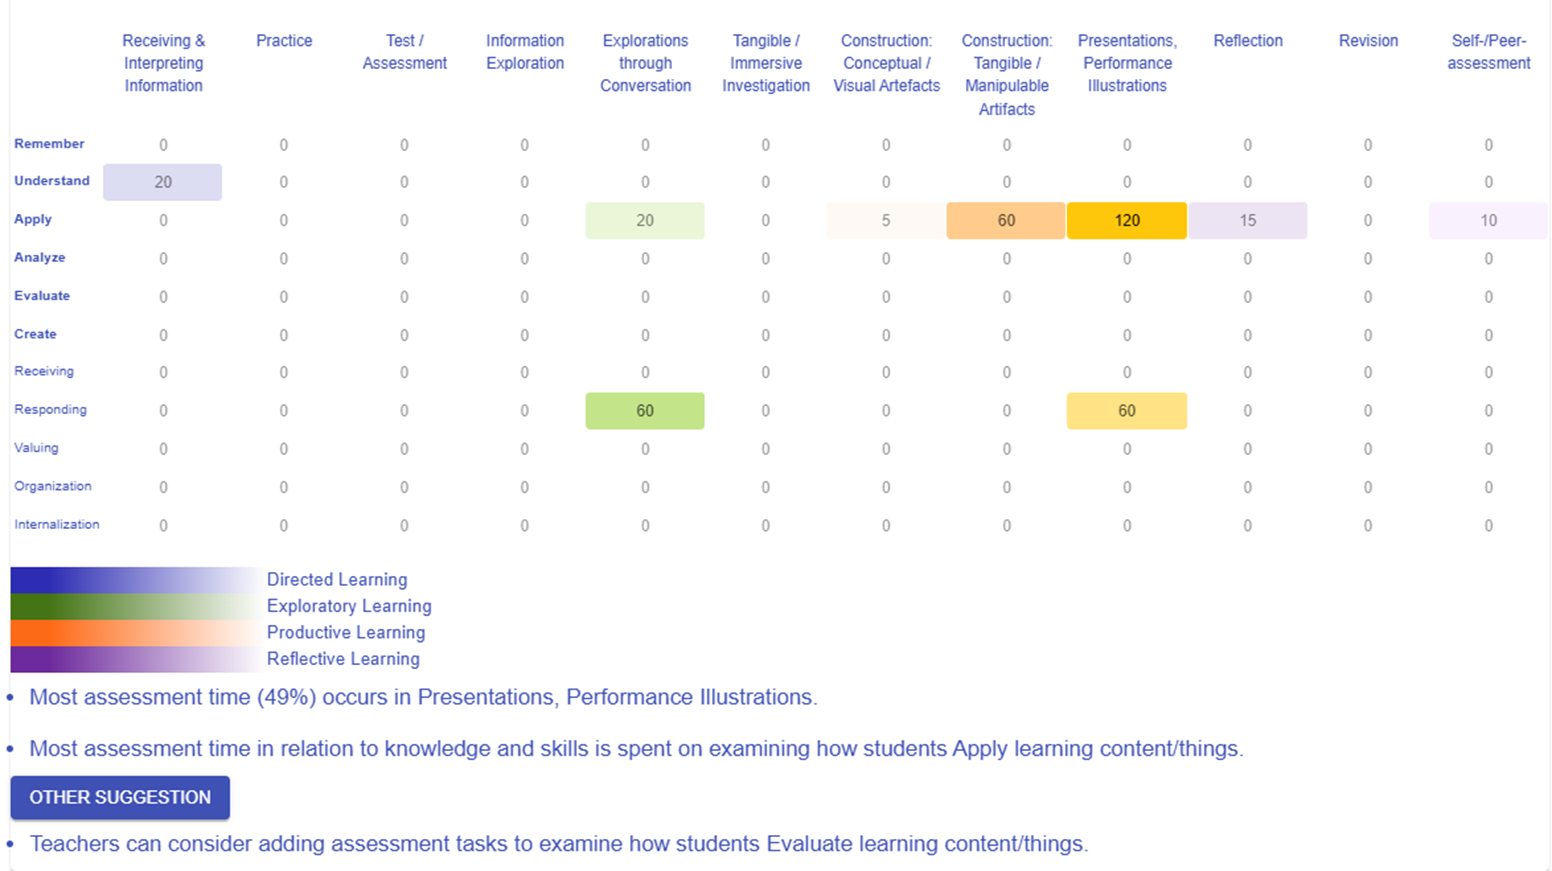
| How can we design our assessment strategy to foster a more holistic development of skills, ensuring we evaluate not just application, but also analysis, evaluation, and creation? | |
|
Figure 7.4: Designer Dashboard (3)
Heatmap of time spent on assessment tasks - LO level vs task category:
Suggestion:
|
|
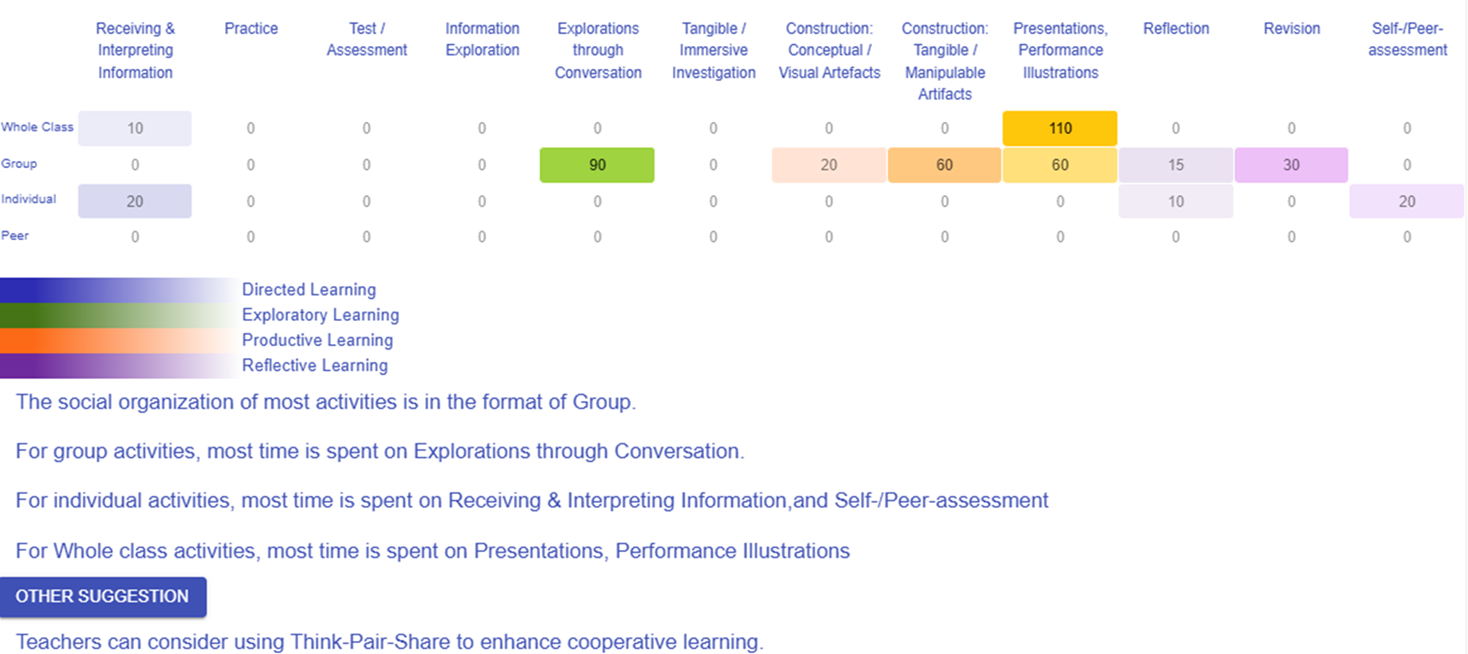
| How can we ensure our use of social organization—individual, group, or whole class—is strategically matched to the cognitive demands of the task? | |
|
Figure 7.5: Designer Dashboard (4)
Heatmap of time spent on all tasks - social organization vs task type:
Suggestion:
This analysis examines how time is distributed across different task types within various social organization formats. It reveals which tasks dominate in each social setting and highlights opportunities to diversify engagement methods. |
|
|
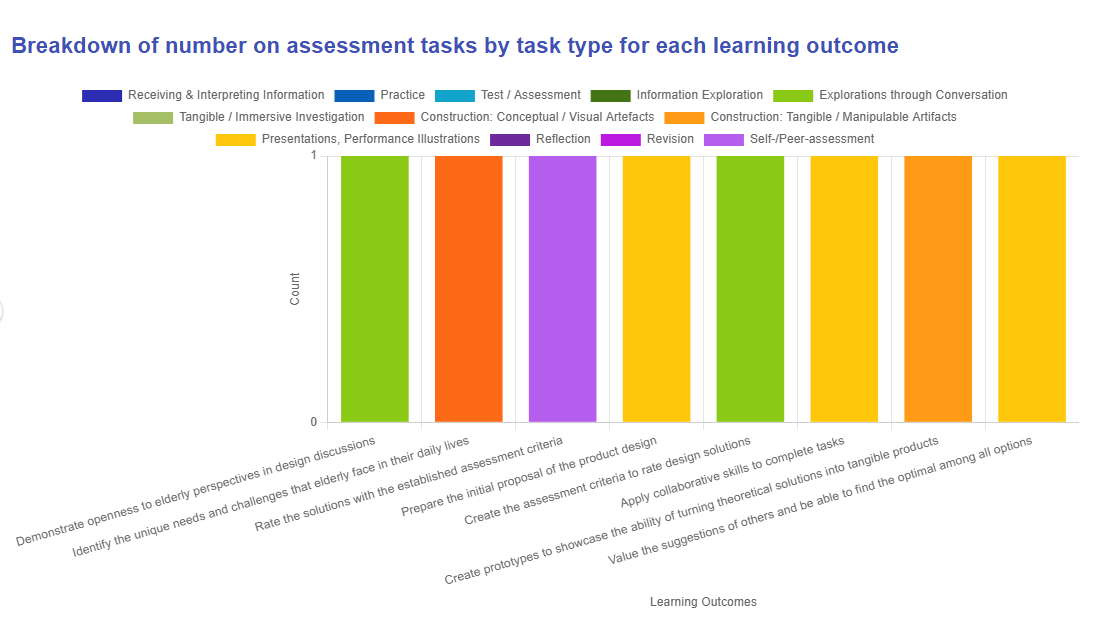
How do you select different task types when designing assessment for each learning outcome? |
|
|
Figure 7.6: Designer Dashboard (5)
This diagram illustrates how each intended learning outcome is evaluated with what type of learning task, helping you identify gaps and ensure a balanced variety of assessment approaches across all outcomes. |
|
|
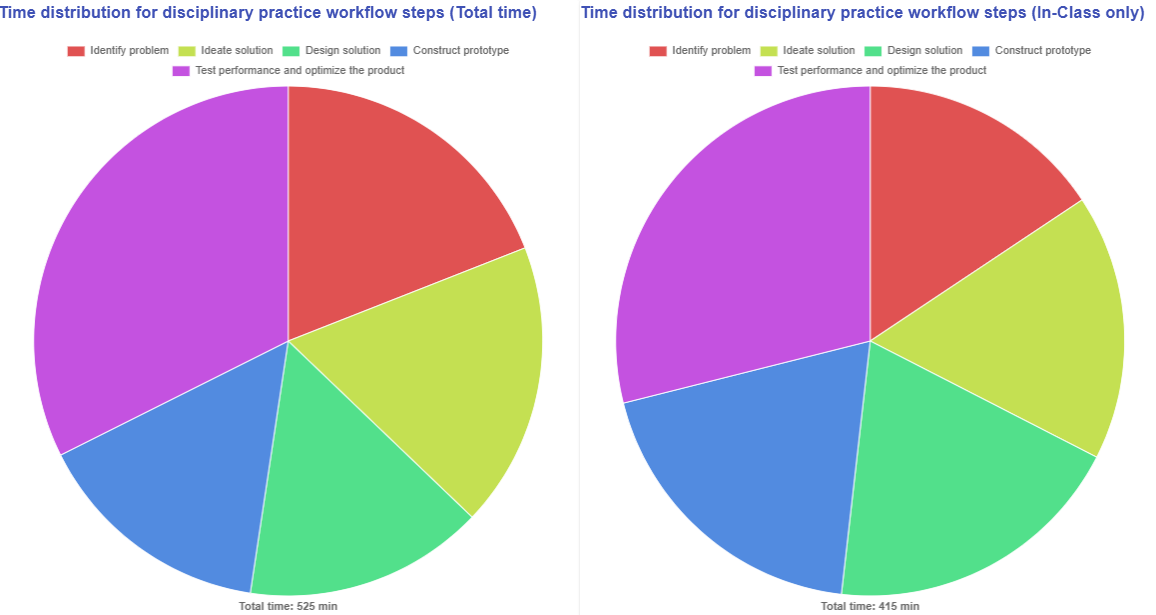
How do you organize your lesson time with respect to disciplinary practices and your chosen pedagogical approach? |
|
|
Figure 7.7: Designer Dashboard (6) - Disciplinary Practices
Figure 7.8: Designer Dashboard (7) - Pedagogical Approach
The two diagrams above illustrate how the workflow steps of disciplinary practice and the pedagogical focus of the chosen pedagogical approach are arranged within your learning design. Additionally, the dashboard shows both the total time allocated for all learning tasks and the specific time dedicated to in-class activities, helping to ensure that the out-of-class workload remains manageable. |
|

8. Confirming the iLAP Section Arrangement
8.1 iLAP Section Arrangement
If you are subscribed to IDEALS, you can convert your completed learning design into a practical online course on the IDEALS Learning Management Platform (iLAP). (Click here to subscribe!)
 Figure 8.1: iLAP Section Arrangement
We offer two modes for the conversion: Curriculum Component (CC) mode and Lesson mode.
- You can switch between the two modes at any time by clicking the
 button in the top-right corner, without losing any data.
 - In CC mode, the system automatically creates course sections based on your curriculum components, so no additional effort is required.
- In Lesson mode, you manually build course sections, arranging learning tasks into individual lessons—similar to a traditional lesson plan.
Demonstration of the Lesson Mode
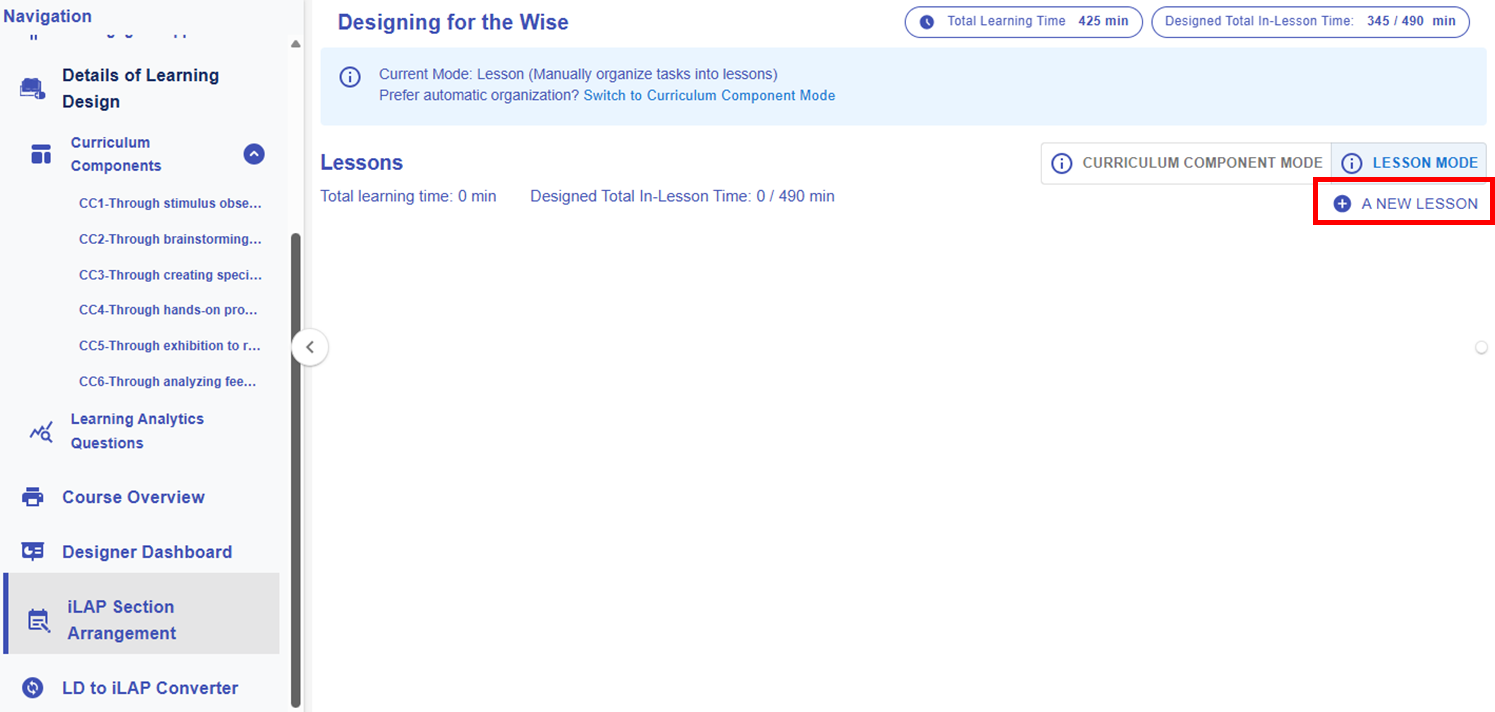
Figure 8.2: Lesson Mode - Add a New Lesson
You can click the ![]() "A NEW LESSON" button to create an empty lesson block for assigning learning tasks later.
"A NEW LESSON" button to create an empty lesson block for assigning learning tasks later.

Figure 8.2: An Empty Lesson Block
Adding a Task to a Lesson
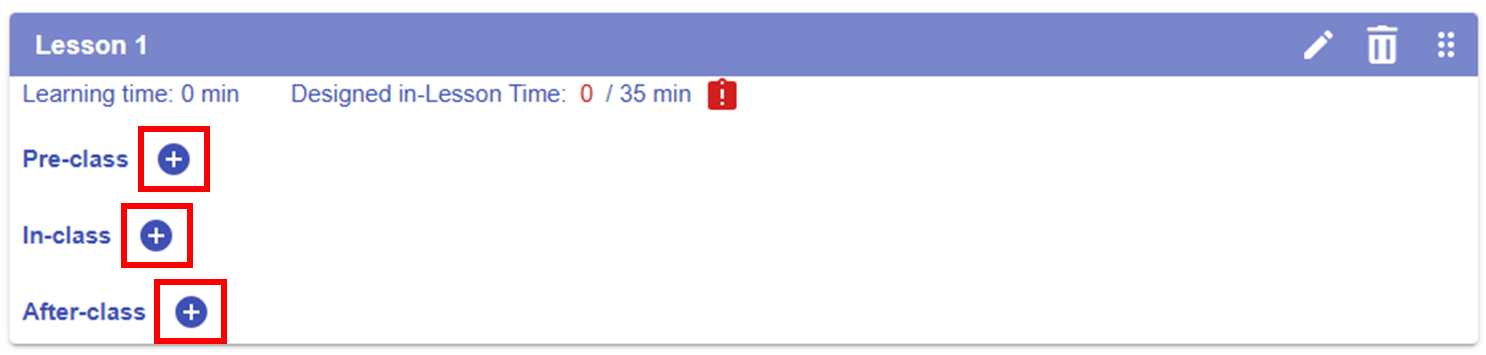
Figure 8.3: Adding a Task to a Lesson (1)
By clicking the ![]() button next to "Pre-class" "In-class" or "After-class", a pop-up window will appear, allowing you to view the created curriculum components and learning tasks.
button next to "Pre-class" "In-class" or "After-class", a pop-up window will appear, allowing you to view the created curriculum components and learning tasks.

Figure 8.4: Adding a Task to a Lesson (2)
You can select the appropriate learning task(s) by clicking the checkbox in the top-right corner of each task. Then, click the "LINK SELECTED TASK(S)" button to assign the selected tasks to the targeted lesson.
Revising and Rearranging a Task
Below is a sample overrun lesson. We will need to revise the task details or move the task to a different stage or lesson.


Figure 8.5: A sample Overrun Lesson
|
1. Alert for Overrun Lesson Plan
Figure 8.6: Alert for Overrun Lesson Plan
|
|
2. Rearranging a Task
Figure 8.6: Moving a Task (1)
Figure 8.7: Moving a Task (2)
|


*Please repeat the mentioned steps to complete the lesson plan.
9. Publishing the Design
9.1 Converting the Learning Design to ILAP
The iLAP is a Learning Management System, part of the IDEALS, that enables you to implement your learning designs created in the Learning Design Studio (LDS). If you wish to use iLAP, please refer to this webpage for subscription information.
In this section, you have already developed a solid learning design with scaffolding using the LDS. You can now convert your learning design into an ready-to-implement course within our Learning Management System, iLAP.
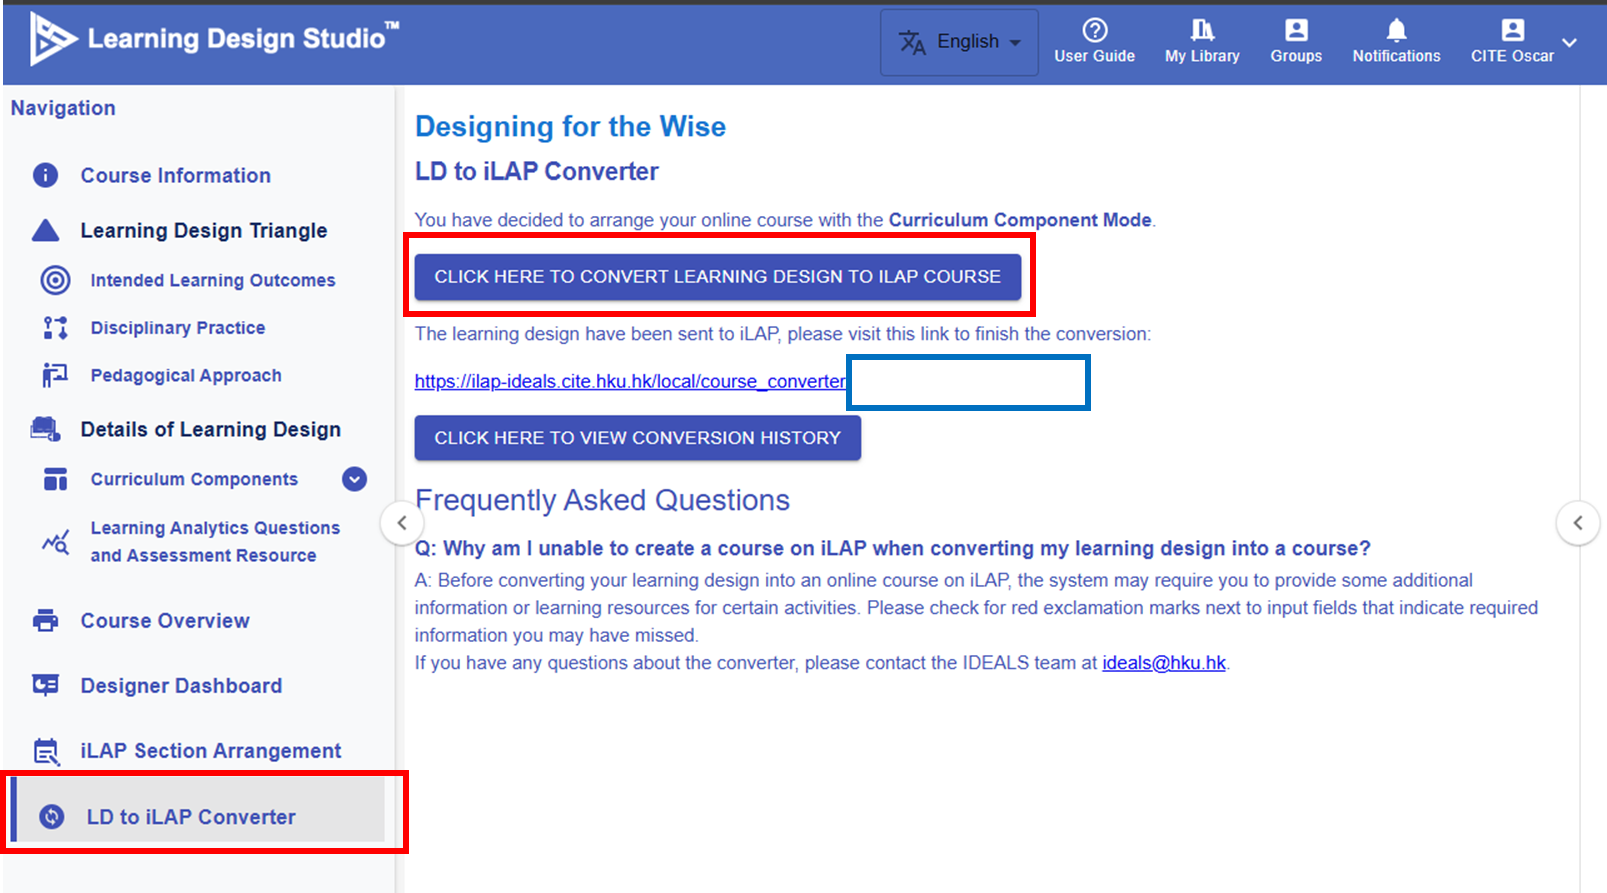 Figure 9.1: LD to ILAP Converter Section
By clicking the "CLICK HERE TO CONVERT TO ILAP COURSE" button, a link will appear, directing you to the iLAP platform where you can proceed with further configuration.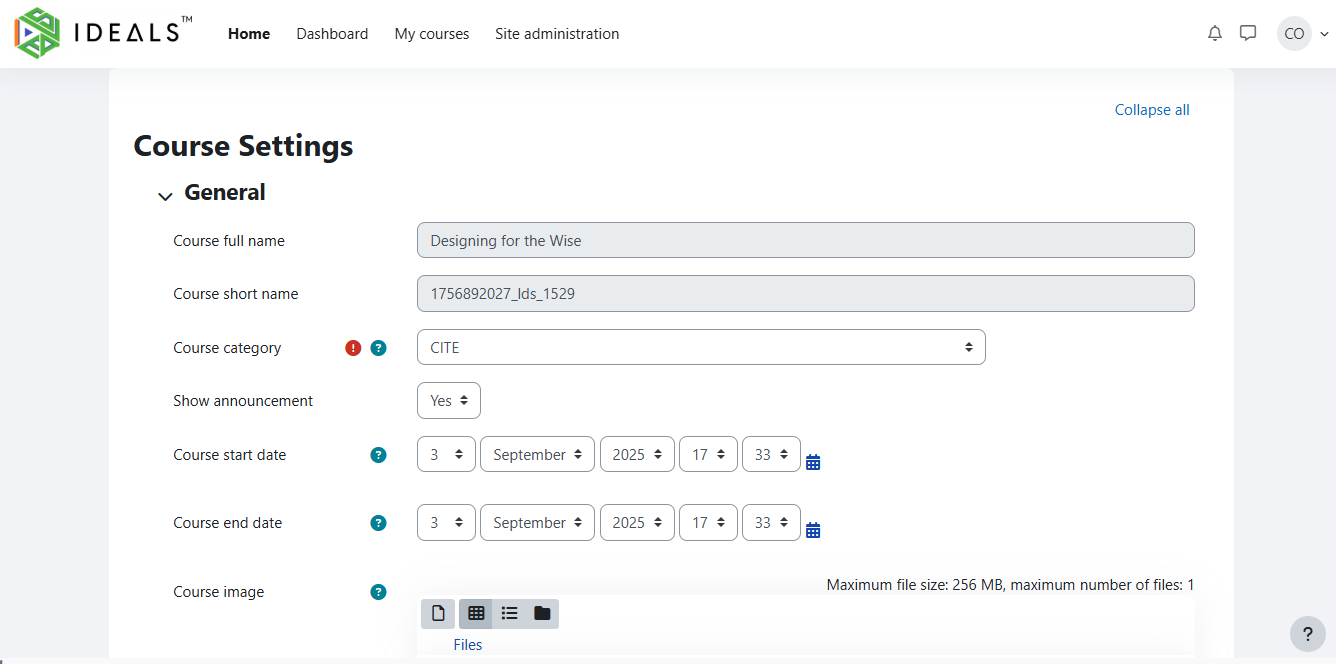
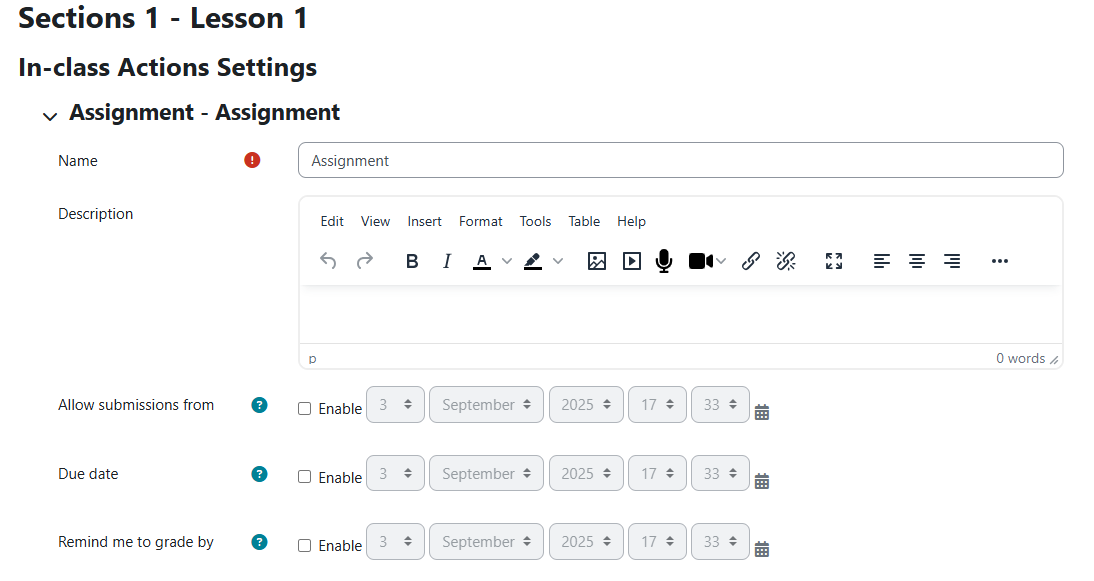

Figure 9.2: Course Configuration on the iLAP
The system will automatically create sections aligned with your learning design. We suggest clicking the "Direct Import" button to create the course first, and then completing the details later.
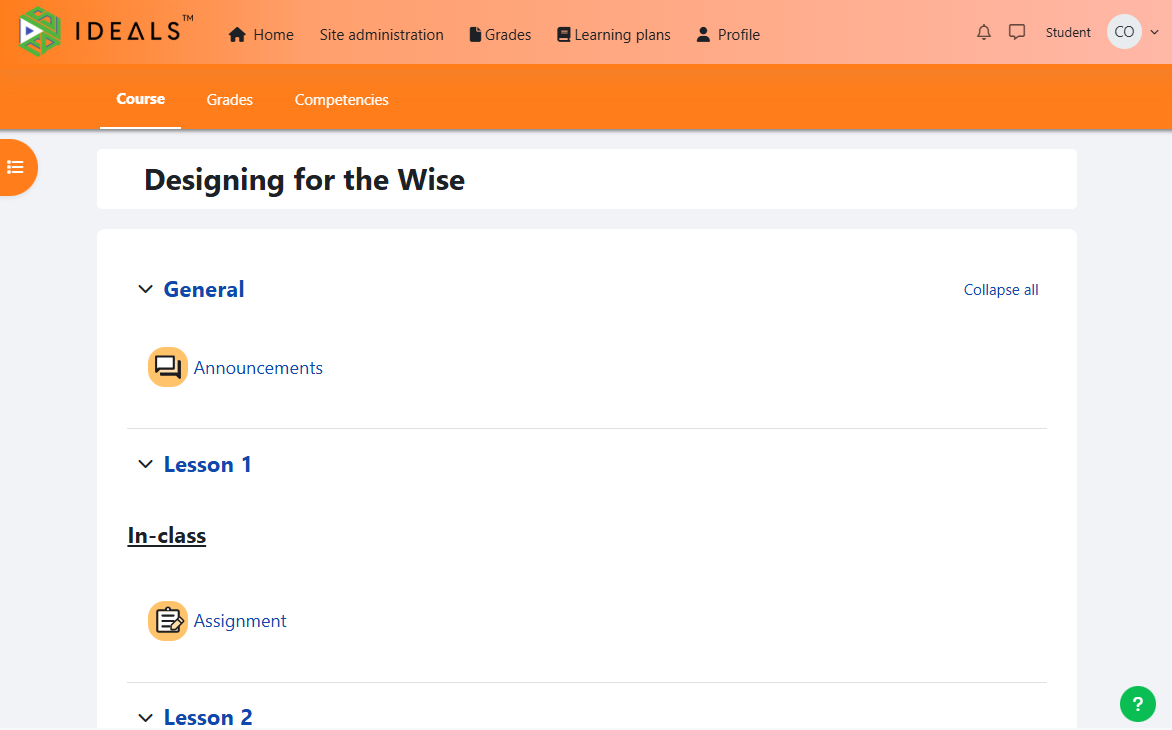
Figure 9.3: The iLAP Course Interface

Figure 9.4: Conversion History
You can find the history record in the LDS after the conversion.
9.2 Exporting and Importing the Design In the LDS
In this section, you will explore how to export and import a learning design in the Learning Design Studio (LDS).
1. Exporting the Design

Figure 9.5 Exporting the Design
By clicking the ![]() button, you can export the design as a ZIP file.
button, you can export the design as a ZIP file.
2. Importing the Design

Figure 9.6 Importing the Design
By clicking the "IMPORT COURSE" button, you can upload the ZIP file to the LDS, and you will see the design appear in the list.
10. Sharing and Collaboration
10.1 Sharing Designs Publicly
In this section, we will explore how to share your learning design with public users.
|
1. Clicking the Share Button There are two places where the Share button can be found. The first is on the My Library page.
Figure 10.1: Sharing the Design (1)
The second location is the Course Information page within a learning design.
Figure 10.2: Sharing the Design (2)
|
|
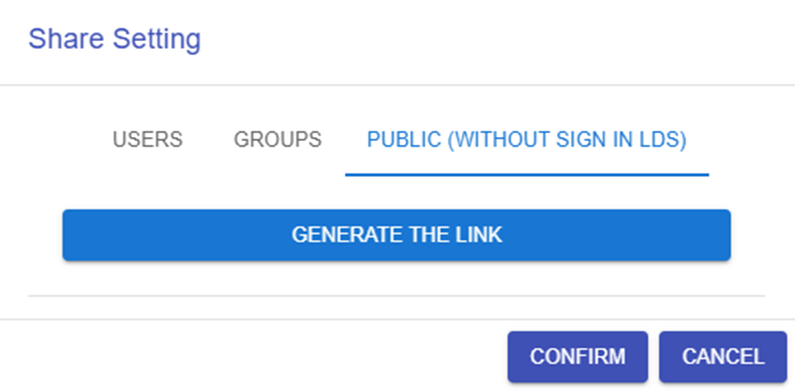
2. Generating / Closing the Shareable Link
Figure 10.3: Enabling the Link for Public Sharing
|
|
3. View the Learning Design
Figure 10.4: Public View of the Shared Design
|


10.2 Sharing Designs with Individual Users
In this section, we will explore how to share your learning design with individual users.
|
1. Clicking the Share Button
Figure 10.5: Sharing the Design
|
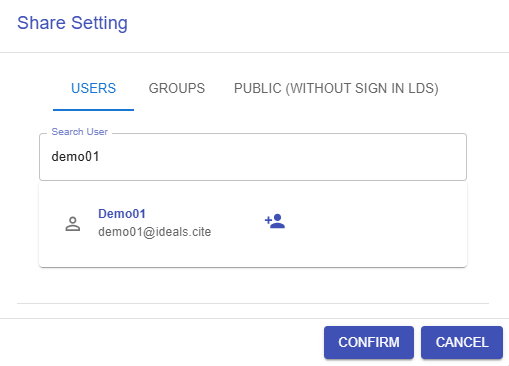
|
Figure 10.6: Searching for the user
|
|
Figure 10.7: The Library of Shared Design
|


10.3.1 Sharing Designs within a Group - What is a Group?
In the following sections, we will explore what a group is in the Learning Design Studio (LDS) and how it can help you collaborate with your team.

A group in the LDS allows you to invite your team or organization to collaborate together. You can share learning designs with group members and co-design collaboratively.
1. Feed
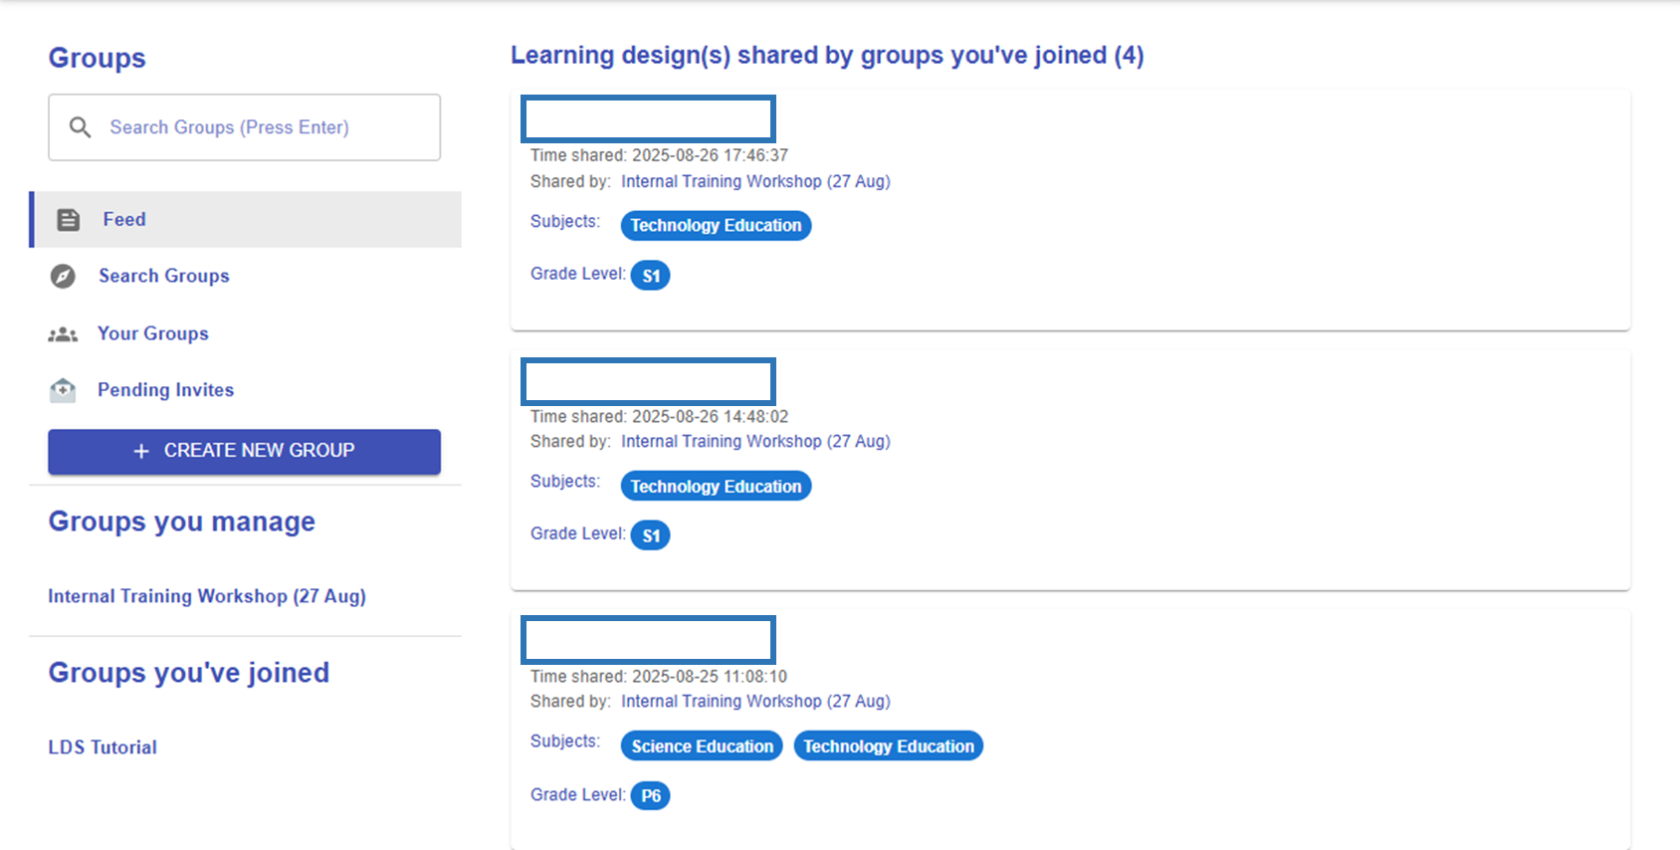
Figure 10.8: The Feed
The feed, similar to social media, shows the most recently shared designs from your groups.
2. Search Groups
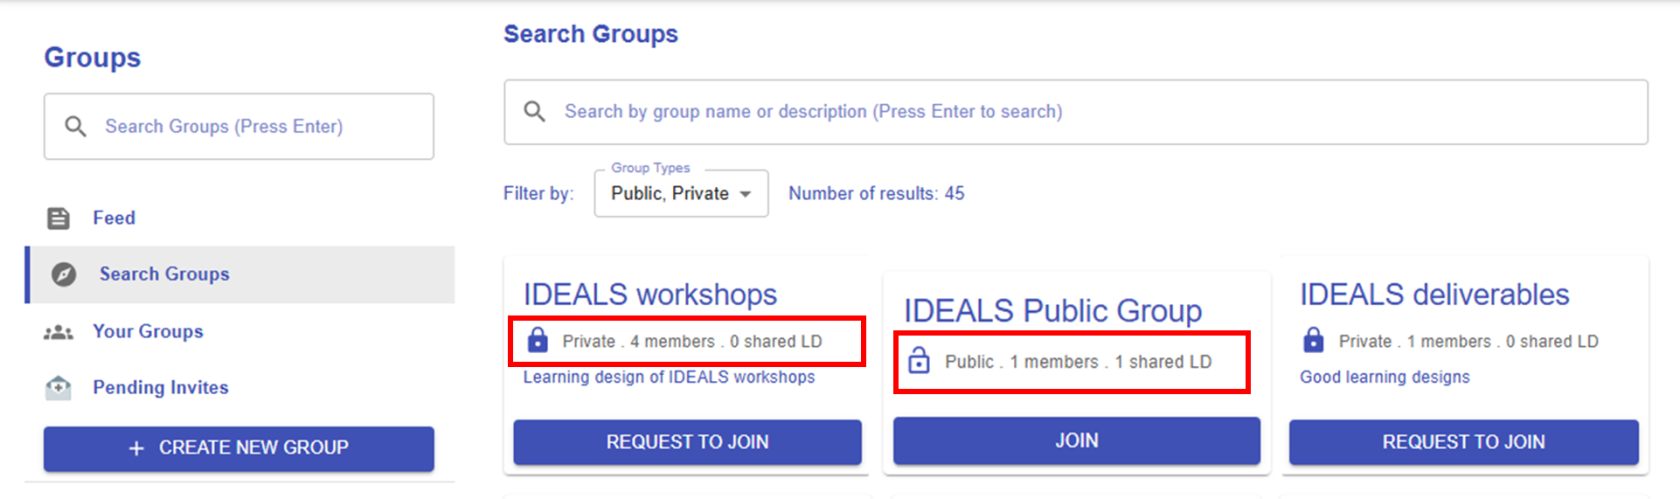 Figure 10.9: The Search Function
There are two types of groups: public and private. You can join a public group at any time, while private groups require you to send a request. As school-based groups are usually private, you can simply search for your school’s name to request to join.
3. Your Groups
|
Figure 10.10: Your Groups List |
Groups you manage
All groups you've joined
|

4. Pending Invites
|
Figure 10.11: Group Invitation |
|
|
Figure 10.12: Invitation Notification |
If you receive a group invitation, you will get a notification from the system. By clicking on it, you will be redirected to the Pending Invites section shown in Figure 9.10 above. You can either accept or decline the invitation. After accepting, the invitation will move from "Pending Group Invites" to "Accepted Group Invites." |


10.3.2 Sharing Designs within a Group - Creating and Managing a Group
In this section, you will learn how to create a new group, share designs, and manage members.
1. Creating a New Group
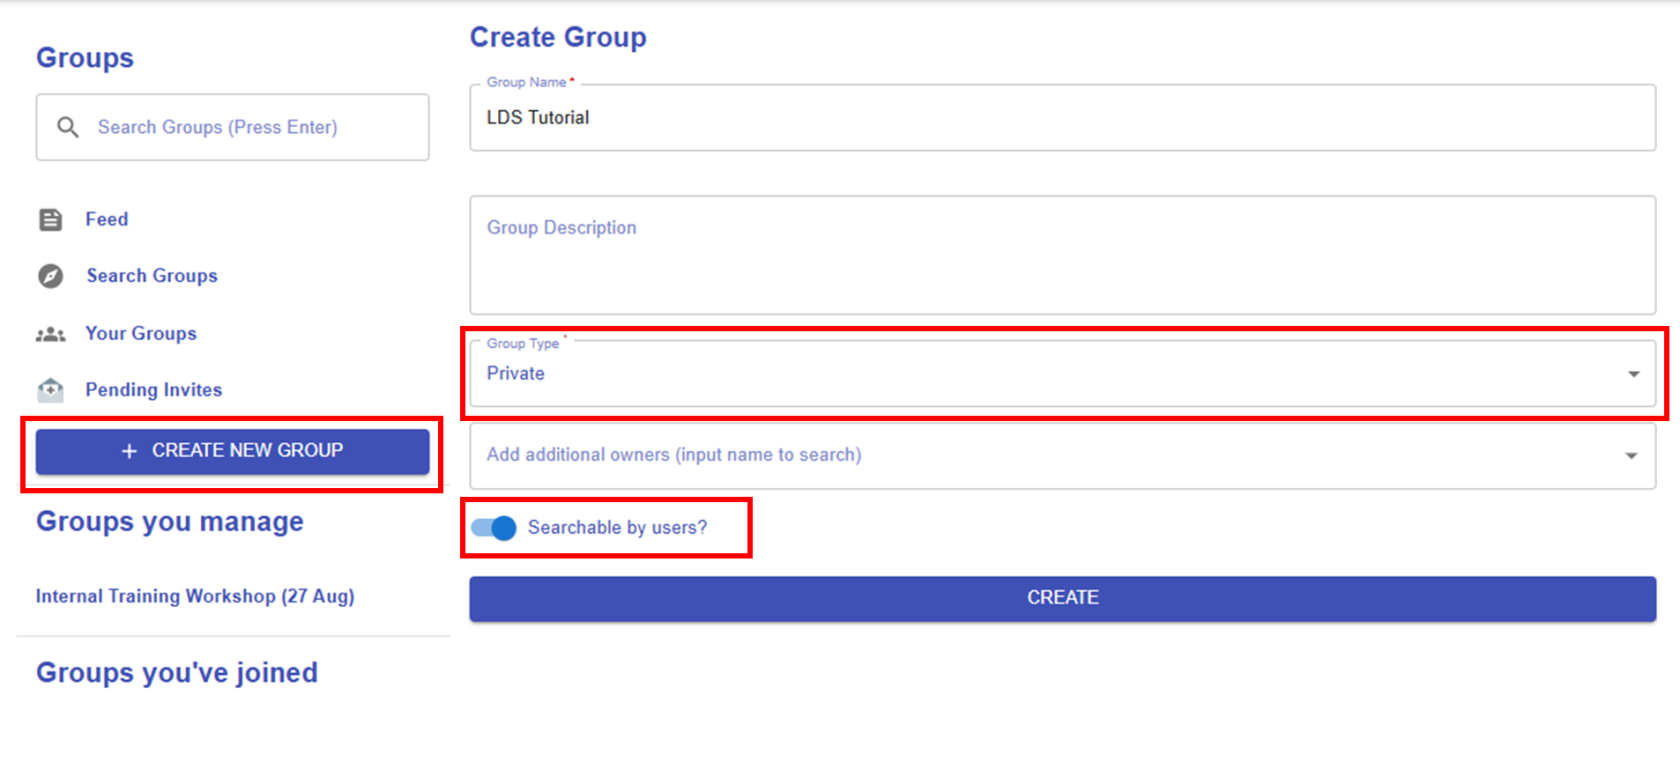 Figure 10.13: Creating a New Group
As mentioned, there are two types of groups, "Private" and "Public". If you choose "Private", you will see an additional option: "Searchable by users". If you enable this option, your group will appear in the group list and can be searched by users. You can change this setting at any time after creating the group.
2. Managing a Group
|
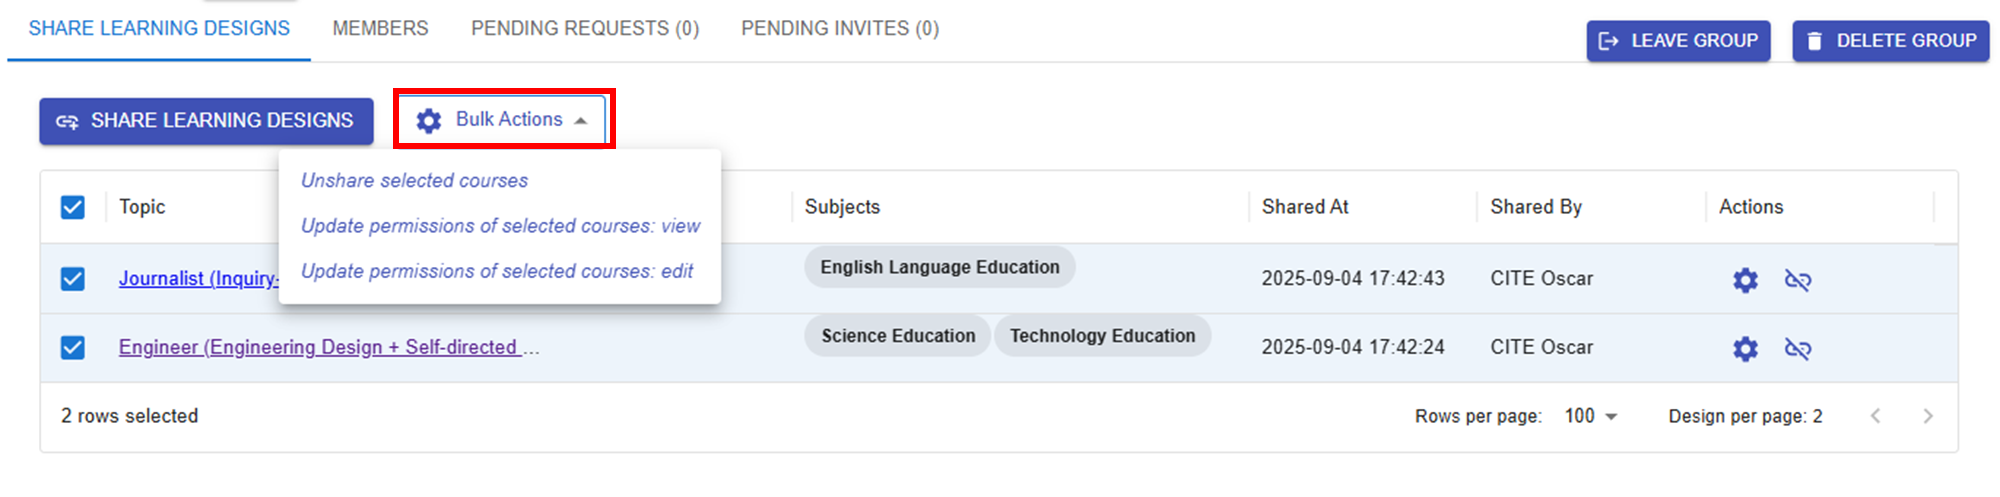
2.1 Share a Learning Design
Figure 10.14: Sharing a Design within the Group
By clicking the "SHARE LEARNING DESIGNS" button, you can select an existing design to share and set permissions to either "Can Edit" or "Can View".
Figure 10.15: Updating the Sharing Conditions of the Designs
Once you've shared your designs, they will appear in the group. You can use Bulk Actions to unshare designs or change their permissions at any time. |
|
2.2 Manage Group Members
Figure 10.16: Inviting Users to the Group
By clicking the
Figure 10.17: Managing a User
Figure 10.18: Pending Requests
|