6. Creating a New Design from Patterns
- 6.1 Entering the Course Information
- 6.2 Exploring with the Learning Design Triangle
- 6.2.1 Intended Learning Outcomes (ILOs)
- 6.2.2 Disciplinary Practice (DP)
- 6.2.3 Pedagogical Approach
- 6.3.1 Creating Curriculum Components (CCs) Part 1
- 6.3.2 Creating Curriculum Components (CCs) Part 2
- 6.3.3 Creating Curriculum Components (CCs) Part 3
6.1 Entering the Course Information
In this chapter, we will explore how to create a new learning design about developing a product for the elderly, similar to what we demonstrated in Chapter 5. However, this time we will use the Pattern Library, beginning with the course-level pattern.
Choosing a Course-level Pattern
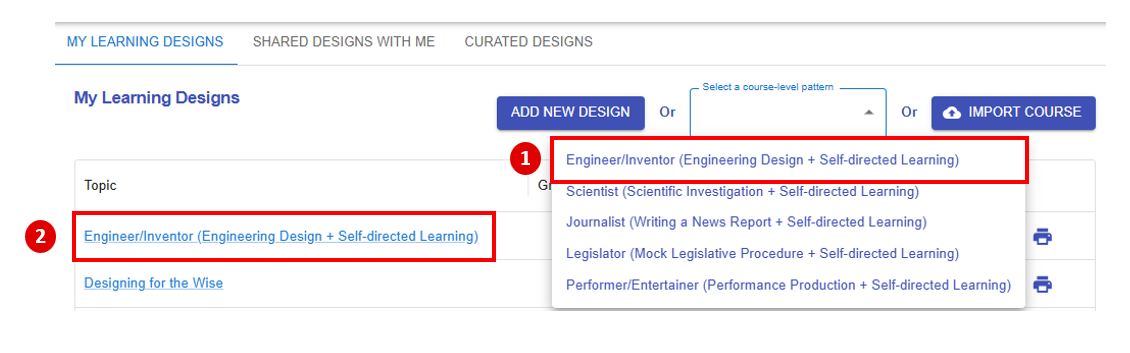 Figure 6.1: The Course-level Pattern Library
After selecting the pattern 1) "Engineer/Inventor (Engineering Design + Self-directed Learning)" , a new learning design will 2) appear in "My Library".
Entering the Course Information
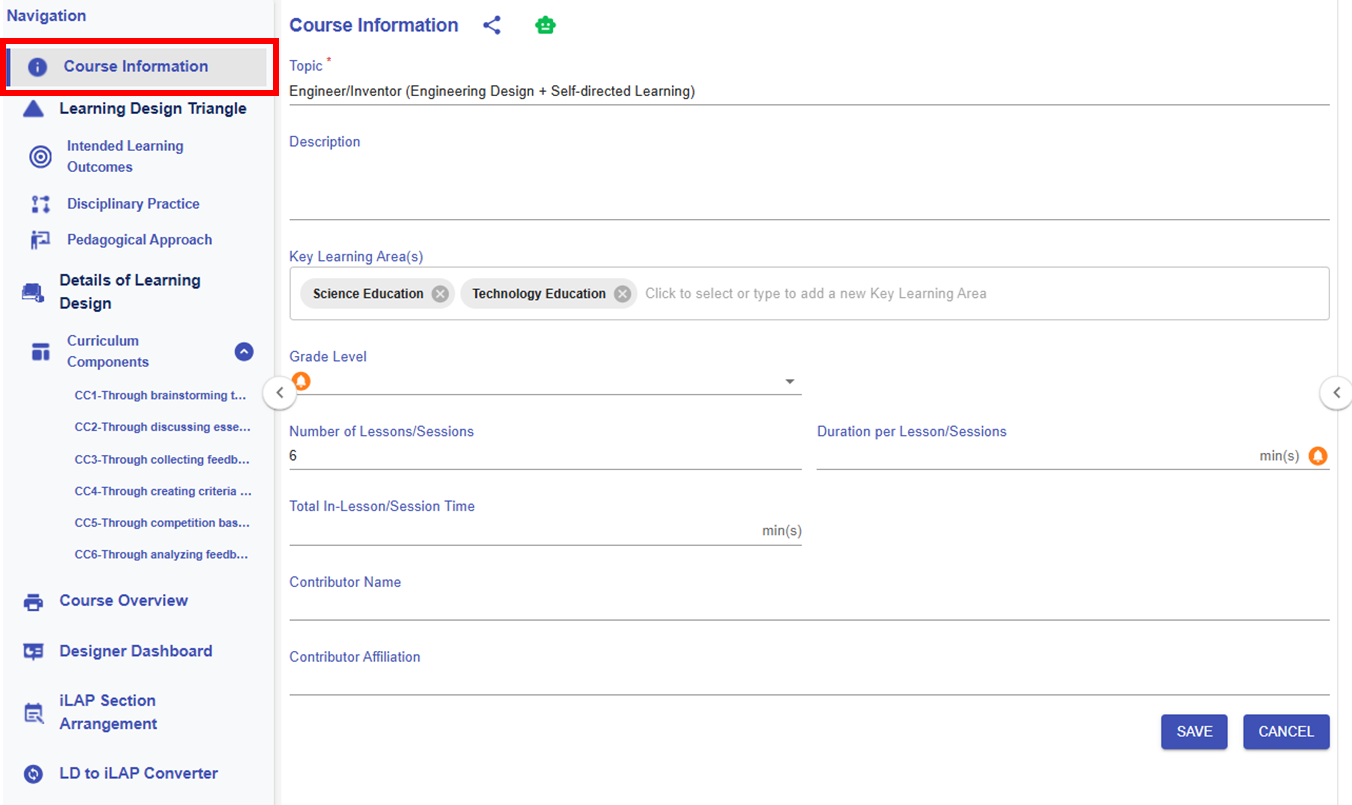
Figure 6.2: The Course Information Section of the Engineering Designer Pattern
After choosing "Engineer/Inventor (Engineering Design + Self-directed Learning)", the pattern have already provided some course information. You can adapt or modify the provided information and fill in the remaining details as needed.
* The customised item will be highlighted in red.
|
Item |
Content |
|---|---|
| Title |
Designing for the Wise
|
| Description |
Designing for the Wise is an interactive course where you’ll discover how to create innovative, user-centered solutions for the elderly. Learn to empathize with the unique challenges the elderly face, apply design thinking processes, and develop practical prototypes that make a real difference. Join us to blend creativity and care as you design a better world for the wise! |
| Key Learning Area(s) |
Science Education, Technology Education |
| Grade Level |
P6 |
| No. of Lesson |
6 |
| Duration per Lesson |
35 |
| Total In-Lesson Time |
210 |
| Contributor Name |
- |
| Contributor Affiliation |
- |
6.2 Exploring with the Learning Design Triangle
Once you have filled out the course information section, you will use the Learning Design Triangle framework to design contextual framework for the entire learning design. Unlike creating a course from scratch, using the course-level pattern provides you with the foundational elements of the LDT, streamlining the design process.
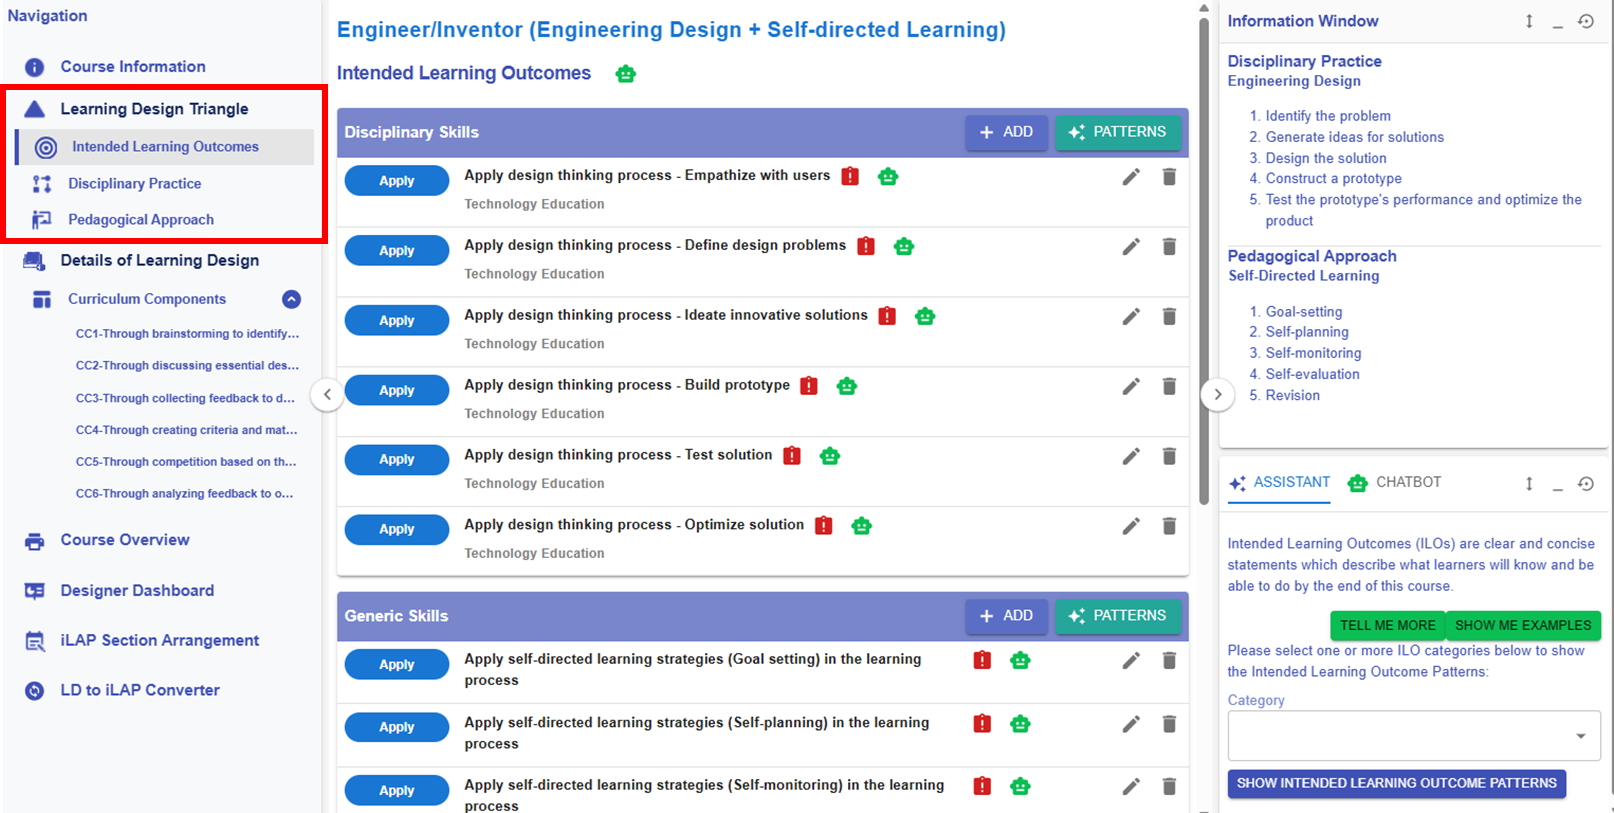
Figure 6.3: Learning Design Triangle Section
6.2.1 Intended Learning Outcomes (ILOs)
The course-level pattern Engineer/Inventor (Engineering Design + Self-directed Learning) has provided some intended learning outcome patterns for you. However, you still need to customise the patterns or add new ILOs to complete your learning design.
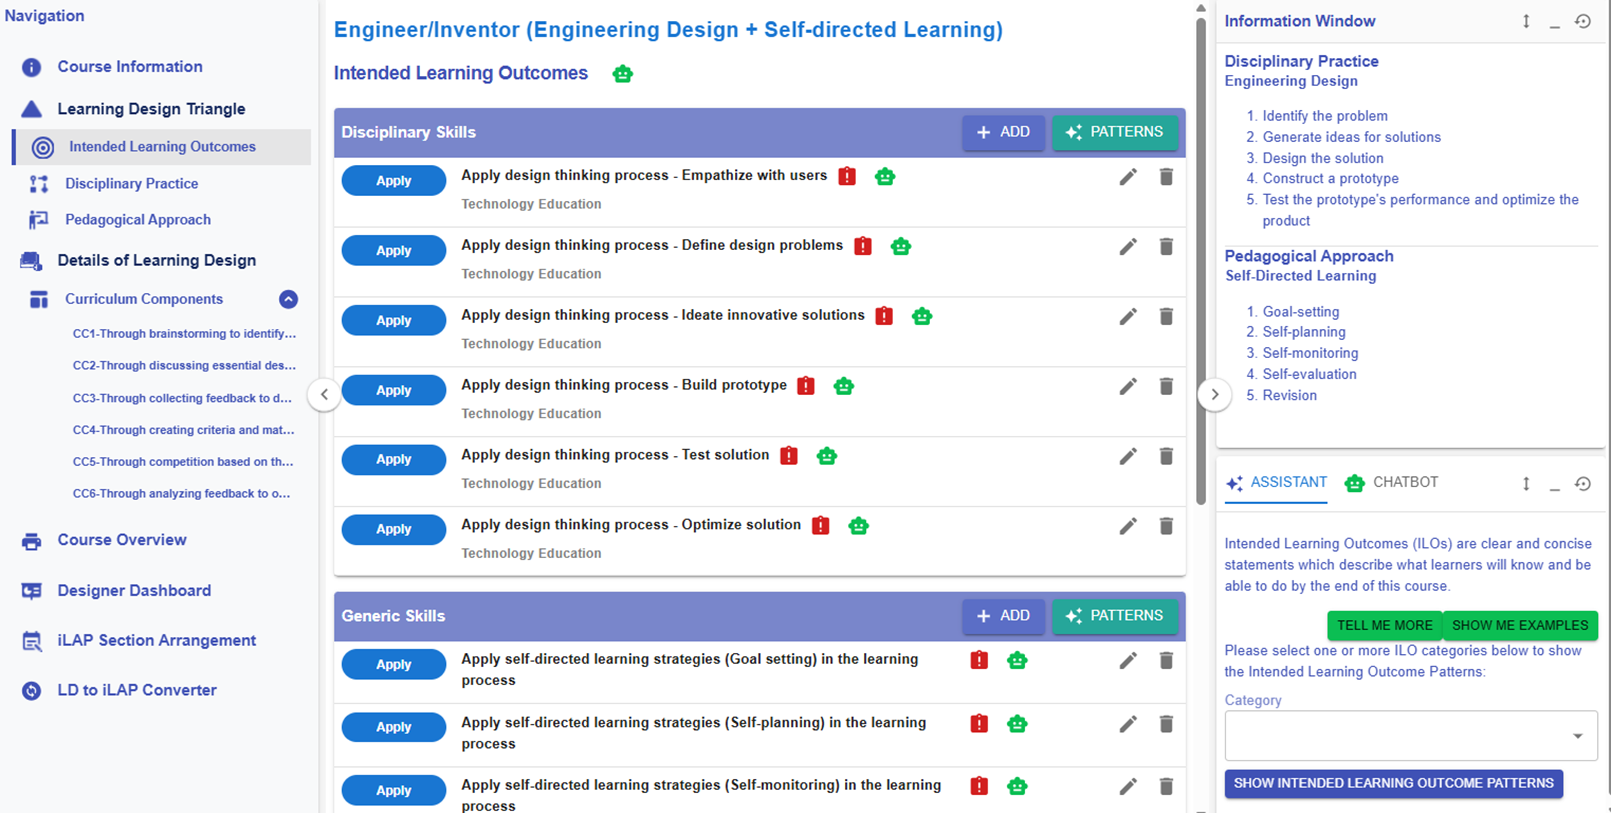
Figure 6.4: Learning Design Triangle Section - Intended Learning Outcomes
For the following part, you will explore how to add the new ILOs to the design.
🌟 For guidance on developing strong ILOs, refer to Chapter 2.2 - Intended Learning Outcomes (ILOs)
In the LDS, there are four categories of Intended Learning Outcomes (ILOs):
- Disciplinary Knowledge: The core concepts, theories, facts, and frameworks that are recognized and developed within a particular field or area of study.
- Disciplinary Skills: The specific techniques, methods, and competencies associated with a particular field or area of study.
- Generic Skills: The broad abilities that help people succeed in education, work, and daily life, regardless of a particular field or area of study.
- Values & Attitudes: The beliefs, principles, and dispositions that guide a person's behavior, decision-making, and interactions with others.
Adding a New ILO
There are two ways to add a new ILO: (1) using the ILO patterns or (2) writing it yourself.
1. Use the ILO Patterns
- You will use our pre-defined pattern to indicate what students is expected to achieve as a result of the learning process.

Figure 6.5: Intended Learning Outcomes - Values & Attitude
- For example, if you want to create an ILO for the Values & Attitude category, we can create one by using the ILO patterns.
 |
 |
|
Figure 6.6: The ILOs Patterns in the LDS Facilitator
Figure 6.7: Details of the Targeted ILO Pattern (1)
|
|
 button to instantly activate the pattern list.

2. Writing it Yourself
- In addition to using patterns, you may write a full ILO yourself.

Figure 6.9: Adding a New ILO
- If you have not added any ILOs before, you can click the
 or
or  button to add a new ILO.

Figure 6.10: Interface of the ILO Builder (1)
- We will review each field in the ILO Builder below.
|
1. Subject/Discipline(s)
Figure 6.11: Interface of the ILO Builder (2)
|
|
2. Category
Figure 6.12: Interface of the ILO Builder (3)
|
|
3. Bloom's Taxonomy Level
Figure 6.13: Interface of the ILO Builder (4)
 Figure 6.14: Writing a ILO with the Learning Design Facilitator
|
|
4. ILO and Learning Design Facilitator
Figure 6.15: Interface of the ILO Builder (5)
Figure 6.16: Writing a ILO with the Chatbot
|
|
5. Sub-ILO(s)
Figure 6.17: Interface of the ILO Builder (6)
|


6.2.2 Disciplinary Practice (DP)
🌟 For guidance on choosing disciplinary practice, refer to Chapter 2.3 - Disciplinary Practice (DP)
The course-level pattern Engineer/Inventor (Engineering Design + Self-directed Learning) has provided the the disciplinary practice details for you.
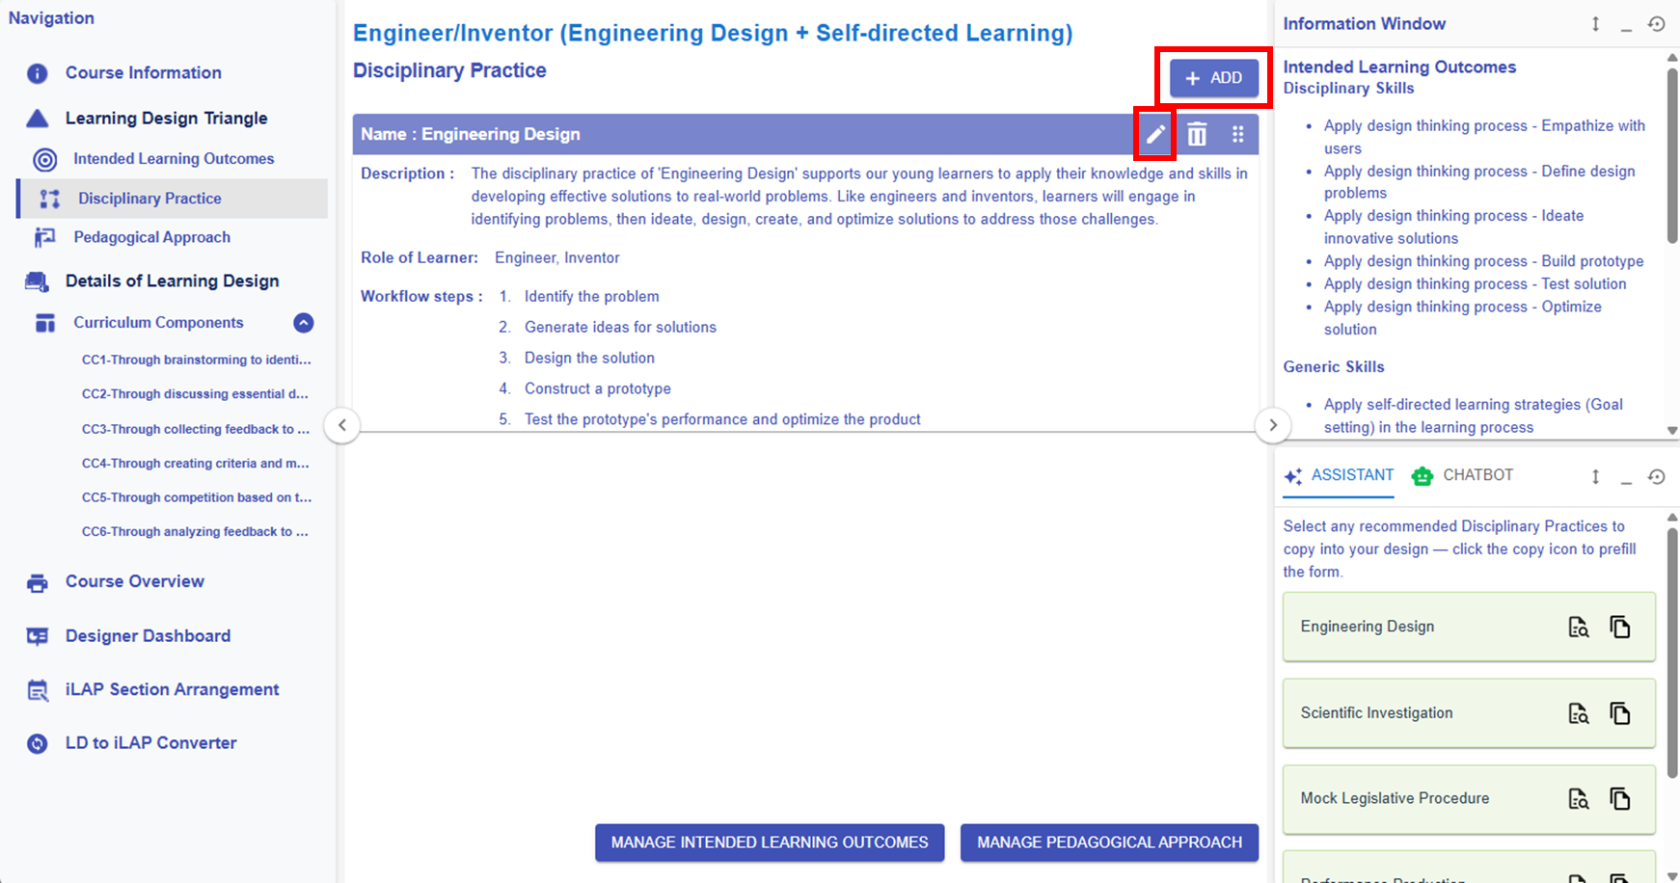
Figure 6.19 Learning Design Triangle Section - Disciplinary Practice
|
1. Editing or Creating a DP
Figure 6.20: Editing/Creating a DP
|
||||
|
2. Learning Design Facilitator
|
||||


6.2.3 Pedagogical Approach
🌟 For guidance on choosing pedagogical approach, refer to Chapter 2.4 - Pedagogical Approach
The course-level pattern Engineer/Inventor (Engineering Design + Self-directed Learning) has provided the the pedagogical approach details for you.
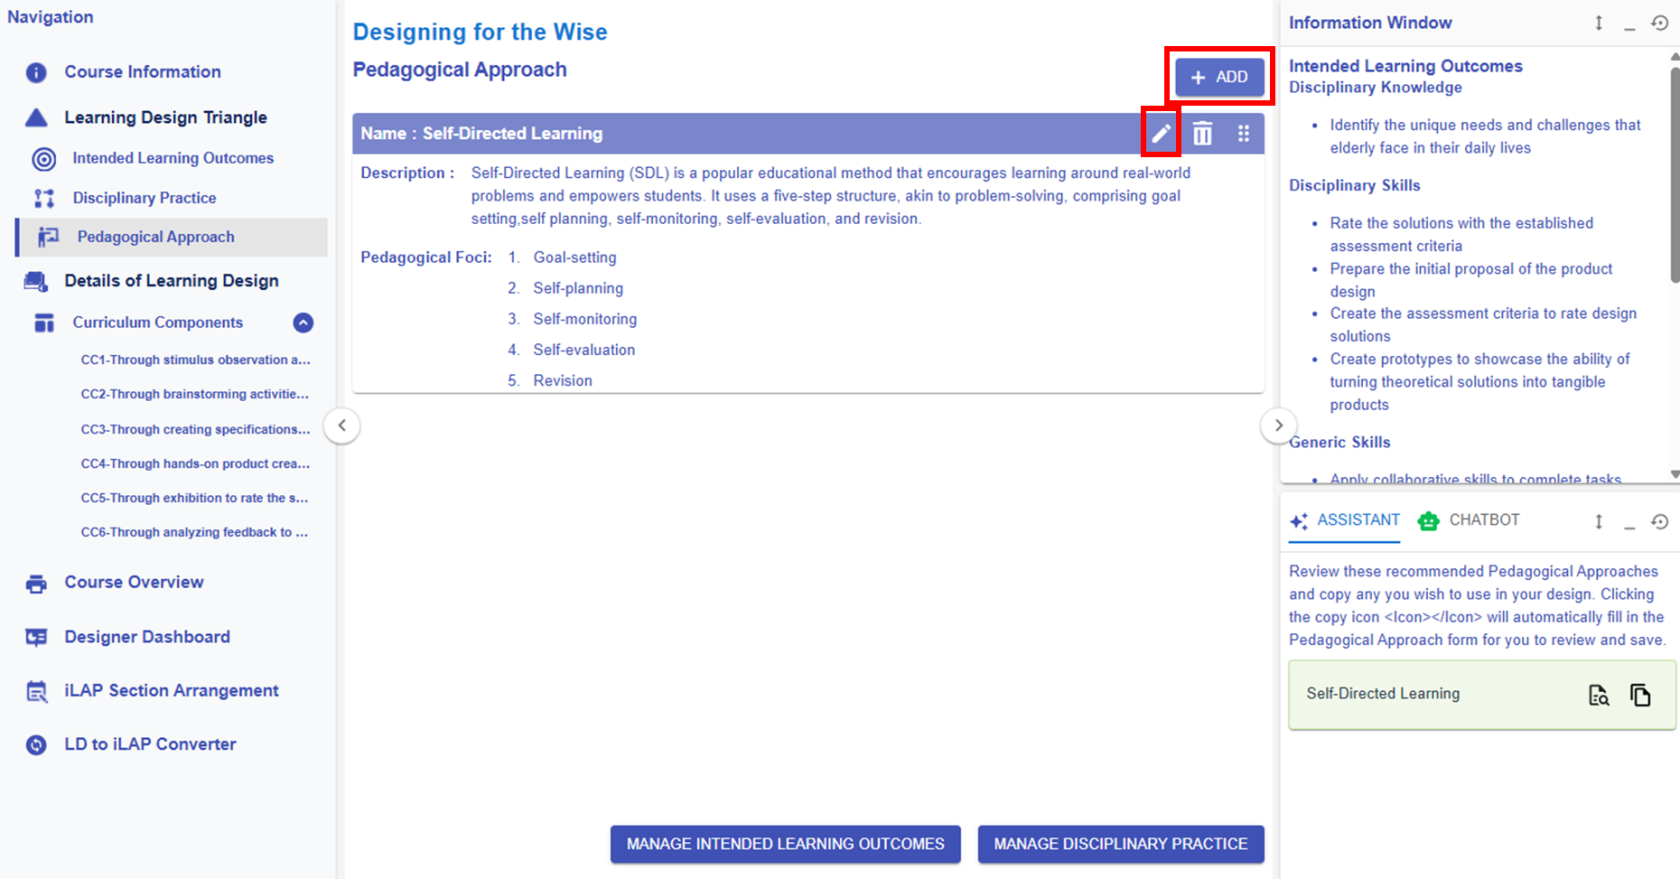
Figure 6.24 Learning Design Triangle Section - Pedagogical Approach
Please see the introduction below on how to interact with the LDS to edit/create the pedagogical approach.
|
1. Editing or Creating a pedagogical approach
Figure 6.25: Editing/Creating the Pedagogical Approach
|
||||
|
2. Learning Design Facilitator
|
 button, you can access the area to modify the pedagogical approach information.


6.3.1 Creating Curriculum Components (CCs) Part 1
After completing the Learning Design Triangle (LDT) to establish the contextual framework for the entire learning design, we will explore how to develop Curriculum Components (CCs) and learning tasks that align with these elements, transforming overarching design concepts into actionable teaching practices. For a detailed theoretical explanation of Curriculum Components (CC), see Chapter 2.5 – Curriculum Component Sequence.
By using a course-level pattern, the Learning Design Studio (LDS) will recommend and assign relevant CC patterns and the task patterns for you. Next, we’ll take a closer look at how they work.
Reviewing and Revising the Existing CCs
1. How to Name a CC?
💡Formula of naming a CC
Through the 1) focal task(s) to 2) achieve the intended learning outcome to 3) implement the workflow step(s) of a disciplinary practice for 4) applying the focus or foci of the pedagogical approach.
- Below are the 6 CC patterns provided by the course-level pattern.
- Through 1) brainstorming to 3) identify problem for 4) goal-setting
- Through 1) discussing essential design elements to 3) ideate solution for 4) self-planning
- Through 1) collecting feedback to 3) design solution for 4) self-planning
- Through 1) creating criteria and material lists to 3) construct prototype for 4) self-monitoring
- Through 1) competition based on the rubrics to 3) test performance of the product for 4) self-evaluation
- Through 1) analyzing feedback to 3) optimize the product for 4) revision
- We recommend adding an intended learning outcome to the title of the CC to specify what you aim to achieve in that particular CC.
- For example,
- Through 1) brainstorming to 2) identify the unique needs and challenges of the elderly to 3) identify problem for 4) goal-setting
- Through 1) brainstorming to 2) identify the unique needs and challenges of the elderly to 3) identify problem for 4) goal-setting
6.3.2 Creating Curriculum Components (CCs) Part 2
Reviewing and Revising the Existing CCs
2. Reviewing the CC Patterns and Task Patterns
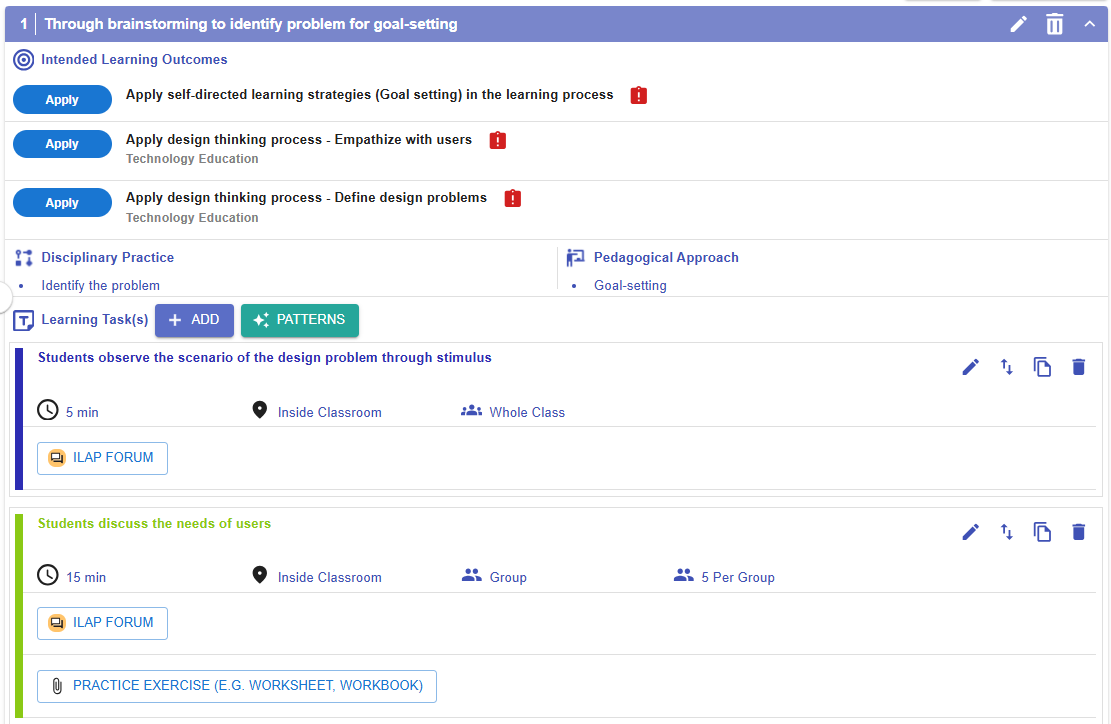
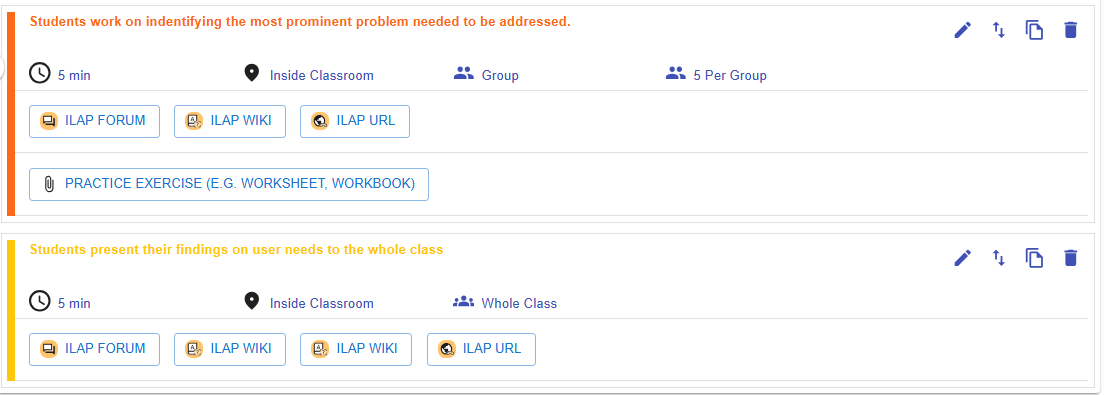
Figure 6.29: Example of a CC Pattern
| Name | Through brainstorming to identify problem for goal-setting |
| Intended Learning Outcomes |
|
|
Disciplinary Practice / Pedagogical Approach
|
Identify problem / Goal-setting |
| Learning Task(s) |
|
- This CC pattern has already provided the backbone of a CC. We now need to modify it to fit our own design by following below steps:
-
- Update the name of the CC to include the key intended learning outcome: "Identify the unique needs and challenges of the elderly".
- Link the intended learning outcomes "Identify the unique needs and challenges of the elderly" to the CC.
- Edit and Add the learning task(s) to fit the design.
- Update the name of the CC to include the key intended learning outcome: "Identify the unique needs and challenges of the elderly".
2.1 Editing a CC

Figure 6.30: Editing a CC
- By clicking the
 button, you can open the CC builder to update the CC details. Please refer to the introduction below for guidance on updating a CC.
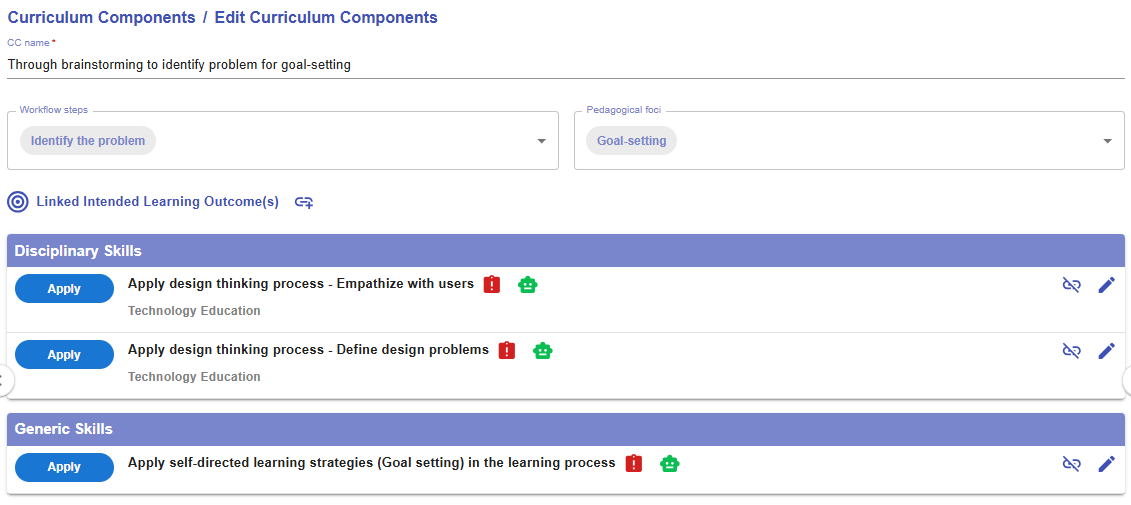 Figure 6.31: The Interface of CC Builder
|
1. CC Name
|
|
2. Workflow steps
Figure 6.32: The Workflow Steps of Engineering Design
|
|
3. Pedagogical foci
Figure 6.33: The Pedagogical Foci of Self-directed Learning
|
|
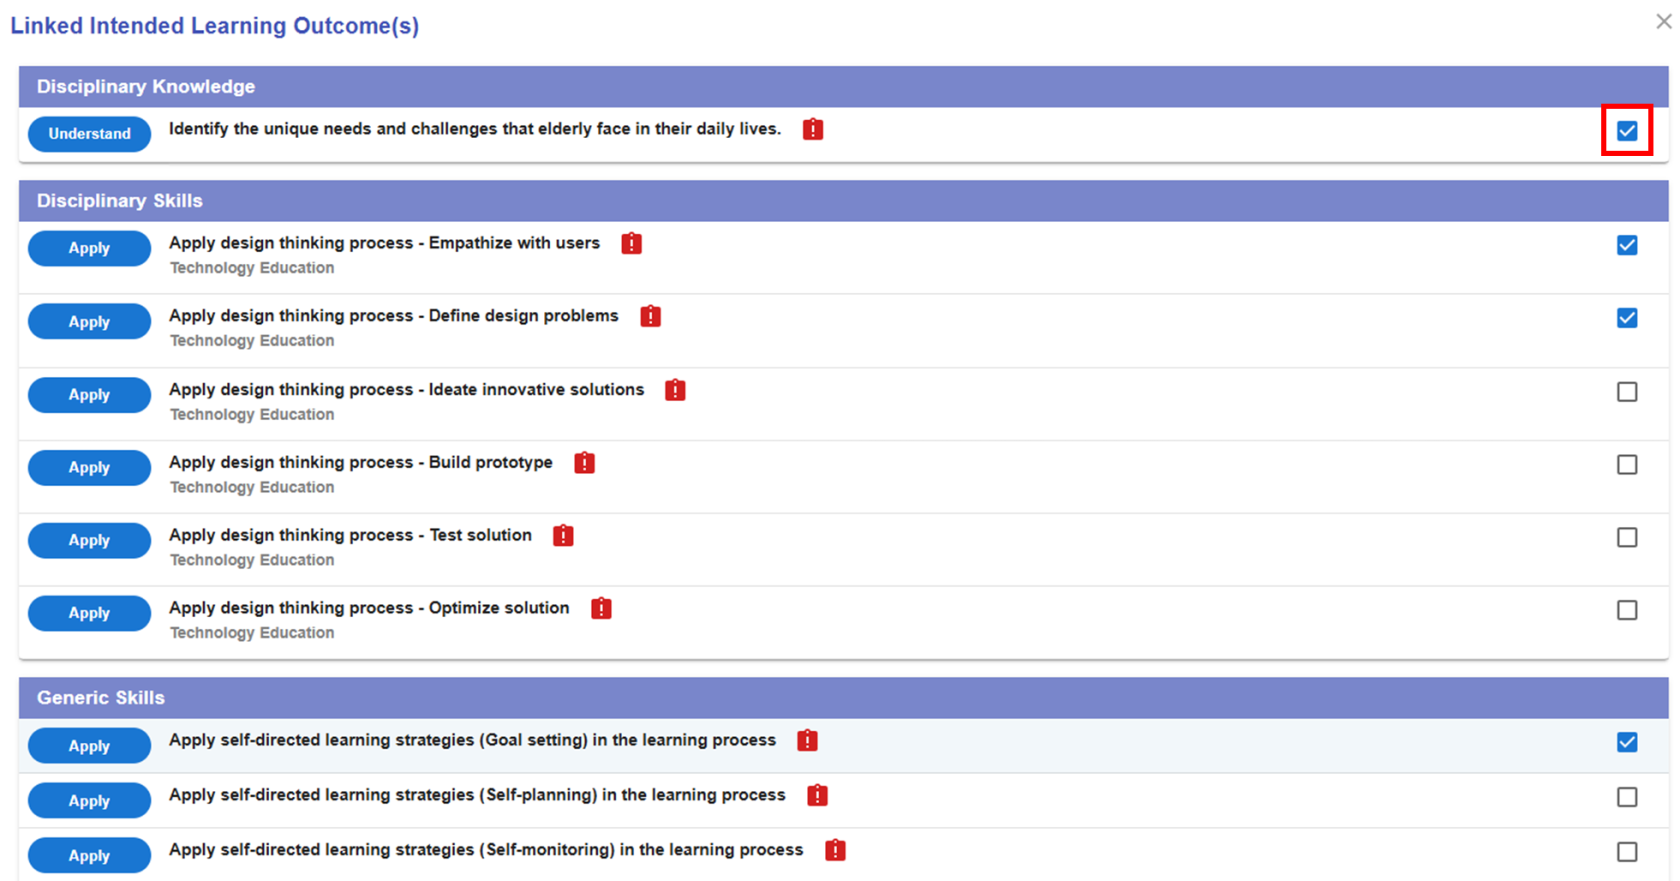
4. Linked Intended Learning Outcomes (ILOs)
4.1. The Link Button
4.2 Selecting the Appropriate ILOs
Figure 6.35: Linking the ILOs to a CC (2)
4.3 The Alert Icon and Complete Icon
Figure 6.36: Unassessed ILOs in a CC
4.4 The Unlink Button
Figure 6.37: Dissociating the ILOs from the CC
|


2.2 Updating the Tasks
- You can either add or edit tasks to fit your needs. There are two ways to add a new task: one is by 1) adding a new task from scratch, and the other is by 2) using task patterns. In this section, we will focus on how to use a task pattern to create a task.

Figure 6.38: Adding a New Task with Task Patterns (1)
|
|
|


Figure 6.39: Adding a New Task with Task Patterns (2)
- By clicking the
 button, you can view a list of task patterns provided by the Learning Design Facilitator. These suggestions are based on your selected workflow step(s) from the disciplinary practice and the selected pedagogical foci from the pedagogical approach.
 - By clicking the
 button, you can explore the details of the targeted task pattern.
 - You can use the targeted task pattern directly by clicking "COPY" button in the pop-up window, or by clicking the
 button in the LDS Facilitator. The task pattern details will be auto-filled into the LDS.
 Figure 6.40: A Newly Added Task Using Task Pattern
- The newly added task will appear at the bottom of the CC. You can click the
 button to edit the task details. We will use this example to explore the task builder.
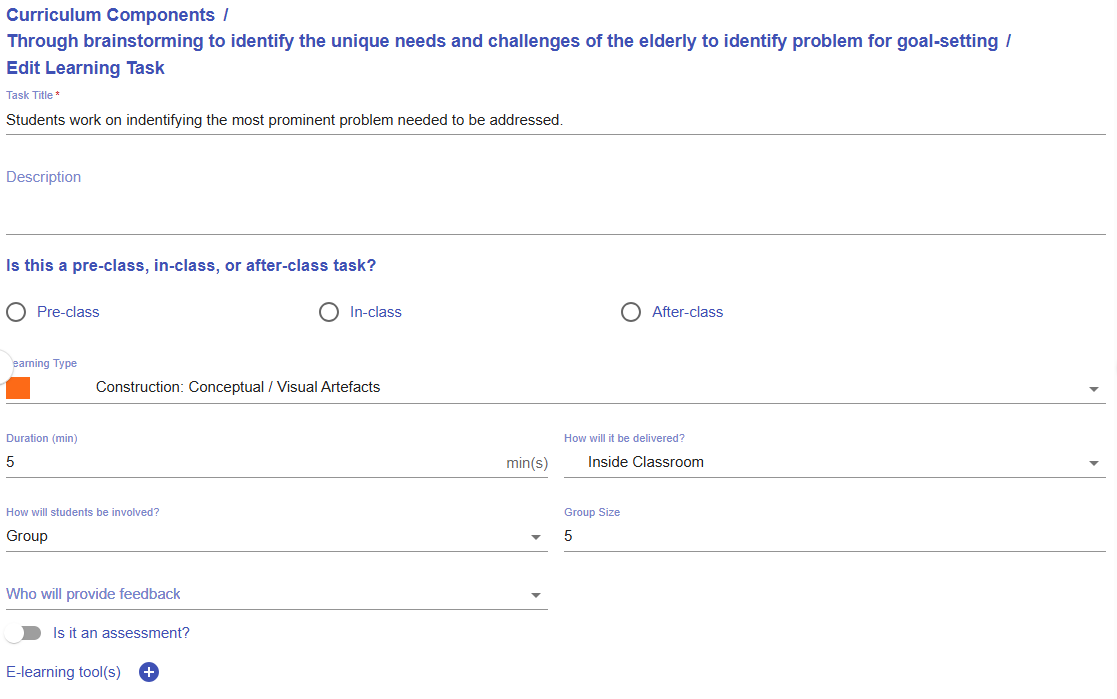
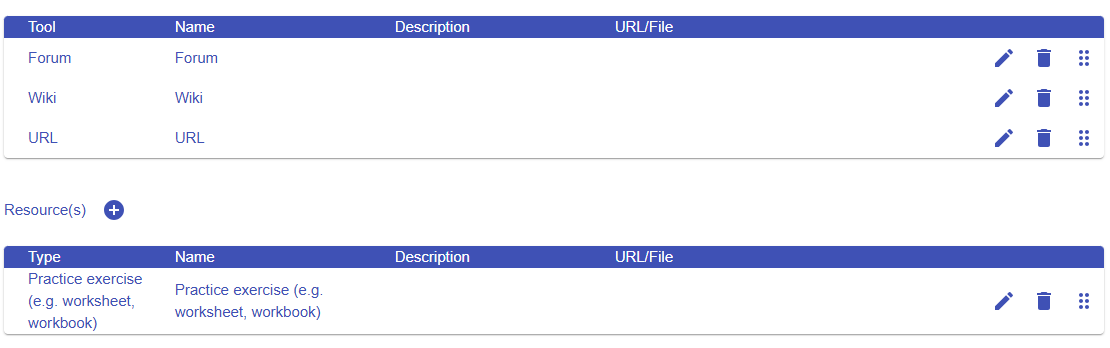
Figure 6.41: Interface of the Task Builder
- Please read the introduction below to guide you in setting up a task.
|
Item |
Example |
|---|---|
|
1. Task Information
Figure 6.42: Task Information |
Task title: Students work on identifying the most prominent problem needed to be addressed.
Description:
You may update the task information to make it more meaningful for the learning design.
Students work on identifying the most prominent problem faced by the elderly that needs to be addressed.
Description: Students will analyse the needs of the elderly based on the previous brainstorming learning tasks. |
|
2. Stage
Figure 6.43: Stage |
Select In-class |
|
3. Task Type
Figure 6.44: Task Type
|
Construction: Conceptual / Visual Artefacts |
|
4. Duration
Figure 6.45: Duration |
Update to an appropriate duration, such as 30 minutes.
|
|
5. Delivery Mode
Figure 6.46: Delivery Mode |
Inside Classroom |
|
6. Social Organization
Figure 6.47: Social Organization |
Group, Size: 5 |
|
7. Feedback Provider
Figure 6.48: Feedback Provider |
Select Teacher |
|
8. Assessment
Figure 6.49: Triggering the Assessment Option in a Task |
A learning task can also serve as an assessment.
If you select the assessment option, you will need to
|
|
9. E-learning Tool
Figure 6.50: Interface for Adding E-learning Tool(s) to a Task |
The e-learning tools section allows you to select the type of tool you want to use to implement the task.
For example, to encourage idea sharing in class, you can use the Forum tool.
You can remove the suggested e-learning tools that are not appropriate for your use. |
|
10. Resources
Figure 6.51: Interface for Adding Resource(s) to a Task |
The resource section allows you to select the type of resource or tool you want to use to support the learning process.
For example, you can upload rubrics for grading the assessment.
You can remove the suggested resources that are not appropriate for your use.
|


Figure 6.52: Preview of the Updated Task
-
You can see that the updates have taken effect in the task preview.

Figure 6.53: Preview of the CC
- The LDS will remind you to assign assessments to any unassessed learning outcomes within the CC.
- After an assessment is assigned to a specific learning outcome, the alert icon
 will change to complete icon
  .
. - Please remember to ensure that all linked intended learning outcomes are assessed in each curriculum component.
2.3 Moving a Task

Figure 6.54: Moving a Task (1)
- By clicking the
 button, you will see a list of tasks for each CC.

Figure 6.55: Moving a Task (2)
-
You can click any of the tasks to reallocate the current task to a position after it.
6.3.3 Creating Curriculum Components (CCs) Part 3
Reviewing and Revising the Existing CCs
3. Creating a New CC from CC Patterns
|
|
|
| Figure 6.56: Adding a New CC from the CC Patterns (1) | |


- Since this learning design focuses on creating a product for the elderly, your colleague may argue that brainstorming alone is insufficient. They might recommend adding an interview section to foster a user-centered mindset. In this case, CC Patterns can offer a quick and practical solution.
-
To retrieve the task pattern related to conducting client interviews, you can select "Identify problem" for the workflow steps and "Goal-setting" for the pedagogical focus in the Learning Design Facilitator. It will then recommend relevant task patterns for you. You can click the
button to explore the details of the task pattern "Interviewing client for goal-setting".
Figure 6.57: Adding a New CC from the CC Patterns (2)
- You can use the targeted CC pattern directly by clicking "COPY" button in the pop-up window, or by clicking the button in the Learning Design Facilitator. The CC pattern details will be auto-filled into the LDS.
-
Please refer to the instructions under 2. Reviewing the CC Patterns and Task Patterns to update your newly created CC.
* You can continue adding more tasks to complete your Curriculum Component (CC), and add additional CCs to finalize your course design by repeating the steps mentioned above.
Additional: Information Window, and Header
- There is some additional information to help you analyse the learning design.
|
Item |
Description |
Example |
|---|---|---|
| 1. Information Window |
Figure 6.58: Information Window in the CC Section |
In the CC section, the information window will visualise your overall CC design with the pie chart
|
| 2. Header |
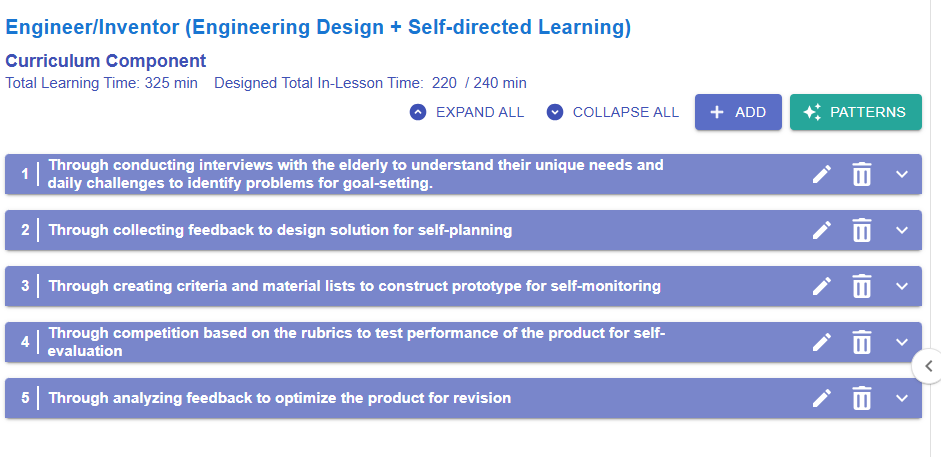
Figure 6.59: Example of a Curriculum Component Sequence
Total Learning Time: 325 min
Designed Total In-Lesson Time: 220 / 240 min
Expand all
Collapse all
|
|