|  [Visit the Website](https://www.cite.hku.hk/) | #### **Overview** **The Centre for Information Technology in Education (CITE)** was established in June 1998 to provide intellectual leadership and support to promote the use of information and communication technology (ICT) for quality education in Hong Kong. CITE supports several quality academic programmes coordinated by the Faculty of Education. These programmes are offered to teachers, educators ,and education-related professionals to meet their increasing needs and interests in further pursuing their studies. It is hoped that these professionals can be equipped with necessary academic and professional knowledge about IT in education. In addition, the Centre provides in-service professional development training to teachers and principals in the use of IT in teaching and learning. Besides, CITE is also committed to providing consultancy services to the community on various aspects of the development of the educational use of IT. The goal is to establish close connections with the education, technology ,and business sectors of the community at large. |
| [](https://ideals-doc.cite.hku.hk/uploads/images/gallery/2025-08/scaled-1680-/ZfQimage.png) | **Learning Design Studio (LDS)** is a pedagogically grounded productivity and collaboration platform for professionals in the Learning Design (LD), Learning Analytics (LA), and Education communities (particularly those interested in using LD to support Teacher Inquiry of Student Learning (TISL)). The platform provides users with easy-to-use learning design patterns for various subjects, supplemented by guidance on setting learning outcomes, curriculum components and visual analysis on learning design. |
| [](https://ideals-doc.cite.hku.hk/uploads/images/gallery/2025-08/scaled-1680-/QLjpicture3.png) | **Interactive Learning and Assessment Platform (iLAP)** serves as a versatile learning management system that can be accessed by both teachers and students. The LDS and the iLAP are interconnected, enabling the selected tools in the LDS to be conveniently transferred into usable tools on the iLAP, which then collect student learning data for learning analysis. |
| **Feature** | **Description** | **Example** |
|---|---|---|
| Student-centred | Describe what learners will achieve, not what the teacher will teach. | ❌ The teacher will introduce the main stages of the water cycle. ✅ Explain the main stages of the water cycle. |
| Measurable | Specify outcomes that can be observed and assessed. | ❌ Write a good essay. ✅ Write a persuasive essay with a clear thesis and supporting arguments. |
| Specific | Clearly define the knowledge, skills, values, or attitudes that learners are expected to achieve. | ❌ Understand the history of World War II. ✅ Identify the key causes of World War II. |
| Appropriate difficulty | Achievable but challenging for most target learners. | ❌Provide a summary of all the main arguments discussed in the debate. ✅ Summarize two key arguments presented during the debate. |
| **Category** | **Description** | **Example** |
|---|---|---|
| Disciplinary Knowledge | The core concepts, theories, facts, and frameworks that are recognized and developed within a particular field or area of study. | Identify the simple past tense as verbs for past events. |
| Disciplinary Skills | The specific techniques, methods, and competencies associated with a particular field or area of study. | Construct sentences about yesterday’s activities using the simple past tense. |
| Generic Skills | The broad abilities that help people succeed in education, work, and daily life, regardless of a particular field or area of study. | Apply effective communication strategies to share ideas with others. |
| Values and Attitudes | The beliefs, principles, and dispositions that guide a person's behavior, decision-making, and interactions with others. | Demonstrate openness by considering new perspectives and adapting to challenges. |
| **Bloom's Level** | **Example of ILOs** |
|---|---|
| **1. Remember - Recall facts** | List the main stages of the water cycle. |
| **2. Understand - Explain ideas** | Describe how water moves through each stage of the water cycle. |
| **3. Apply - Use knowledge in new situations** | Illustrate the water cycle by matching real-life weather events to each stage. |
| **4. Analyze - Draw connections among ideas** | Compare the processes of the water cycle in different climates and environments. |
| **5. Evaluate - Make judgments** | Evaluate the effects of pollution on the water cycle. |
| **6. Create - Produce original work** | Design a simple model to demonstrate the water cycle. |
| **Disciplinary Practice** | **Role of Learner** | **Details** |
|---|---|---|
| Engineering Design | Engineer, Inventor | **Description** The disciplinary practice of 'Engineering Design' supports our young learners to apply their knowledge and skills in developing effective solutions to real-world problems. Like engineers and inventors, learners will engage in identifying problems, then ideate, design, create, and optimize solutions to address those challenges. **Workflow steps** 1. Identify the problem 2. Generate ideas for solutions 3. Design the solution 4. Construct a prototype 5. Test the prototype's performance and optimize the product |
| Writing a News Report | Journalist | **Description** The disciplinary practice of ‘Writing a News Report’ supports our young learners in engaging with the inquiry-based process of writing. Like journalists, learners must collect and verify information, organize their findings logically, and write in an objective and impartial tone to create a timely, factual, and engaging report that helps audiences understand current events and issues. **Workflow steps** 1. Identify the writing purpose, target audience, and key features of a news report 2. Research, collect and organize information for the news report 3. Draft the news report and fact-check the content 4. Conduct peer and self assessment 5. Revise and publish the news report |
| Mock Legislative Procedure | Legislator | **Description** The disciplinary practice of 'Mock Legislative Procedure' supports our young learners in collaboratively drafting legislation that addresses specific issues. Like legislators, learners engage in researching background information, analyzing the interests and impacts of various parties, and drafting legislative proposals. Through constructive collaboration, they work to reach consensus and develop legislation that incorporates ideas from different stakeholders. **Workflow steps** 1. Identify aims through exploration: gather background information, understand the functions of the role, and clarify the purposes of the council meeting 2. Research as an expert: search for information and focus on deepening understanding 3. Prepare and share the first draft for mutual understanding, evaluation, and revision: propose measures suggested by stakeholders' representatives 4. Conduct constructive and rational discussions to reach consensus 5. Reach consensus and produce a collaborative output |
| Performance Production | Performer, Entertainer | **Description** The disciplinary practice of 'Performance Production' supports our young learners in transforming literature into engaging performances. Like performers and entertainers, learners will engage in reading and analyzing literature, developing scripts, collaborating in rehearsals, and performing for audiences to produce a compelling and expressive performance that effectively communicates the themes and messages of the literature. **Workflow steps** 1. Determine the script 2. Prepare for the show 3. Rehearse 4. Perform the show 5. Receive audience feedback |
| Scientific Investigation | Scientist | **Description** The disciplinary practice of 'Scientific Investigation' supports our young learners in exploring the natural world and developing evidence-based explanations. Like scientists, learners will engage in formulating inquiry questions, proposing hypotheses, designing and conducting experiments, and using logical reasoning to draw informed conclusions that deepen their understanding of scientific phenomena and processes. **Workflow steps** 1. Formulate an inquiry question 2. Research and propose a hypothesis 3. Design an experiment 4. Conduct the experiment 5. Analyse data and interpret results |
| **** Figure 2.3: Self-directed Learning (SDL) | **Self-Directed Learning (SDL)** is recognized as an important approach for developing life and career skills that prepare students for further education and the workforce. SDL has two key characteristics: **Personal Responsibility:** - Students are expected to take ownership of their learning. This means they set their own learning goals and accept responsibility for their thoughts and actions. - They make decisions about what and how to learn, maintaining control over many aspects of their learning process. **Social Interaction:** - Even though SDL focuses on personal responsibility, learning typically happens in a social setting. - Students interact with teachers and other learners, which can enhance understanding and spark further interest in the subject. - SDL involves negotiation between the teacher and learners about learning goals, methods, activities, and assessments. - This dynamic teaching-learning process empowers students to take charge of their own learning while collaboratively engaging with teachers and peers to achieve deeper understanding and meaningful outcomes. |
| **SDL Components** | **Description** |
|---|---|
| **1. Goal-setting** | - Students identify own learning goals and learning activities. |
| **2. Self-planning** | - Students regulate and plan the detailed decisions and arrangements related to their own learning, such as creating a schedule outline and planning tasks. |
| **3. Self-monitoring** | - Students self‐manage their own time. - Students monitor own their own repertoire of learning strategies. - Students adjust their own learning pathway as they progress. |
| **4. Self-evaluation** | - Students are aware of the assessment criteria. - Students critically evaluate their work according to the set criteria. |
| **5. Revision** | - Students revise their work based on the feedback received from their teachers or peers at various stages. - Students reflect on their own learning and apply what they have learnt to new contexts. |
| CC Name | A CC name is formed by combining four components. 1. **Focal task(s)**: Observation and discussion tasks 2. **Main intended learning outcome**: Discover possible factors that affect the rate of photosynthesis 3. **Workflow step(s) of a disciplinary practice**: Formulate an inquiry question 4. **Focus or foci of the pedagogical approach**: Goal-setting E.g. **Through observation and discussion tasks to** **discover possible factors that affect the rate of photosynthesis** **to formulate an inquiry question** **for goal-setting** | ||||||||||
| Linked Intended Learning Outcomes | - ILO1: Understand factors affecting the rate of photosynthesis - ILO2: Understand the mechanism of of photosynthesis - ILO3: Apply the process of scientific investigation to construct scientific knowledge | ||||||||||
| Workflow Step of Disciplinary Practice | Scientific Investigation-Formulate an inquiry question | ||||||||||
| Pedagogical Focus | Self-directed Learning - Goal-setting | ||||||||||
| Learning Tasks | \* *Each task type has a representative color.*
|
| CC Name | A CC name is formed by combining four components. 1. **Focal task(s)**: Preparing problem identification reports with the help of AI 2. **Main intended learning outcome**: Understand the United Nations Sustainable Development Goals (SDGs) 3. **Workflow step(s) of a disciplinary practice**: Identify the problem to be addressed by the new product 4. **Focus or foci of the pedagogical approach**: Goal-setting E.g. **Through preparing problem identification reports with the help of AI ****to understand the Sustainable Development Goals (SDGs),** **and to identify the problem to be addressed by the new product** **for goal-setting** | ||||||||||||||||
| Linked Intended Learning Outcomes | - ILO 1: Understand key features of expository writing and different expository techniques - ILO 2: Understand the United Nations Sustainable Development Goals (SDGs) - ILO 3: Apply different expository techniques in writing and speaking (e.g. presentation and pitching) to enhance communication | ||||||||||||||||
| Workflow Step of Disciplinary Practice | Engineering Design-Identify the problem | ||||||||||||||||
| Pedagogical Focus | Self-directed Learning - Goal-setting | ||||||||||||||||
| Learning Tasks | \* *Each task type has a representative color.*
|
| **Directed Learning** | ||
| **Receiving & Interpreting Information **Students undertake prescribed activities to acquire information and develop an understanding of a topic. STEAM Subject: - Watching a video on photosynthesis - Reading a textbook chapter about photosynthesis Language Subject: - Reading a news report - Watching a micro movie **** | ||
| **Practice** Students work through prescribed tasks to apply learnt content/ skills. STEAM Subject: - Labelling the parts of a plant cell with flash cards - Completing the questions about photosynthesis in the H5P interactive video Language Subject: - Practicing pronunciation of new vocabularies in pairs - Writing sentences using newly learned past tense verbs | ||
| **Test / Assessment** Students take part in assessment activities. STEAM Subject: - Completing a lab report - Taking a quiz on photosynthesis Language Subject: - Analysing an article and respond to questions about its content - Having a spelling test on the week's vocabularies | ||
| **Exploratory Learning** | ||
| **Information Exploration **Students seek out and gather existing information from various sources to deepen their understanding of a topic. STEAM Subject: - Asking an AI chatbot for information about the rate of photosynthesis - Benchmarking existing thermal bags online to inform a new design Language Subject: - Researching common vocabulary in news reports online - Using AI tools to analyze the tone and style of a news report | ||
| **Explorations through Conversation** Students engage in exploration of issues with others through conversations. STEAM Subject: - Interviewing clients to identify product needs - Discussing variables for a fair photosynthesis experiment Language Subject: - Interviewing stakeholders about community issues - Discussing findings from the interview script | ||
| **Tangible / Immersive Investigation** Students conduct hands-on investigations in physical or virtual settings, generating new data through experiments, surveys, or direct observation. STEAM Subject: - Conducting an experiment to collect data on the rate of photosynthesis - Playing with simple circuits to explore electricity flow Language Subject: - Exploring a virtual museum with VR to learn about history and related vocabulary - Visiting the supermarket to learn vocabulary related to daily life | ||
| **Productive Learning** | ||
| **Construction: Conceptual / Visual Artefacts **Students work individually or together to construct a conceptual, visual artifact. STEAM Subject: - Creating a mind map on photosynthesis using information from the internet - Designing an experiment plan Language Subject: - Creating the writing outline of the news report - Using AI to develop evaluation criteria for a news report | ||
| **Construction: Tangible / Manipulable Artefacts ** Students work individually or together to construct a tangible, manipulable artifact. STEAM Subject: - Building a prototype of a thermal bag - Building a digital thermometer with a micro:bit. Language Subject: - Writing a news report based on an outline - Creating a storybook using generative AI | ||
| **Presentation, Performance and Illustration ** Students present, illustrate or perform individually or in group. STEAM Subject: - Presenting scientific findings from experiments - Displaying a thermal bag prototype in a competition Language Subject: - Presenting a news report - Screening a post-edited micro movie | ||
| **Reflective Learning** | ||
| **Reflection **Students engage in reflecting on the learning process & experience and making the thoughts explicit. STEAM Subject: - Reflecting on the previous scientific investigation process and identifying its shortcomings - Writing a journal entry about challenges faced during the prototype development Language Subject: - Reflecting on the pros and cons of using AI to create a storyboard for a micro movie - Writing a reflection on the process of composing a news report | ||
| **Revision **Students are given an opportunity to re-submit a piece of work, hence giving them a chance to reflect and improve. STEAM Subject: - Revising the thermal bag prototype - Revising the experimental plan for a scientific investigation Language Subject: - Revising the content of a news report - Revising the script of a micro movie before final filming | ||
| **Self- / Peer- assessment **Students engage in peer- and/ or self- assessment (using self-generated or teacher-provided rubric) STEAM Subject: - Using well-designed criteria to self- and peer-assess prototypes of thermal bags - Using well-designed criteria to self- and peer-assess experimental plans for scientific investigations Language Subject: - Using well-designed criteria to self- and peer-assess news reports - Using well-designed criteria to self- and peer-assess storyboards for micro movies | ||
| **Item** | **Description** | **Tutorial** |
|---|---|---|
| 1. Languages | The LDS currently supports English, Traditional Chinese, and Simplified Chinese. | N/A |
| 2. User Guide | A simple navigation to the LDS. | N/A |
| 3. My Library | You can access and manage your learning designs in one place. Create new designs, edit existing ones, and easily view designs shared with you by others. | Ch 4-9 |
| 4. Groups | You can create groups for your school or organization, invite members to join, and collaboratively share and co-create learning designs. | Ch 10 |
| 5. Notifications | You will receive a notification when there are important updates or invitations from the group. | N/A |
| 6. Profile | You can update your email address and display name in the LDS. | N/A |
| [](https://ideals-doc.cite.hku.hk/uploads/images/gallery/2026-07/RYZimage.png) | [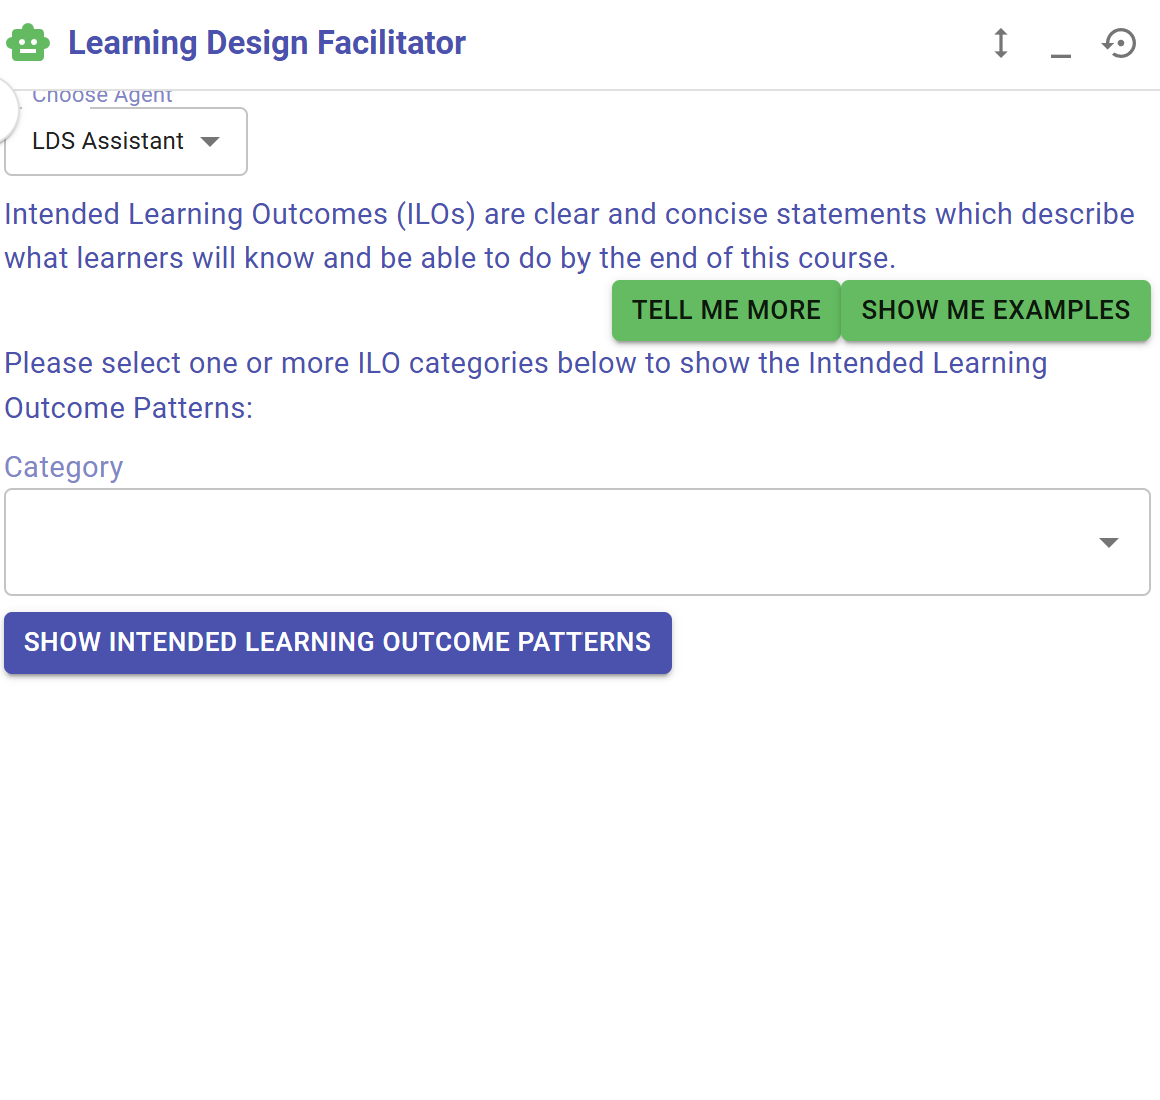](https://ideals-doc.cite.hku.hk/uploads/images/gallery/2026-07/klTimage.png) |
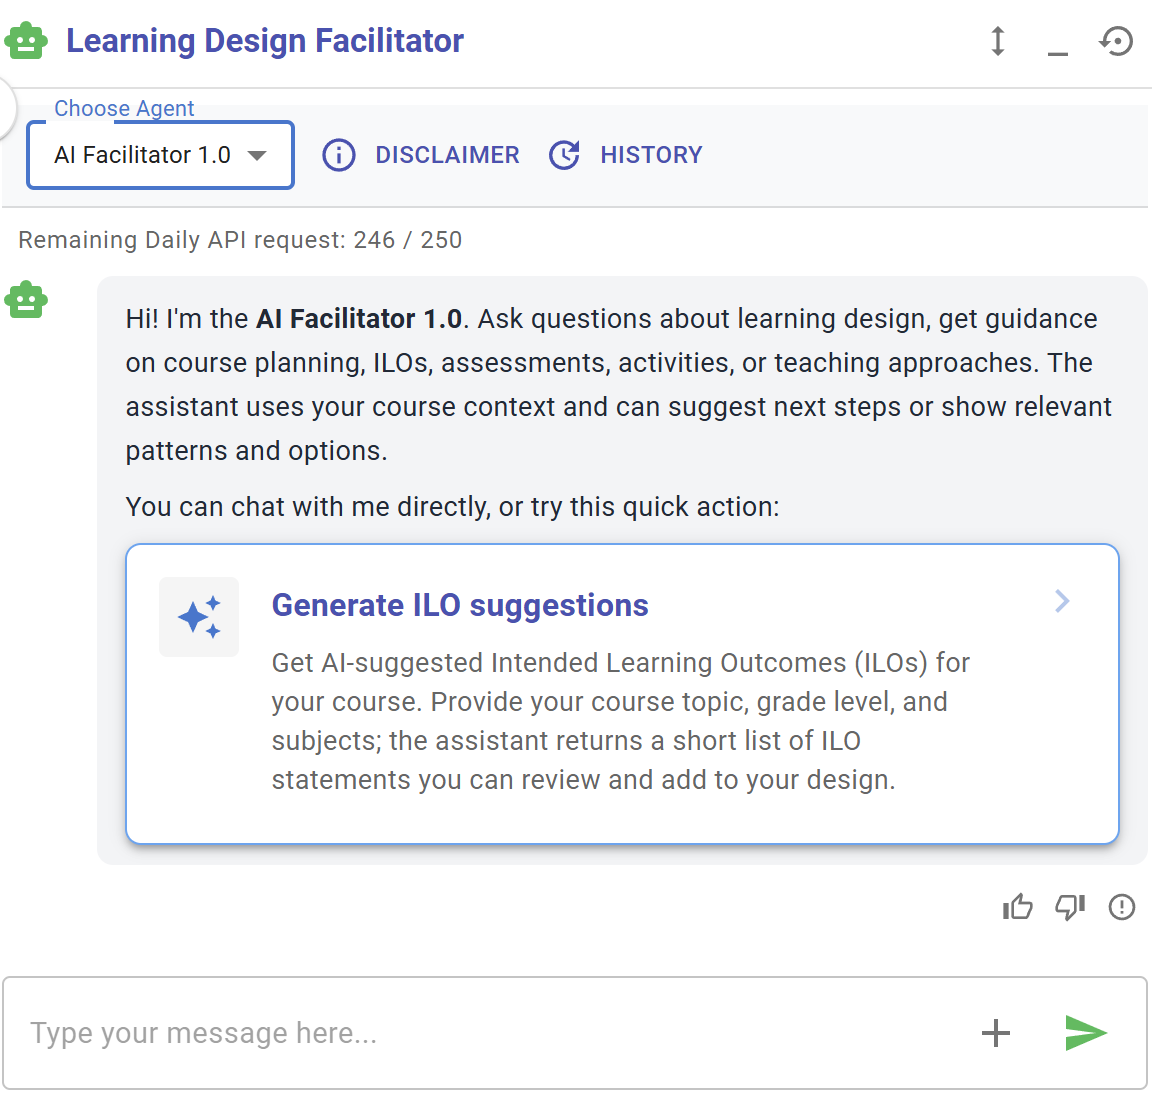
| Figure 3.6: Interface of AI Facilitator | Figure 3.7: Interface of LDS Assistant |
| [](https://ideals-doc.cite.hku.hk/uploads/images/gallery/2026-07/ZHfimage.png) | [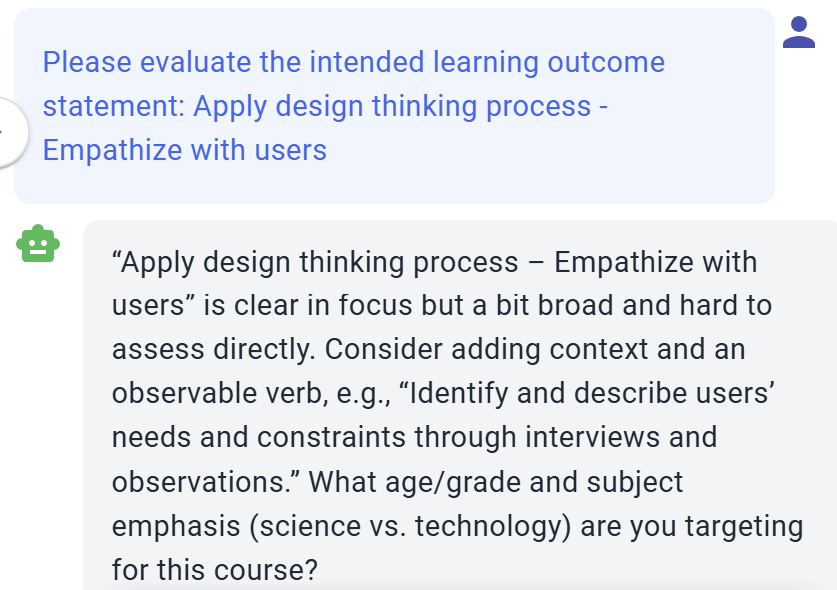](https://ideals-doc.cite.hku.hk/uploads/images/gallery/2026-07/AVximage.png) |
| Figure 3.13: Access to Learning Design Facilitator Sometimes, you may see the  button in different locations, such as next to the Intended Learning Outcomes. Please feel free to click on it to request feedback . | |
| [](https://ideals-doc.cite.hku.hk/uploads/images/gallery/2026-07/VtIimage.png) |
| Figure 3.17: Curriculum Component Patterns |
| [](https://ideals-doc.cite.hku.hk/uploads/images/gallery/2026-07/suLimage.png) |
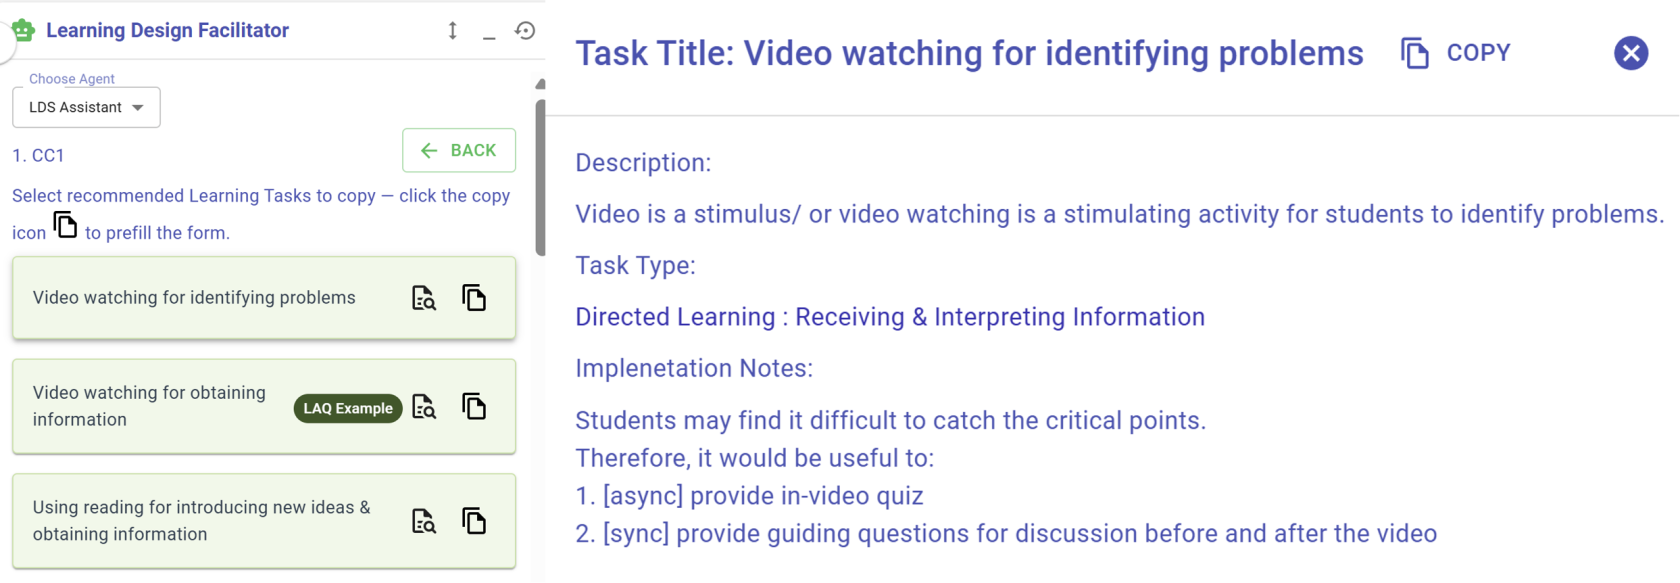
| Figure 3.18: Task Patterns |
| [](https://ideals-doc.cite.hku.hk/uploads/images/gallery/2026-07/vWXimage.png) |
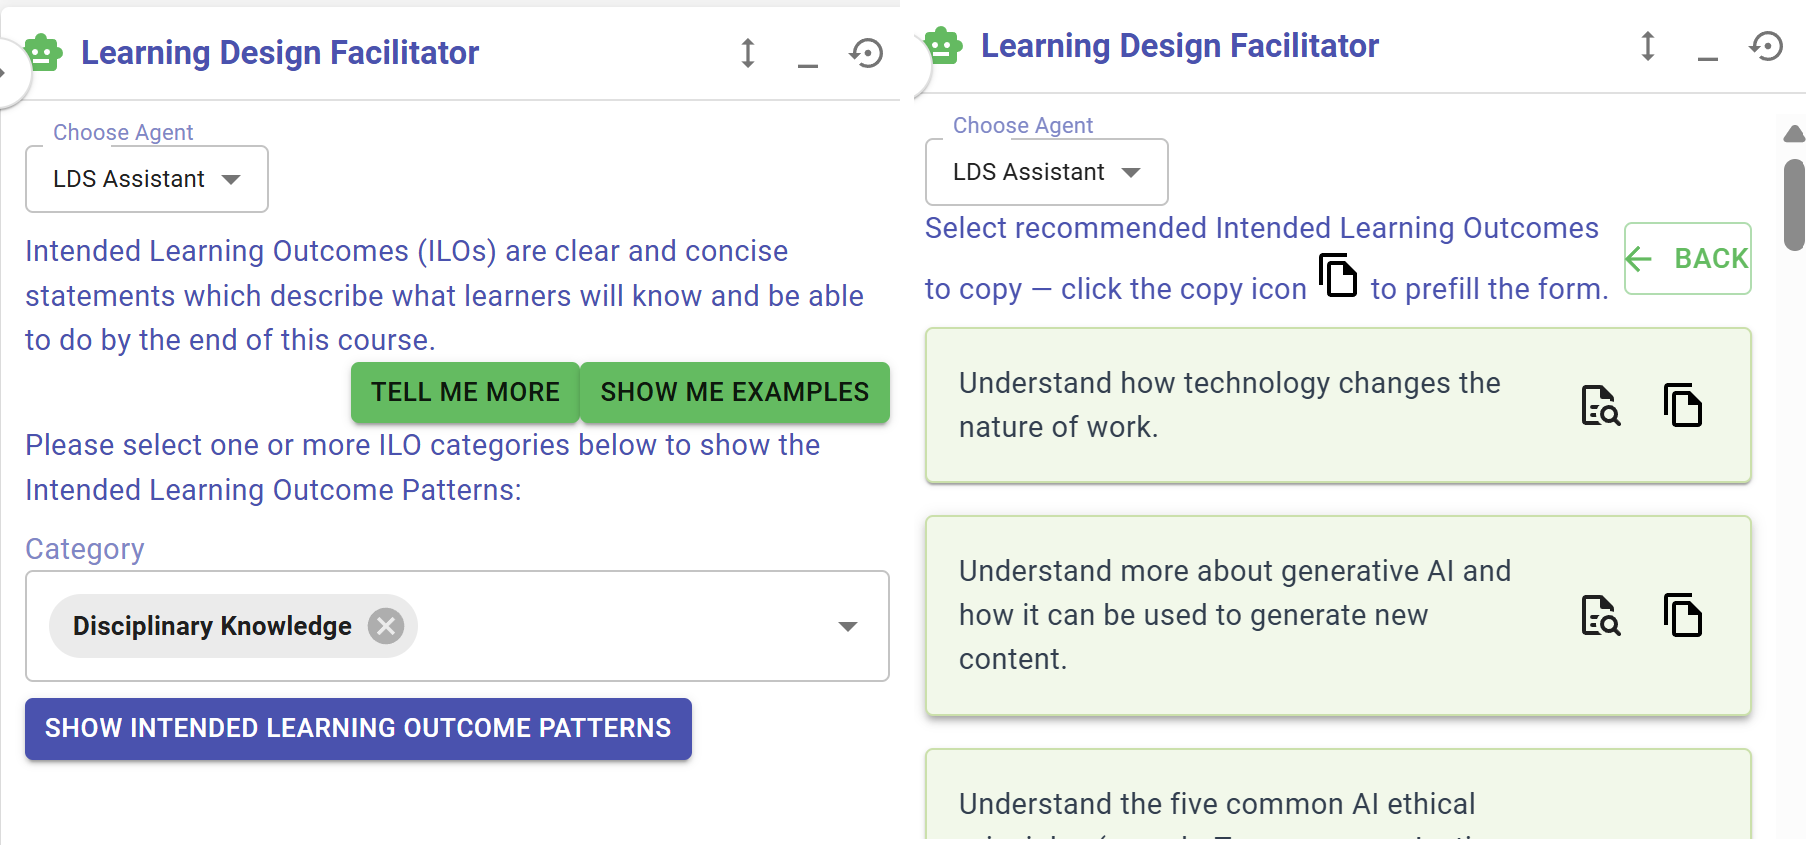
| Figure 3.19: Intended Learning Outcomes Patterns |
| [](https://ideals-doc.cite.hku.hk/uploads/images/gallery/2025-11/scaled-1680-/t8aimage.png) Figure 4.1: My Library | 1. **Starting from Scratch ([Tutorial](https://ideals-doc.cite.hku.hk/books/learning-design-studio-user-guide/chapter/5-creating-a-new-design-from-scratch))** This approach is ideal for users who want full control and a deeper understanding of every aspect of creating a learning design. By building each element yourself, you’ll become familiar with all the options and features the LDS offers. Even when you choose to start from scratch, the LDS remains flexible by providing many suggested patterns at different levels and aspects to guide your learning design process. 2. **Starting from Patterns ([Tutorial](https://ideals-doc.cite.hku.hk/books/learning-design-studio-user-guide/chapter/6-creating-a-new-design-from-patterns))** This approach is recommended for beginners or anyone seeking a quicker setup. As mentioned in [**Ch3.3 Pattern Library**](https://ideals-doc.cite.hku.hk/books/learning-design-studio-user-guide/page/34-pattern-library), course-level patterns provide ready-made structures of learning designs, making the process easier and more efficient. Currently, the LDS provides five course-level patterns: 1. **Engineer/Inventor**: Engineering Design + Self-directed Learning 2. **Scientist**: Scientific Investigation + Self-directed Learning 3. **Journalist**: Writing a News Report + Self-directed Learning 4. **Legislator**: Mock Legislative Procedure + Self-directed Learning 5. **Performer/Entertainer**: Performance Production + Self-directed Learning 3. **Importing an Existing Design ([Tutorial](https://ideals-doc.cite.hku.hk/books/learning-design-studio-user-guide/page/92-exporting-and-importing-the-design-in-the-lds))** If you have a learning design that was previously created in the LDS, or if someone has shared a design with you, you can import it directly. This is useful for reusing and revising existing content. |
| **Item** | **Content** |
|---|---|
| Title | Designing for the Wise |
| Description | Designing for the Wise is an interactive course where you’ll discover how to create innovative, user-centered solutions for older adults. Learn to empathize with the unique challenges seniors face, apply design thinking processes, and develop practical prototypes that make a real difference. Join us to blend creativity and care as you design a better world for the wise! |
| Key Learning Area(s) | Science Education, Technology Education |
| Grade Level | P6 |
| No. of Lesson | 14 |
| Duration per Lesson | 35 mins |
| Total In-Lesson Time | 490mins |
| Contributor Name | IDEALS Admin |
| Contributor Affiliation | IDEALS Partner School |
| **1. Subject/Discipline(s)**  Figure 5.5: Interface of the ILO Builder (2) - Select the appropriate discipline(s) for each ILO as needed. |
| **2. Category** 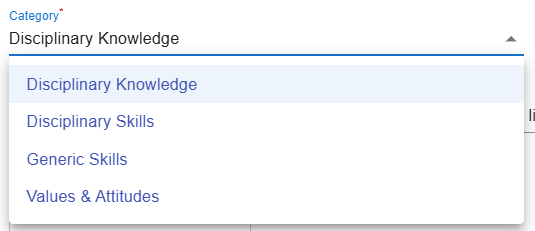 Figure 5.6: Interface of the ILO Builder (3) - Select the category of ILO: **Disciplinary Knowledge, Disciplinary Skills, Generic Skills, or Values & Attitudes**. |
| **3. Bloom's Taxonomy Level** 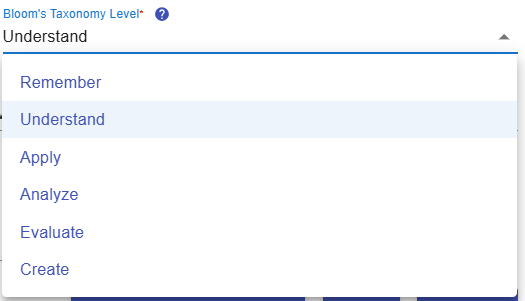 Figure 5.7: Interface of the ILO Builder (4) - Select the Bloom’s Taxonomy level that best reflects the intended skill, knowledge, or value for this outcome (e.g., Remember, Apply, Evaluate). 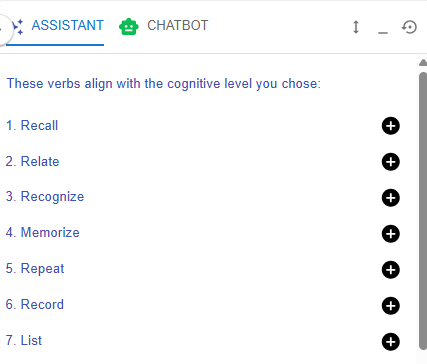 Figure 5.8: Writing a ILO with the Learning Design Facilitator - After selecting the Bloom’s Taxonomy level, the Learning Design Facilitator will recommend suitable action verbs to help you formulate your ILOs. - Choose the appropriate action verb that best reflects the skill, knowledge, or value targeted by your ILO. |
| **4. ILO and Learning Design Facilitator**  Figure 5.9: Interface of the ILO Builder (5) - Click the Learning Design Facilitator buttonto request feedback from the chatbot on your ILO. 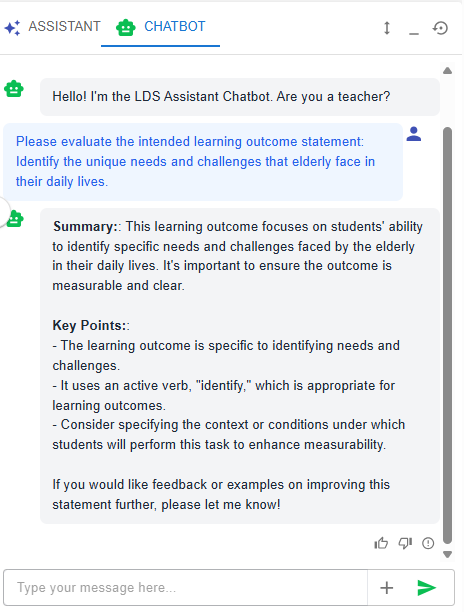 Figure 5.10: Evaluating a ILO with the Chatbot |
| **5. Sub-ILO(s)**  Figure 5.11: Interface of the ILO Builder (6) - To provide greater clarity, an ILO can be subdivided into more detailed sub-ILOs as needed. |
| 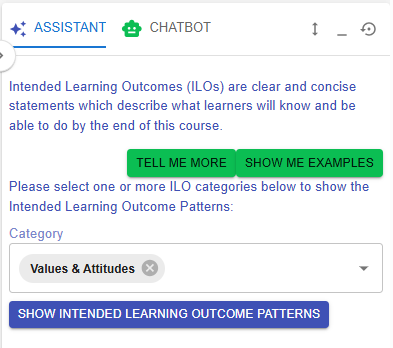 | 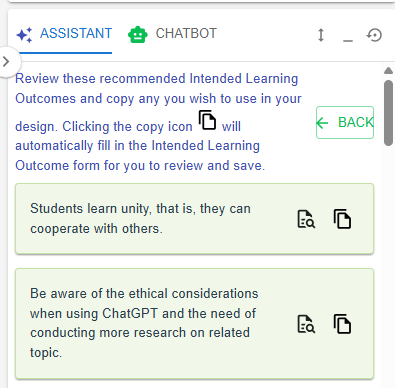 |
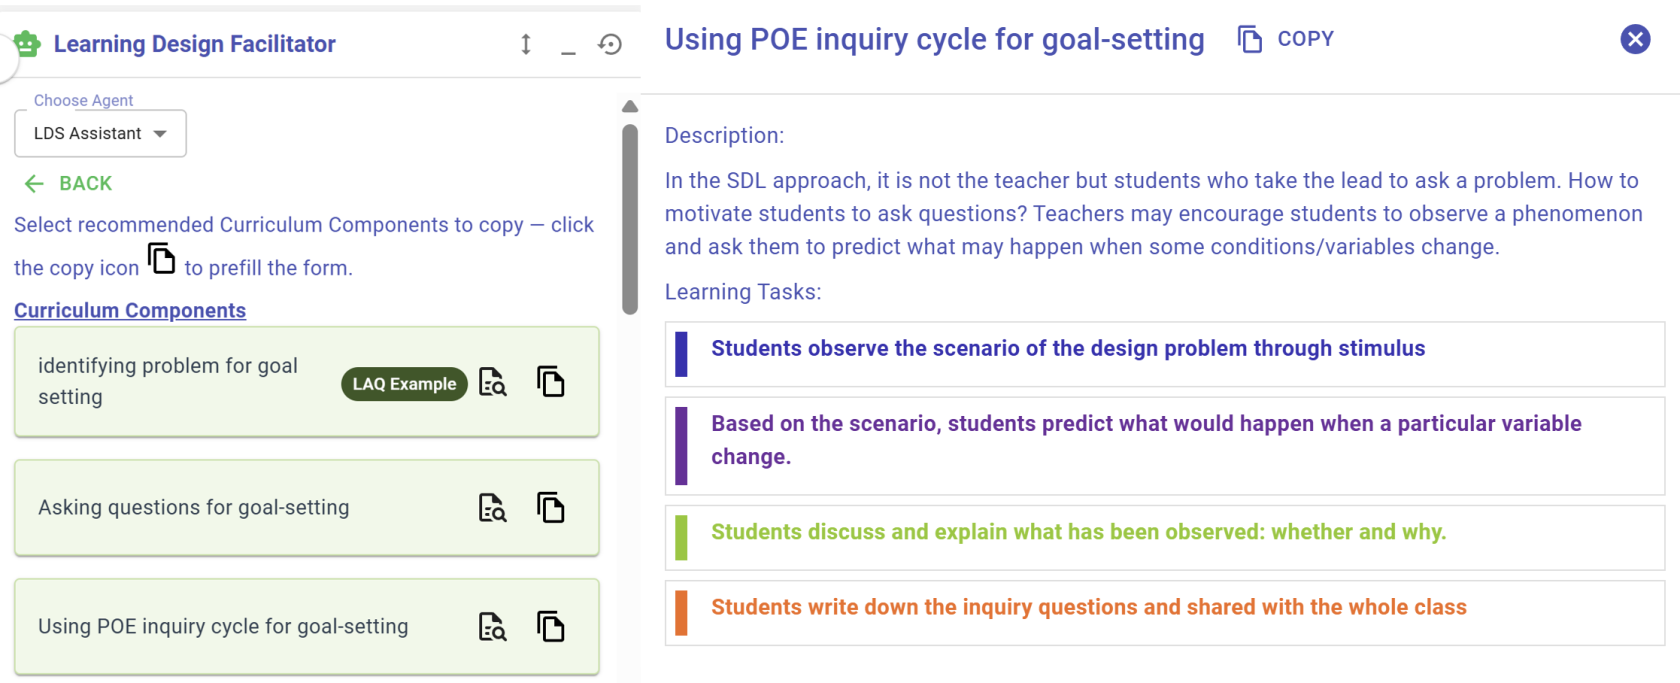
| Figure 5.13: The ILOs Patterns in the LDS Facilitator - After selecting the targeted ILO category in the Learning Design Facilitator, click the **"SHOW INTENDED LEARNING OUTCOME PATTERNS"** button to view suggested patterns. Alternatively, you can click the  button to instantly activate the pattern list. - By clicking the  button, you can explore the details of the targeted ILO pattern. 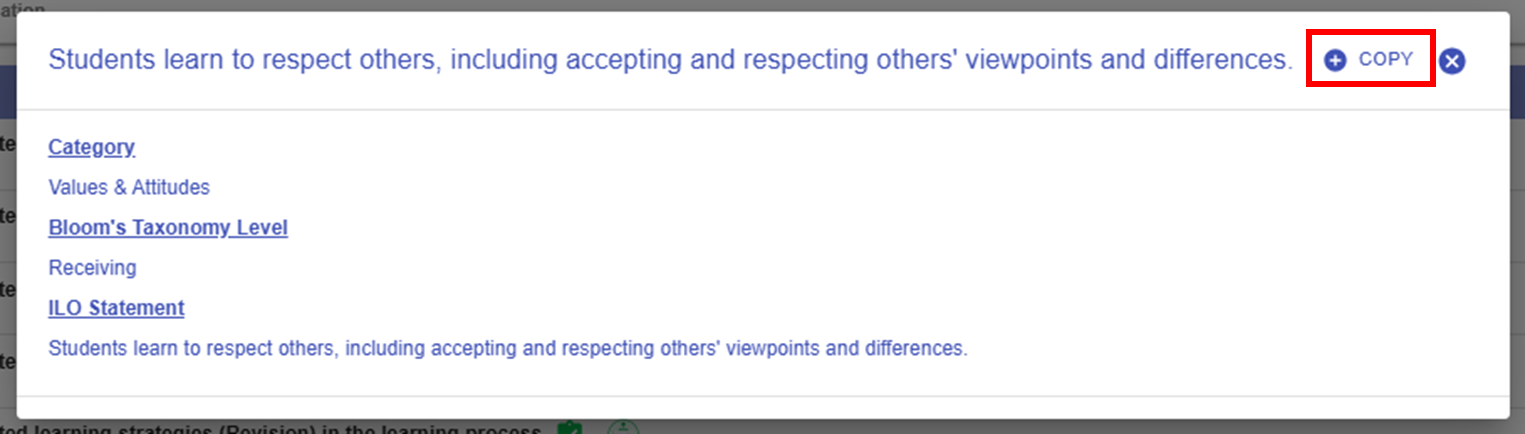 Figure 5.14: Details of the Targeted ILO Pattern (1) - You can use the targeted ILO pattern directly by clicking **"COPY"** button in the pop-up window, or by clicking the  button in the Learning Design Facilitator. The ILO pattern details will be auto-filled into the LDS.  Figure 5.15: Details of the Targeted ILO Pattern (2) - You can edit the details of the targeted ILO pattern in the ILO builder if needed. | |
| ||||
| ||||
| **2.1 CC Name** **💡Formula of naming a CC** Through the **1) focal task(s)** to **2) achieve the intended learning outcome** to **3) implement the workflow step(s) of a disciplinary practice** for **4) applying the focus or foci of the pedagogical approach**. - E.g. Through **1) stimulus observation and conducting interviews with the elderly** to **2) understand their unique needs and daily challenges** to **3) identify problems** for **4) goal-setting**. |
| **2.2 Workflow steps** 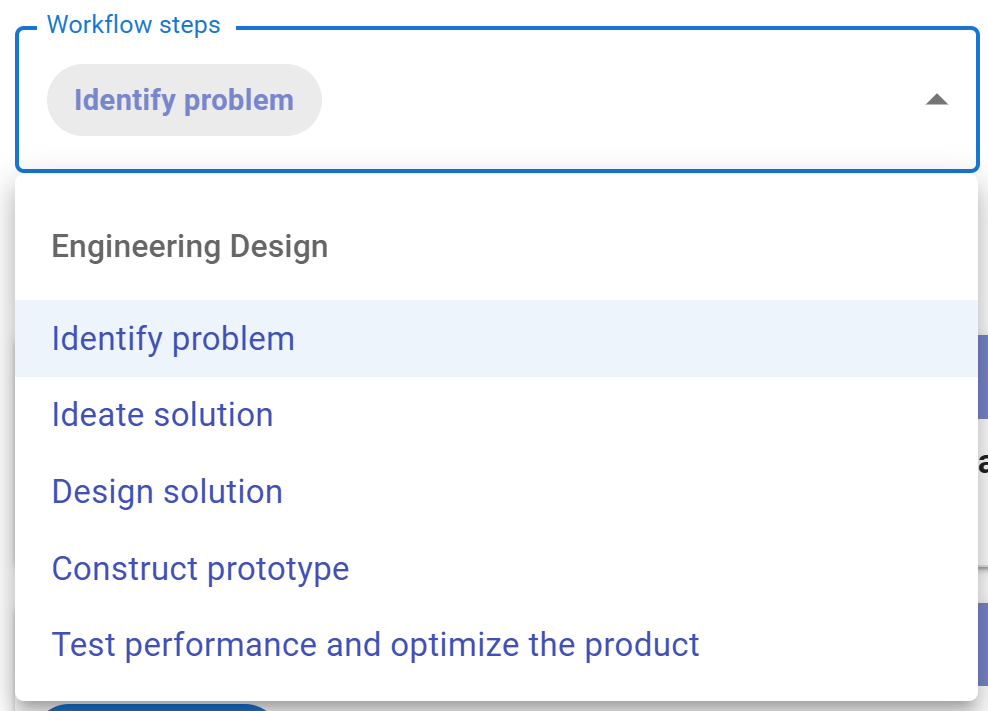 Figure 5.29: The Workflow Steps of Engineering Design - The workflow steps of Engineering Design are drawn from the Disciplinary Practice (DP) section you completed previously. - Select "Identify problem" for this CC. |
| **2.3 Pedagogical foci** 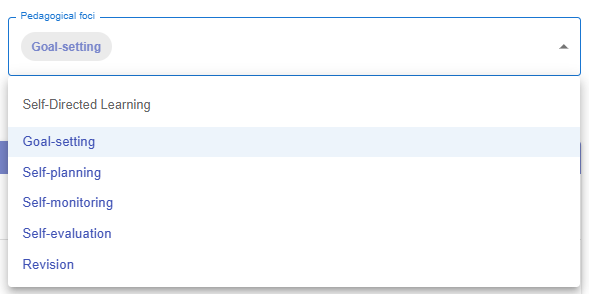 Figure 5.30: The Pedagogical Foci of Self-directed Learning - The pedagogical foci of Self-directed Learning are drawn from the Pedagogical Approach section you completed previously. - Select "Goal-setting" for this CC. |
| **2.4 Linked Intended Learning Outcomes (ILOs)** - Finally, we will select the ILOs to be achieved in the CC, ensuring they align with the chosen workflow steps of disciplinary practice and pedagogical approach within the specific phase of learning. 2.4.1. The Link Button  Figure 5.31: Linking the ILOs to a CC (1) - You can view all the Intended Learning Outcomes (ILOs) entered in the LDT section by clicking the [](https://ideals-doc.cite.hku.hk/uploads/images/gallery/2025-09/EXKimage.png) button. 2.4.2 Selecting the Appropriate ILOs [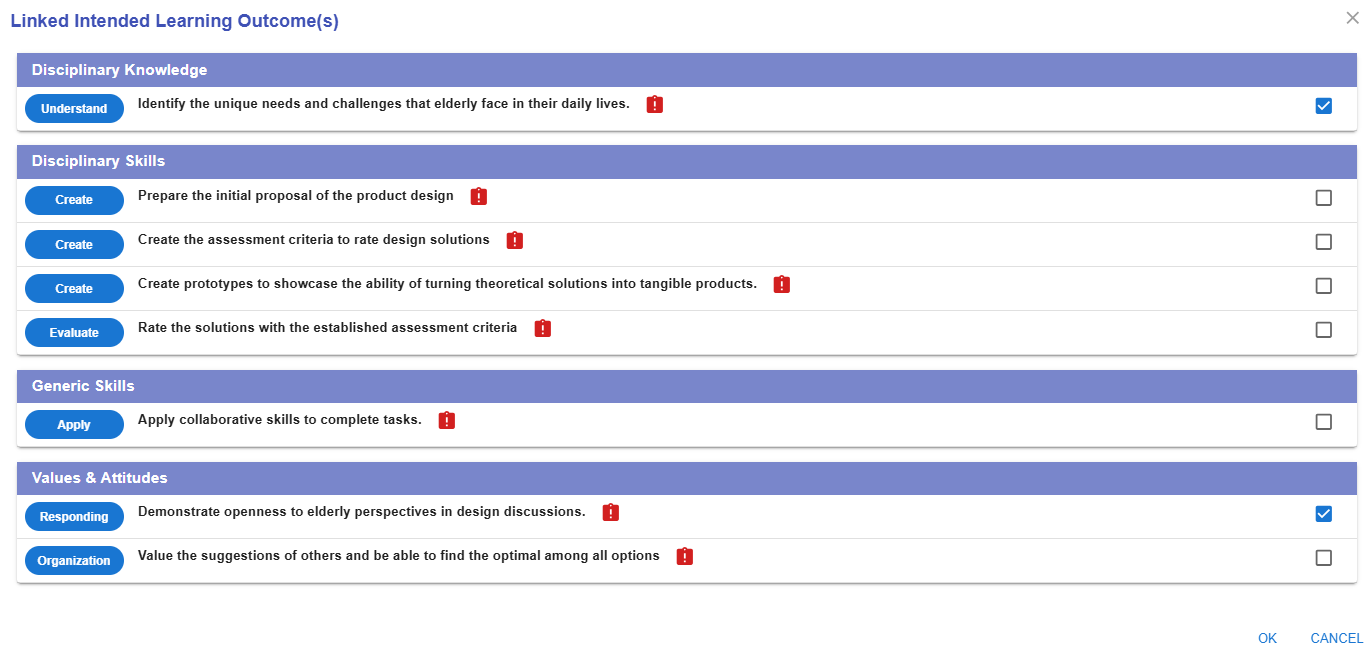](https://ideals-doc.cite.hku.hk/uploads/images/gallery/2025-10/scaled-1680-/egUimage.png) Figure 5.32: Linking the ILOs to a CC (2) E.g. - Identify the unique needs and challenges that elderly face in their daily lives. - Demonstrate openness to elderly perspectives in design discussions. 2.4.3 The Alert Icon and Complete Icon  Figure 5.33: Unassessed ILOs in a CC - For each learning outcome, you should add an assessment to evaluate student performance. If an assessment has not been added to a learning outcome, an alert icon  will appear as a reminder. Once an assessment is assigned, this will be replaced with a complete icon . We will discuss how to assign an assessment in the next section. 2.4.4 The Unlink Button  Figure 5.34: Dissociating the ILOs from the CC - You can dissociate a specific ILO from the CC by clicking the [](https://ideals-doc.cite.hku.hk/uploads/images/gallery/2025-09/r6ximage.png) button. |
| **Item** | **Example of this CC** |
|---|---|
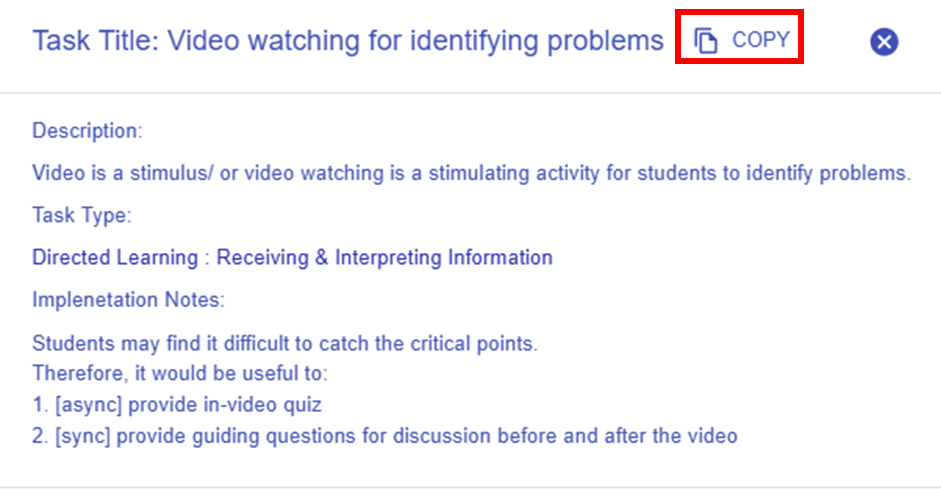
| **1. Task Information** - Provide a clear task title and description for a learning task. 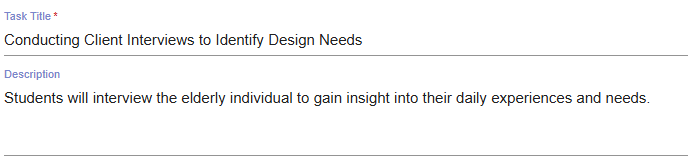 Figure 5.38: Task Information | **Task title:** Conducting Client Interviews to Identify Design Needs **Description**: Students will interview the elderly individual to gain insight into their daily experiences and needs. |
| **2. Stage** - Is this a pre-class, in-class, or after-class task?  Figure 5.39: Stage | In-class |
| **3. Task Type** - Please refer to **Chapter 2.6 - Task Taxonomy** for more details.  Figure 5.40: Task Type | Explorations through Conversation |
| **4. Duration** - How long is the task? 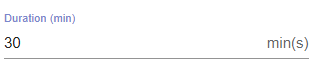 Figure 5.41: Duration | 30 mins |
| **5. Delivery Mode** - Possible Options: - Face-to-Face (Inside Classroom, Outside Classroom) - Online (Synchronous, Asynchronous) - Hybrid  Figure 5.42: Delivery Mode | Outside Classroom |
| **6. Social Organization** - Possible Options: - Whole Class - Group - Individual - Peer  Figure 5.43: Social Organization | Group, Size: 5 |
| **7. Feedback Provider** - You can select more than one feedback providers. - Teacher - Peer - Self - Others  Figure 5.44: Feedback Provider | Teacher |
| **8. Assessment** 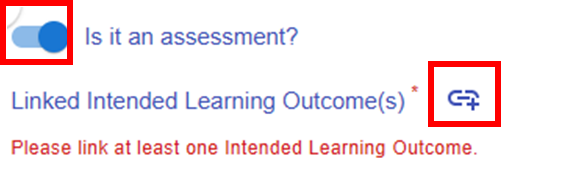 [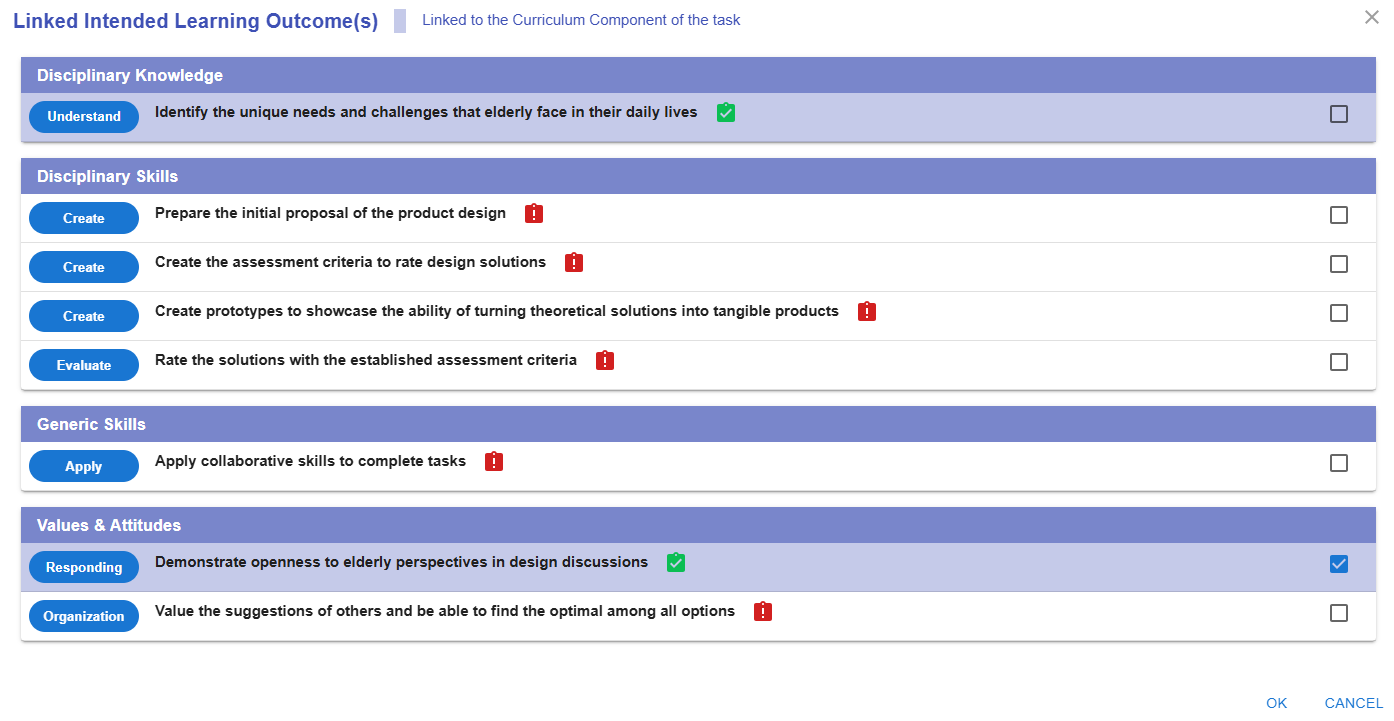](https://ideals-doc.cite.hku.hk/uploads/images/gallery/2025-12/scaled-1680-/pOfimage.png) 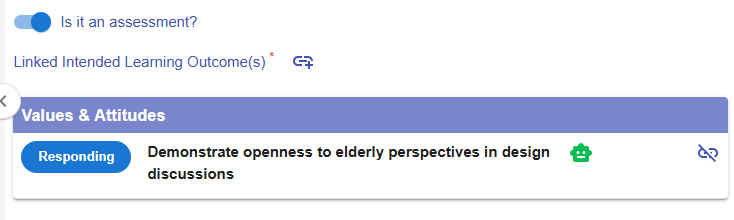 Figure 5.45: Triggering the Assessment Option in a Task | A learning task can also serve as an assessment. If you select the assessment option, you will need to - assign the feedback provider(s), and - specify the targeted learning outcomes for this task to be assessed - e.g. Demonstrate openness to elderly perspectives in design discussions |
| **9. E-learning Tool** 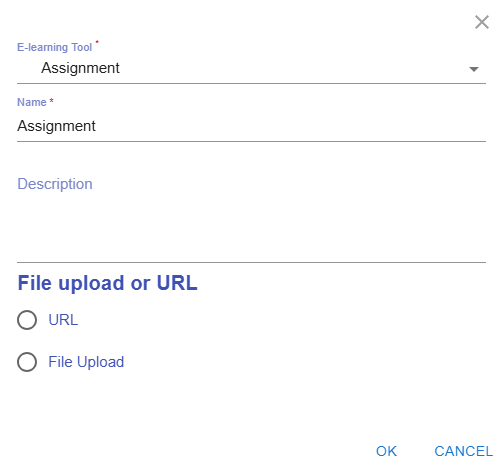 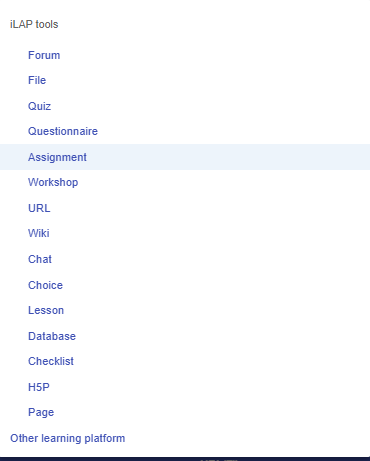 Figure 5.46: Interface for Adding E-learning Tool(s) to a Task | The e-learning tools section allows you to select the type of tool you want to use to implement the task. For example, if you want to create a space for students to submit their homework, you can choose the Assignment tool, as demonstrated here. |
| **10. Resources** 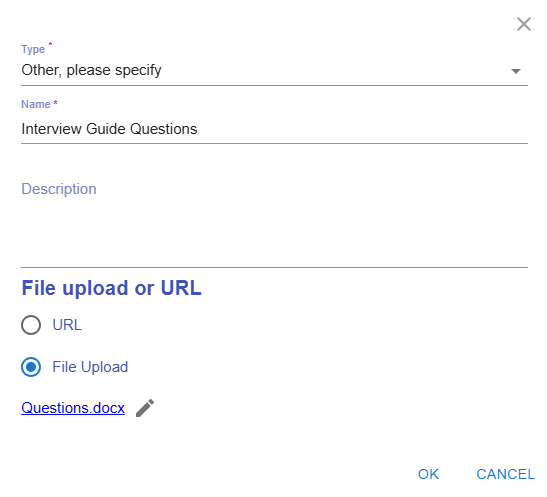 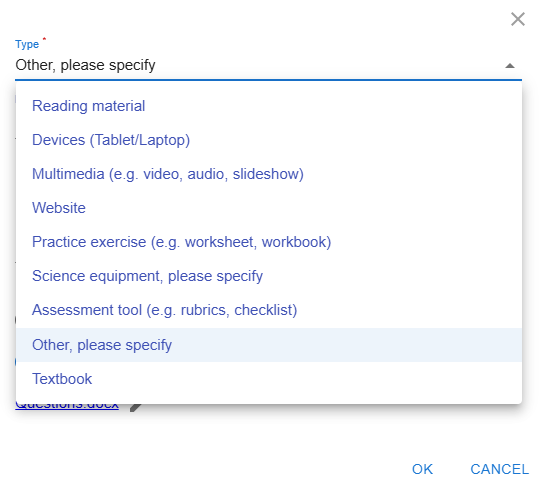 Figure 5.47: Interface for Adding Resource(s) to a Task | The resource section allows you to select the type of resource or tool you want to use to support the learning process. For example, you can upload the interview guiding questions and the interview skills rubric for use in the course. |
| **Item** | **Description** | **Example** |
|---|---|---|
| 1. Information Window | 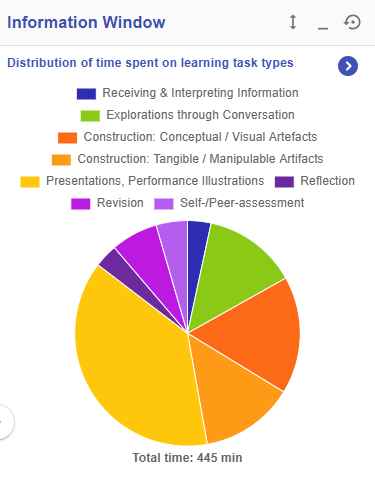 Figure 5.52: Information Window in the CC Section | In the CC section, the information window will visualise your overall CC design with the pie chart - Distribution of time spent on learning task types - Distribution of number of iLAP tools adopted - Distribution of time spent on delivery modes |
| 2. Header | [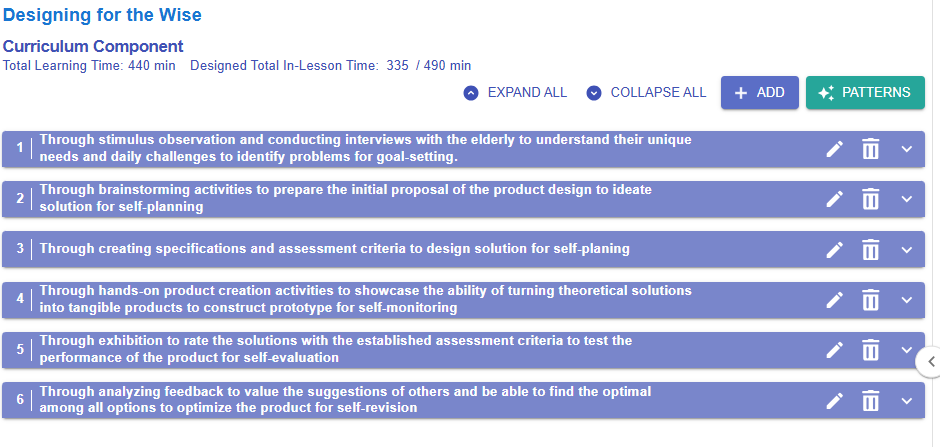](https://ideals-doc.cite.hku.hk/uploads/images/gallery/2025-12/scaled-1680-/DyQimage.png) Figure 5.53: An Example of a Curriculum Component Sequence Total Learning Time: 440 min - It includes the time spent on all pre-class, in-class, and after-class activities. Designed Total In-Lesson Time: 335 / 490 min - 335 min is the time spent on in-class activities. - 490 min is the possible in-class time allocated for this course Expand all - Expand all the CC to see the details Collapse all - Collapse all the CC to hide the details | |
| **Item** | **Content** |
|---|---|
| Title | Designing for the Wise |
| Description | Designing for the Wise is an interactive course where you’ll discover how to create innovative, user-centered solutions for the elderly. Learn to empathize with the unique challenges the elderly face, apply design thinking processes, and develop practical prototypes that make a real difference. Join us to blend creativity and care as you design a better world for the wise! |
| Key Learning Area(s) | Science Education, Technology Education |
| Grade Level | P6 |
| No. of Lesson | 6 |
| Duration per Lesson | 35 |
| Total In-Lesson Time | 210 |
| Contributor Name | - |
| Contributor Affiliation | - |
|  |  |
| Figure 6.6: The ILOs Patterns in the LDS Facilitator - After selecting the targeted ILO category in the Learning Design Facilitator, click the **"SHOW INTENDED LEARNING OUTCOME PATTERNS"** button to view suggested patterns. Alternatively, you can click the  button to instantly activate the pattern list. - By clicking the  button, you can explore the details of the targeted ILO.  Figure 6.7: Details of the Targeted ILO Pattern (1) - You can use the targeted ILO pattern directly by clicking **"COPY"** button in the new pop-up window, or by clicking the  button in the Learning Design Facilitator. The ILO pattern details will be auto-filled into the LDS.  Figure 6.8: Details of the Targeted ILO Pattern (2) - After copying the ILO pattern, you can see the ILO "Students learn to respect others, including accepting and respecting others' viewpoints and differences." appear in the ILO builder. - To better fit our course context and the Bloom‘s Taxonomy, we can modify it to: “Demonstrate willingness to accept and respect the elderly, including accepting and respecting their viewpoints and differences.” | |
| **1. Subject/Discipline(s)**  Figure 6.11: Interface of the ILO Builder (2) - Select the appropriate discipline(s) for each ILO as needed. |
| **2. Category**  Figure 6.12: Interface of the ILO Builder (3) - Select the category of ILO: **Disciplinary Knowledge, Disciplinary Skills, Generic Skills, or Values & Attitudes**. |
| **3. Bloom's Taxonomy Level**  Figure 6.13: Interface of the ILO Builder (4) - Select the Bloom’s Taxonomy level that best reflects the intended skill, knowledge, or value for this outcome (e.g., Remember, Apply, Evaluate).  Figure 6.14: Writing a ILO with the Learning Design Facilitator - After selecting the Bloom’s Taxonomy level, the Learning Design Facilitator will recommend suitable action verbs to help you formulate your ILOs. - Choose the appropriate action verb that best reflects the skill, knowledge, or value targeted by your ILO. |
| **4. ILO and Learning Design Facilitator**  Figure 6.15: Interface of the ILO Builder (5) - Click the Learning Design Facilitator buttonto request feedback from the chatbot on your ILO.  Figure 6.16: Writing a ILO with the Chatbot |
| **5. Sub-ILO(s)**  Figure 6.17: Interface of the ILO Builder (6) - To provide greater clarity, an ILO can be subdivided into more detailed sub-ILOs as needed. |
| **1. Editing or Creating a DP** - By clicking the  or  button, you can access the DP builder to modify the DP information. 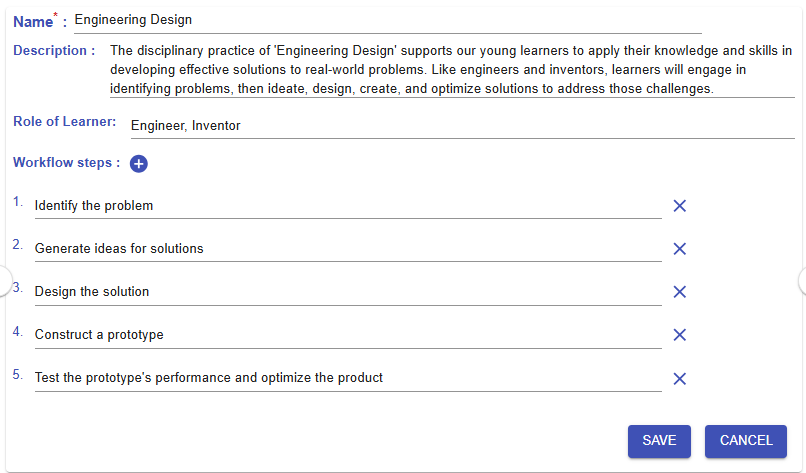 Figure 6.20: Editing/Creating a DP | ||||
**2. Learning Design Facilitator**
- In the Learning Design Facilitator, there are DP Patterns that we have designed for you to copy and use in your own design.
| ||||
| **1. Editing or Creating a pedagogical approach** - By clicking the  or button, you can access the area to modify the pedagogical approach information. 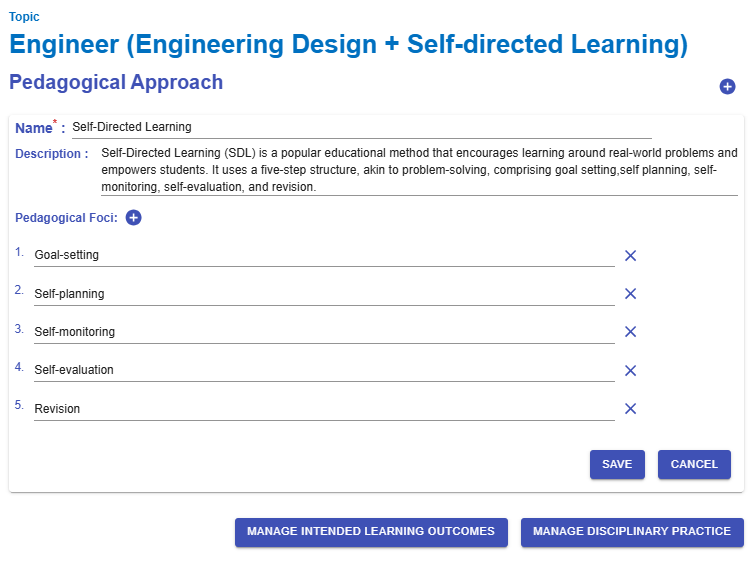 Figure 6.25: Editing/Creating the Pedagogical Approach | ||||
**2. Learning Design Facilitator**
- In the Learning Design Facilitator, there are Pedagogical Approach Patterns that we have designed for you to copy and use in your own design.
|
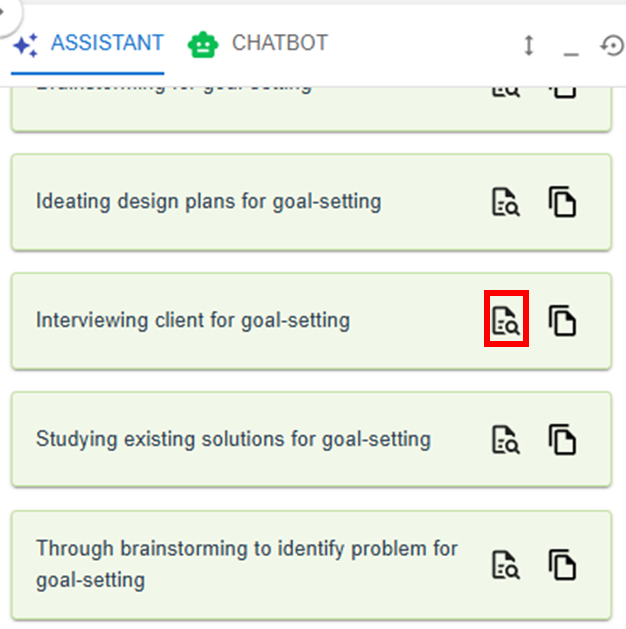
| **Name** | Through brainstorming to identify problem for goal-setting |
| **Intended Learning Outcomes** | - Apply design thinking process - Empathize with users - Apply design thinking process - Define design problems - Apply self-directed learning strategies (Goal setting) in the learning process |
| **Disciplinary Practice / Pedagogical Approach** | Identify problem / Goal-setting |
| **Learning Task(s)** | - Students observe the scenario of the design problem through stimulus - Students discuss the needs of users - Students work on identifying the most prominent problem needed to be addressed - Students present their findings on user needs to the whole class |
| **1. CC Name**
- |
| **2. Workflow steps**  Figure 6.32: The Workflow Steps of Engineering Design - The workflow steps of Engineering Design are drawn from the Disciplinary Practice (DP) section you completed previously. - In this case, we do not need to make changes to **"Identify problem"**. |
| **3. Pedagogical foci**  Figure 6.33: The Pedagogical Foci of Self-directed Learning - The pedagogical foci of Self-directed Learning are drawn from the Pedagogical Approach section you completed previously. - In this case, we do not need to make changes to **"Goal-setting"**. |
| **4. Linked Intended Learning Outcomes (ILOs)** - We need to link the intended learning outcomes **"Identify the unique needs and challenges of the elderly face in their daily lives"** to the CC 4.1. The Link Button  Figure 6.34: Linking the ILOs to a CC (1) - You can view all the Intended Learning Outcomes (ILOs) entered in the LDT section by clicking the [](https://ideals-doc.cite.hku.hk/uploads/images/gallery/2025-09/EXKimage.png) button. 4.2 Selecting the Appropriate ILOs [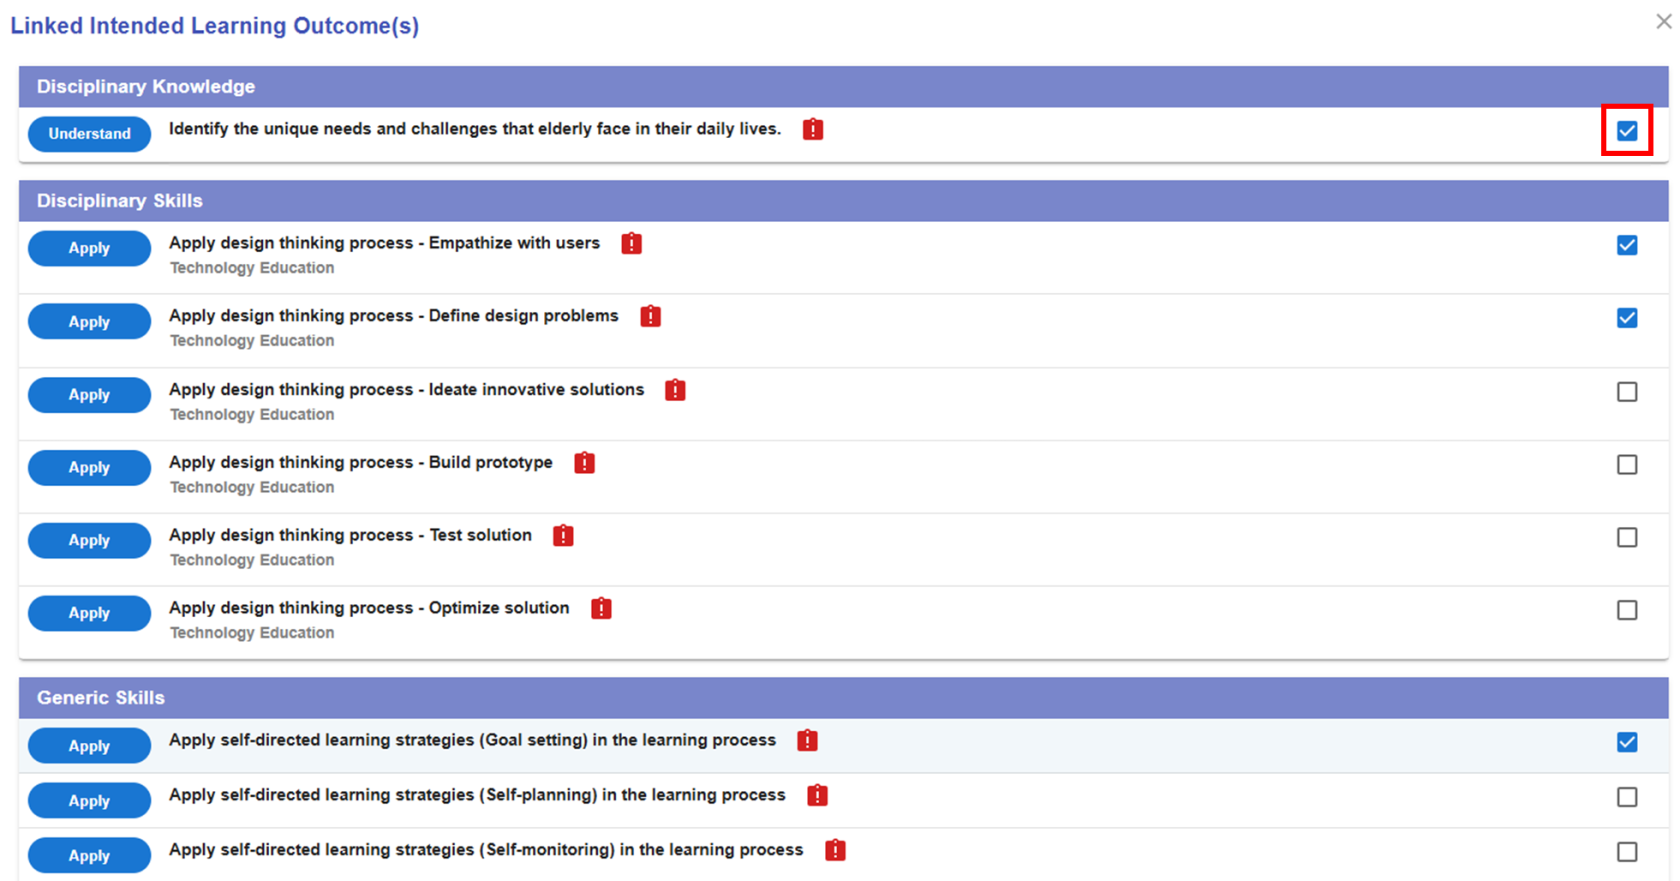](https://ideals-doc.cite.hku.hk/uploads/images/gallery/2025-09/scaled-1680-/bMOimage.png) Figure 6.35: Linking the ILOs to a CC (2) - Select the intended learning outcomes we want to link to the CC. 4.3 The Alert Icon and Complete Icon 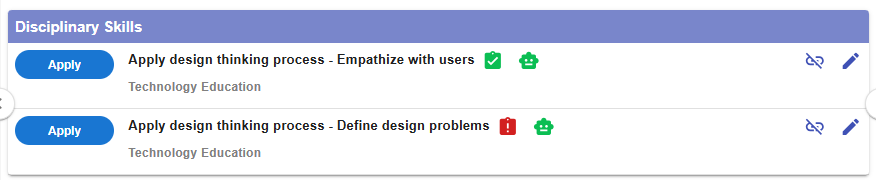 Figure 6.36: Unassessed ILOs in a CC - For each learning outcome, you should add an assessment to evaluate student performance. If an assessment has not been added to a learning outcome, an alert icon  will appear as a reminder. Once an assessment is assigned, this will be replaced with a complete icon . We will discuss how to assign an assessment soon. 4.4 The Unlink Button  Figure 6.37: Dissociating the ILOs from the CC - You can dissociate a specific ILO from the CC by clicking the [](https://ideals-doc.cite.hku.hk/uploads/images/gallery/2025-09/r6ximage.png) button. |
|  |  |
| **Item** | **Example** |
|---|---|
| **1. Task Information** - Provide a clear task title and description for a learning task.  Figure 6.42: Task Information | **Task title:** Students work on identifying the most prominent problem needed to be addressed. **Description**: You may update the task information to make it more meaningful for the learning design. **Task title:** Students work on identifying the most prominent problem faced by the elderly that needs to be addressed. **Description**: Students will analyse the needs of the elderly based on the previous brainstorming learning tasks. |
| **2. Stage** - Is this a pre-class, in-class, or after-class task? [](https://ideals-doc.cite.hku.hk/uploads/images/gallery/2025-12/STcimage.png) Figure 6.43: Stage | Select In-class |
| **3. Task Type** - Please refer to **[Chapter 2.6 - Task Taxonomy](https://ideals-doc.cite.hku.hk/books/learning-design-studio-user-guide/page/26-task-taxonomy)** for more details.  Figure 6.44: Task Type | Construction: Conceptual / Visual Artefacts |
| **4. Duration** - How long is the task?  Figure 6.45: Duration | Update to an appropriate duration, such as 30 minutes. |
| **5. Delivery Mode** - Possible Options: - Face-to-Face (Inside Classroom, Outside Classroom) - Online (Synchronous, Asynchronous) - Hybrid  Figure 6.46: Delivery Mode | Inside Classroom |
| **6. Social Organization** - Possible Options: - Whole Class - Group - Individual - Peer  Figure 6.47: Social Organization | Group, Size: 5 |
| **7. Feedback Provider** - You can select more than one feedback providers. - Teacher - Peer - Self - Others  Figure 6.48: Feedback Provider | Select Teacher |
| **8. Assessment** 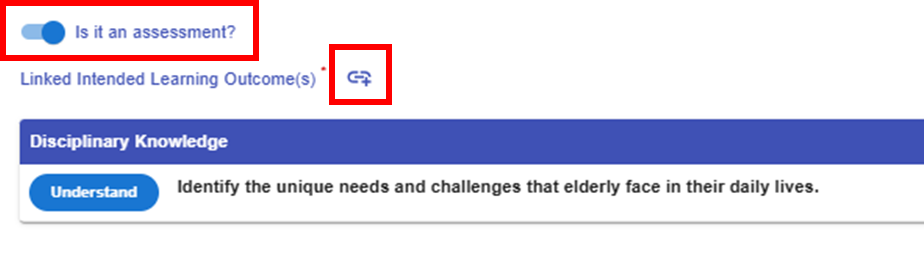 Figure 6.49: Triggering the Assessment Option in a Task | A learning task can also serve as an assessment. If you select the assessment option, you will need to - assign the feedback provider(s), and - specify the targeted learning outcomes for this task to be assessed - - Identify the unique needs and challenges that elderly face in their daily lives. |
| **9. E-learning Tool** 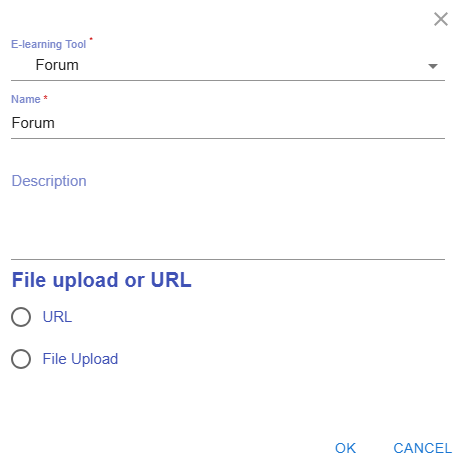 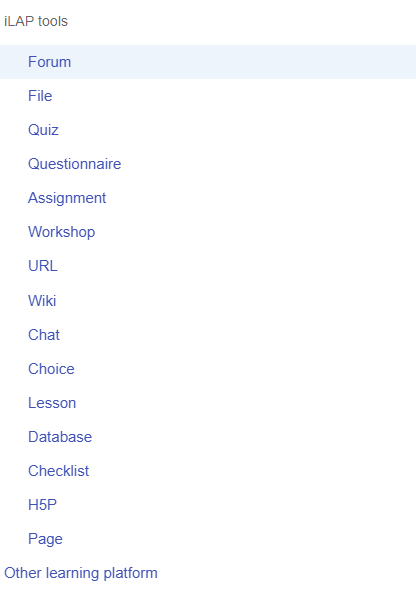 Figure 6.50: Interface for Adding E-learning Tool(s) to a Task | The e-learning tools section allows you to select the type of tool you want to use to implement the task. For example, to encourage idea sharing in class, you can use the Forum tool. You can remove the suggested e-learning tools that are not appropriate for your use. |
| **10. Resources** 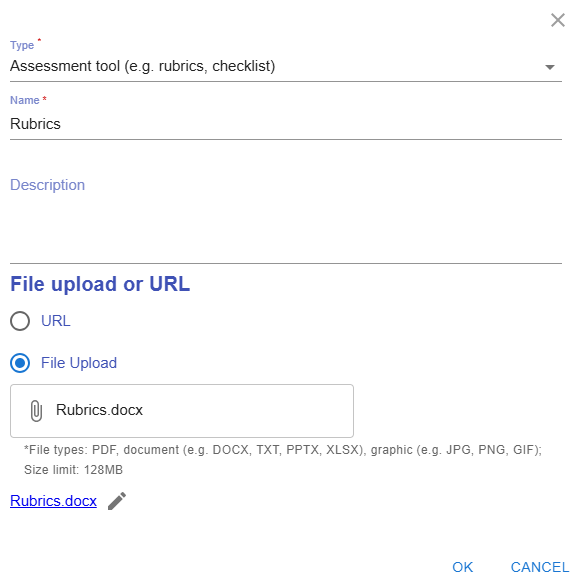 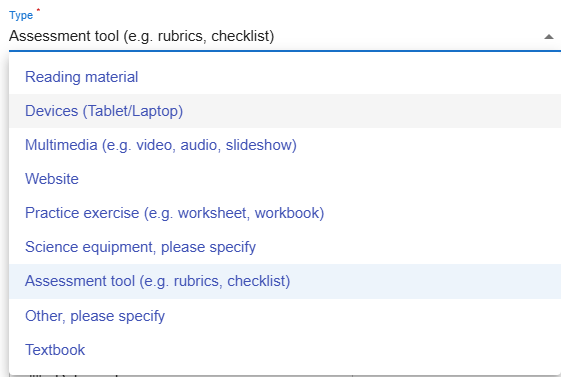 Figure 6.51: Interface for Adding Resource(s) to a Task | The resource section allows you to select the type of resource or tool you want to use to support the learning process. For example, you can upload rubrics for grading the assessment. You can remove the suggested resources that are not appropriate for your use. |
|  |  |
| Figure 6.56: Adding a New CC from the CC Patterns (1) | |
| **Item** | **Description** | **Example** |
|---|---|---|
| 1. Information Window | 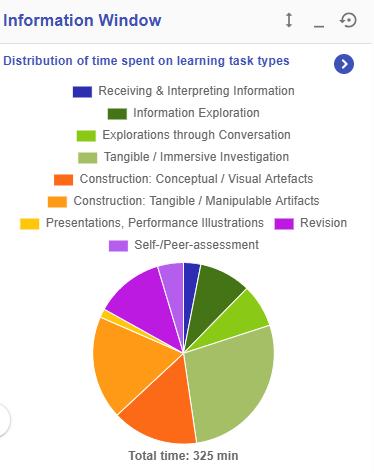 Figure 6.58: Information Window in the CC Section | In the CC section, the information window will visualise your overall CC design with the pie chart - Distribution of time spent on learning task types - Distribution of number of iLAP tools adopted - Distribution of time spent on delivery modes |
| 2. Header | [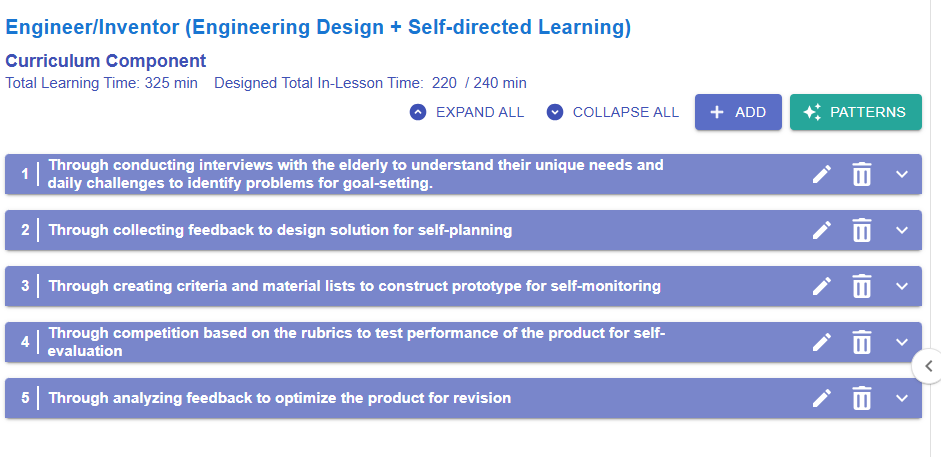](https://ideals-doc.cite.hku.hk/uploads/images/gallery/2025-12/scaled-1680-/OtMimage.png) Figure 6.59: Example of a Curriculum Component Sequence **Total Learning Time: 325 min** - It includes the time spent on all pre-class, in-class, and after-class activities. **Designed Total In-Lesson Time: 220 / 240 min** - 220 min is the time spent on in-class activities. - 240 min is the possible in-class time allocated for this course **Expand all** - Expand all the CC items to see the details **Collapse all** - Collapse all the CC items to hide the details | |
| **How can we ensure that students engage with different types of learning tasks to optimize their learning experience?** | |
| [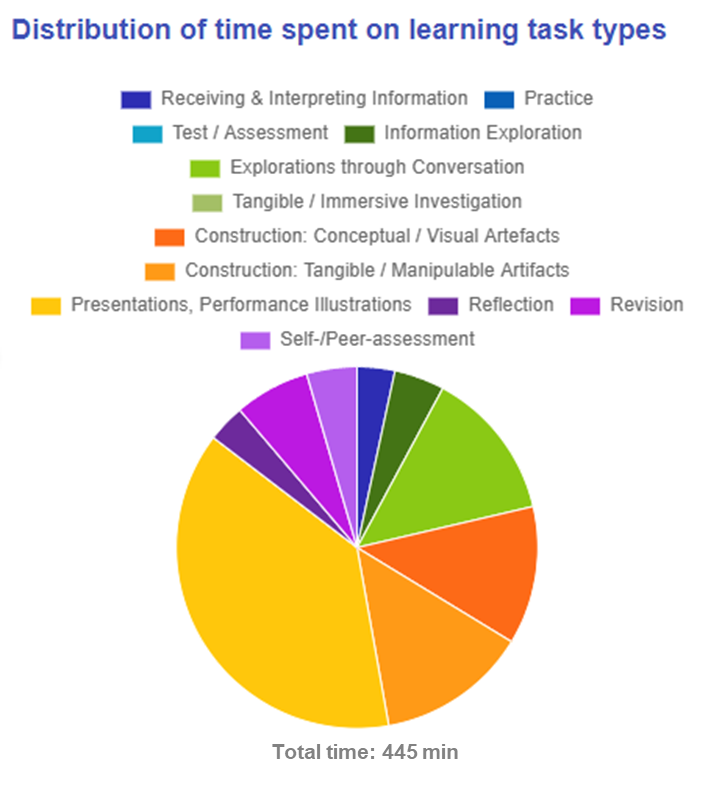](https://ideals-doc.cite.hku.hk/uploads/images/gallery/2025-12/D16image.png) Figure 7.2: Designer Dashboard (1) | **Distribution of time spent on learning task types:** - The total duration of learning time is 445 min. - 415 min (i.e.93%) out of this total duration is in-class time. - Top 3 learning time task types are Presentations, Performance Illustrations (38%), - Explorations through Conversation (20%),and Construction: Tangible / Manipulable Artifacts (13%). This analysis focus on the time spent on learning task types. It shows the ratio of in-class to out-of-class activities. It also highlights the top task types through both text descriptions and color-coded segments in the pie chart, helping you quickly understand the overall distribution of learning tasks. |
| **How can we ensure a comprehensive student learning experience by providing a balanced range and frequency of different learning tasks?** | |
| [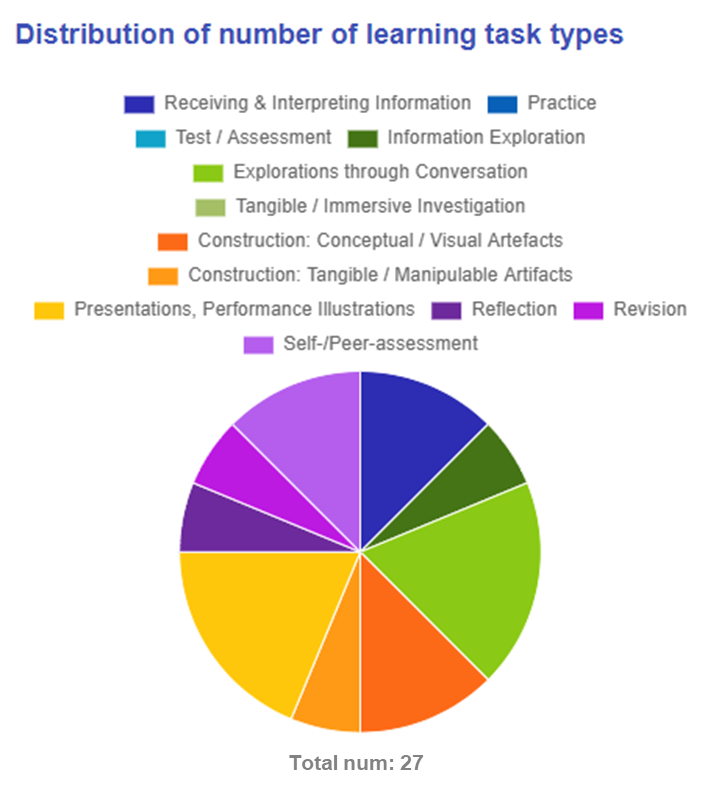](https://ideals-doc.cite.hku.hk/uploads/images/gallery/2025-12/dI0image.png) Figure 7.3: Designer Dashboard (2) | **Distribution of number of learning task types:**
- The total no. of learning tasks is 27, with 9 task types in this course.
- The learning task type: Construction: Conceptual / Visual Artefacts is used most frequently, with 6 tasks belonging to this category.
- Practice, Test / Assessment, and Reflection are absent in the design.
**Suggestion:**
- Teachers can consider adding learning tasks related to “test/assessment” to evaluate students’ understanding and proficiency in the subject matter.
- Teachers can consider adding learning tasks related to “reflection” to enhance students’ metacognitive process.
- Teachers can consider adding learning tasks related to “practice” to allow students to reinforce their skills and knowledge through repeated application.
|
| **How can we design our assessment strategy to foster a more holistic development of skills, ensuring we evaluate not just application, but also analysis, evaluation, and creation?** | |
| [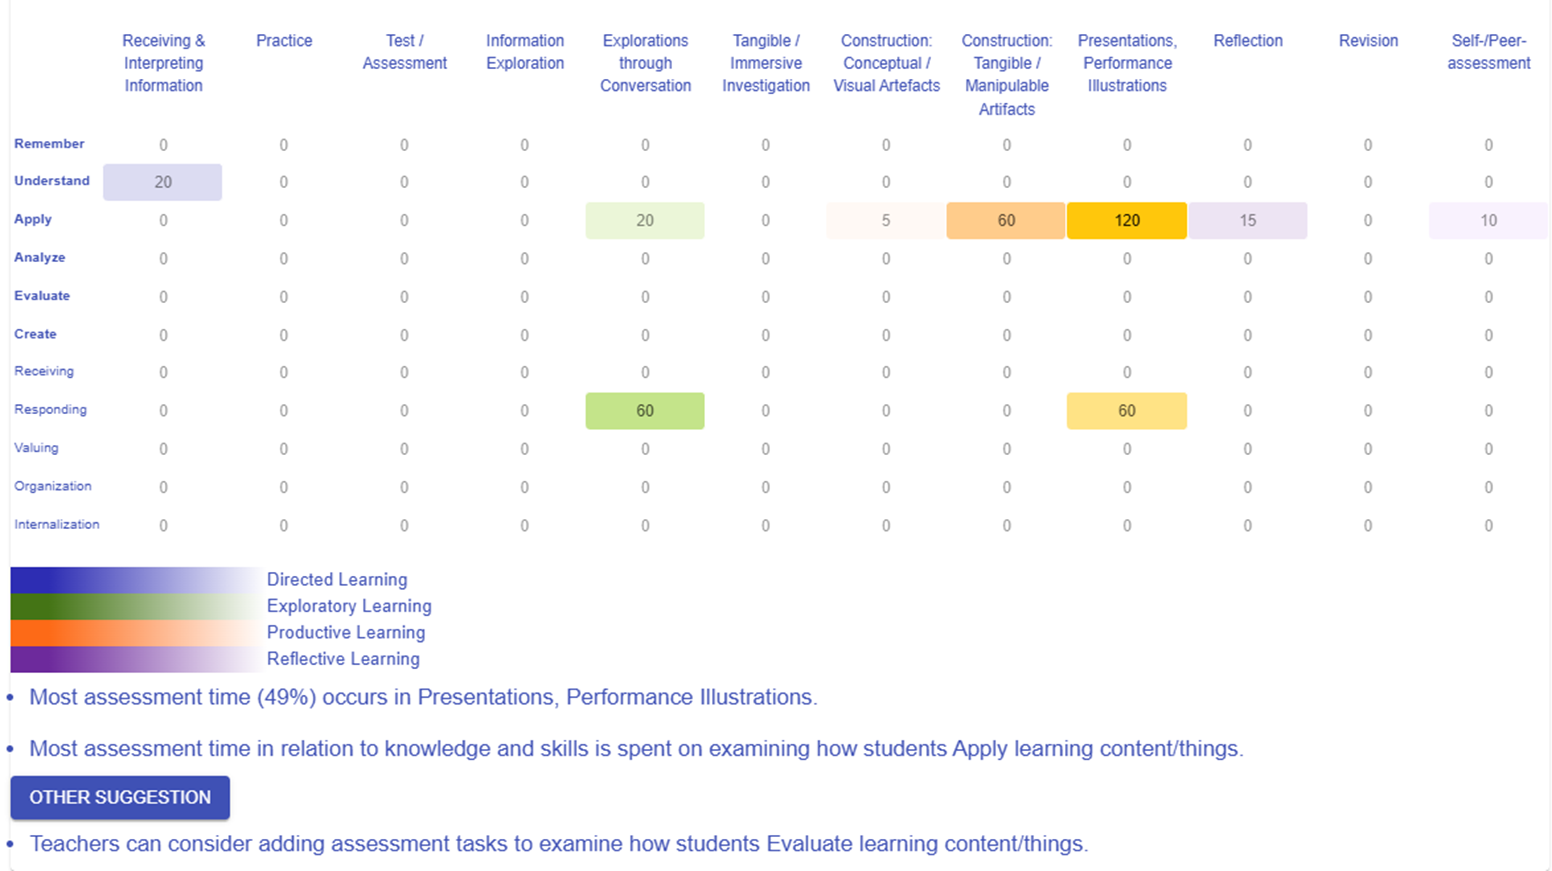](https://ideals-doc.cite.hku.hk/uploads/images/gallery/2025-12/G7Timage.png)
Figure 7.4: Designer Dashboard (3)
**Heatmap of time spent on assessment tasks - LO level vs task category:**
- Most assessment time (49%) occurs in Presentations, Performance Illustrations.
- Most assessment time in relation to knowledge and skills is spent on examining how students Apply learning content/things.
- Teachers can consider adding assessment tasks to examine how students Analyze learning content/things.
- Teachers can consider adding assessment tasks to examine how students Evaluate learning content/things.
| |
| **How can we ensure our use of social organization—individual, group, or whole class—is strategically matched to the cognitive demands of the task?** | |
| [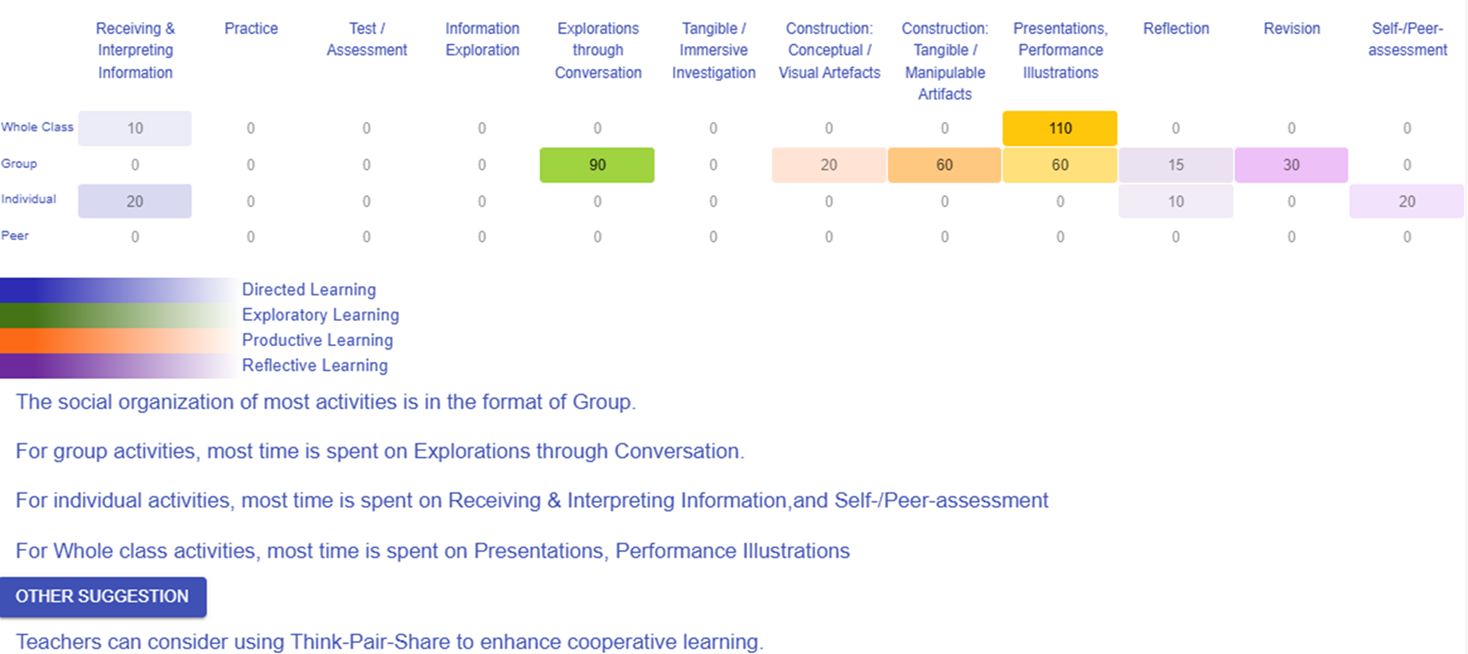](https://ideals-doc.cite.hku.hk/uploads/images/gallery/2025-12/X87image.png)
Figure 7.5: Designer Dashboard (4)
**Heatmap of time spent on all tasks - social organization vs task type:**
- The social organization of most activities is in the format of Group.
- For group activities, most time is spent on Explorations through Conversation.
- For individual activities, most time is spent on Receiving & Interpreting Information, and Self-/Peer-assessment
- For Whole class activities, most time is spent on Presentations, Performance Illustrations
**Suggestion:**
- Teachers can consider using Think-Pair-Share to enhance cooperative learning.
| |
| **How do you select different task types when designing assessment for each learning outcome?** | |
| [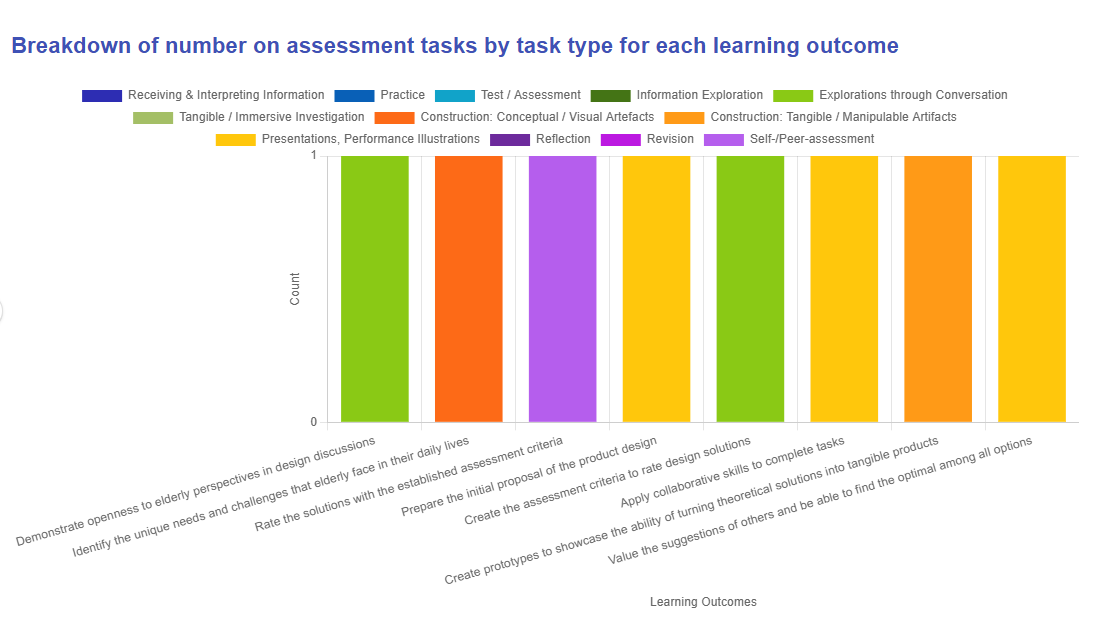](https://ideals-doc.cite.hku.hk/uploads/images/gallery/2026-01/image.png) Figure 7.6: Designer Dashboard (5) This diagram illustrates how each intended learning outcome is evaluated with what type of learning task, helping you identify gaps and ensure a balanced variety of assessment approaches across all outcomes. | |
| **How do you organize your lesson time with respect to disciplinary practices and your chosen pedagogical approach?** | |
| [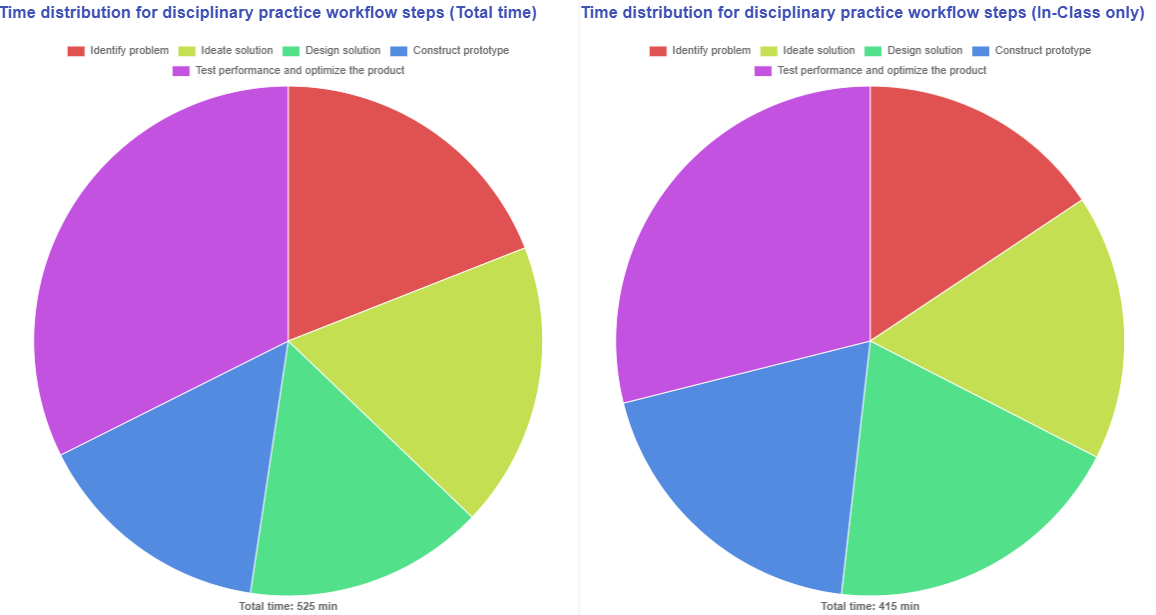](https://ideals-doc.cite.hku.hk/uploads/images/gallery/2025-09/Knbimage.png) Figure 7.7: Designer Dashboard (6) - Disciplinary Practices [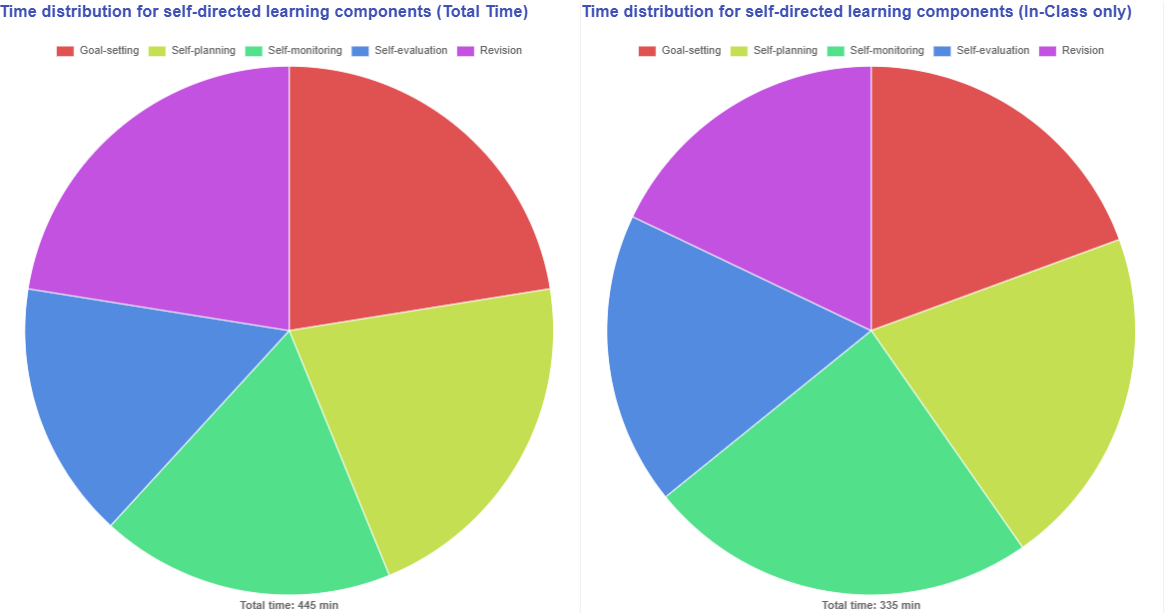](https://ideals-doc.cite.hku.hk/uploads/images/gallery/2025-09/Vs0image.png) Figure 7.8: Designer Dashboard (7) - Pedagogical Approach The two diagrams above illustrate how the workflow steps of disciplinary practice and the pedagogical focus of the chosen pedagogical approach are arranged within your learning design. Additionally, the dashboard shows both the total time allocated for all learning tasks and the specific time dedicated to in-class activities, helping to ensure that the out-of-class workload remains manageable. | |
| **1. Alert for Overrun Lesson Plan**   Figure 8.6: Alert for Overrun Lesson Plan - Only tasks assigned as in-class activities are counted toward the "**Designed In-Lesson Time"**. If the total time for in-class activities exceeds the **35-minute limit set in the Course Information section** at the beginning, you will see **"95/35 min"** displayed in red as a reminder, along with a button next to the In-Class Session. |
| **2. Rearranging a Task** - To address the lesson overrun issue, you can consider utilizing pre-class and after-class time to make teaching and learning more flexible. - Please refer to the introduction below for instructions on how to move a task in the lesson builder. 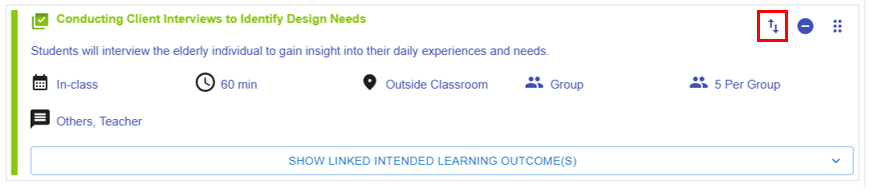 Figure 8.6: Moving a Task (1) - By clicking the  button, a pop-up window will appear, allowing you to move the task to a stage in a different lesson. 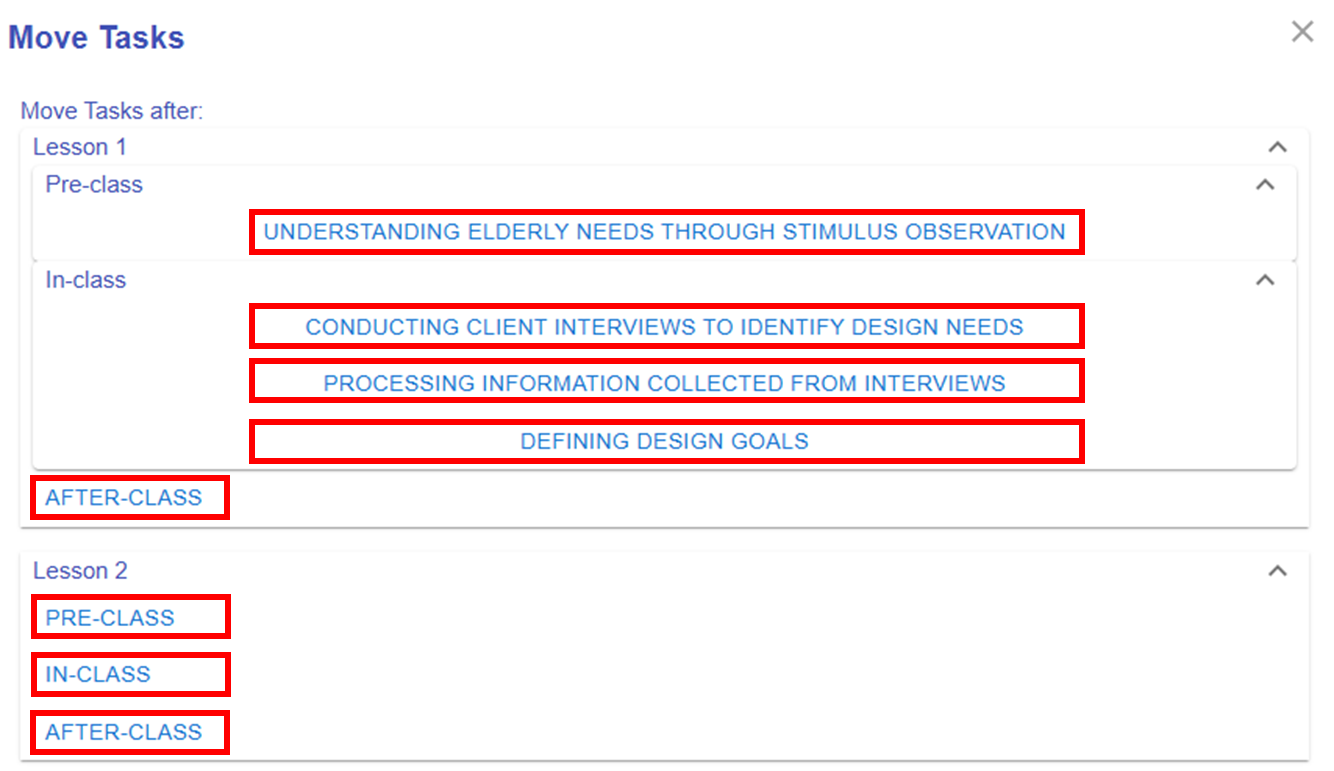 Figure 8.7: Moving a Task (2) - Tasks can be moved to a specific stage in the targeted lesson by clicking either an empty block (**"Pre-class"**, **"In-Class"**, or **"After-class"**) or an existing task name. |
| **1. Clicking the Share Button** There are two places where the Share button can be found. The first is on the My Library page.  Figure 10.1: Sharing the Design (1) The second location is the Course Information page within a learning design. 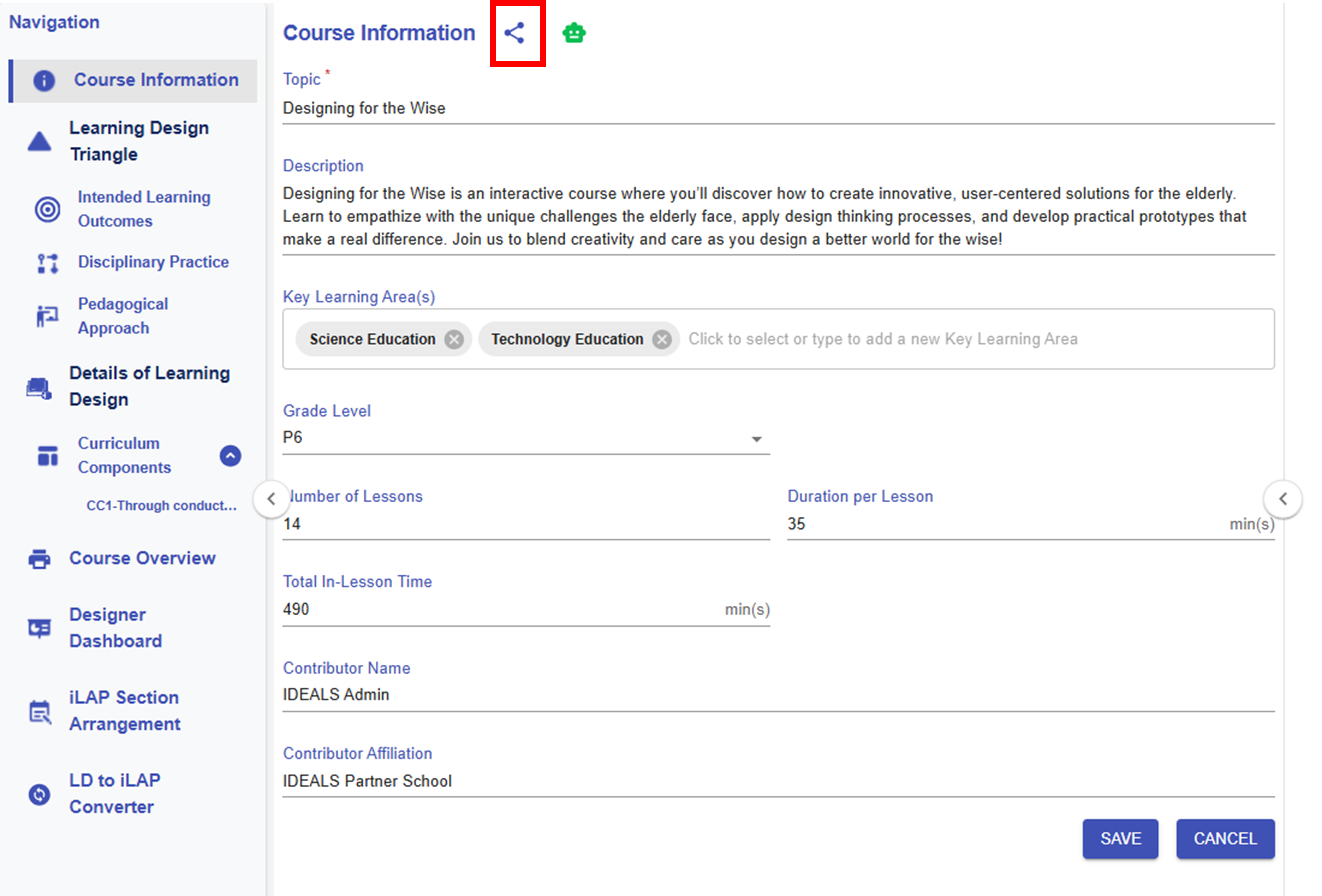 Figure 10.2: Sharing the Design (2) - By clicking the [](https://ideals-doc.cite.hku.hk/uploads/images/gallery/2025-09/0O8image.png)button, a pop-up window with several sharing options will appear. |
| **2. Generating / Closing the Shareable Link** [](https://ideals-doc.cite.hku.hk/uploads/images/gallery/2025-09/x6simage.png) 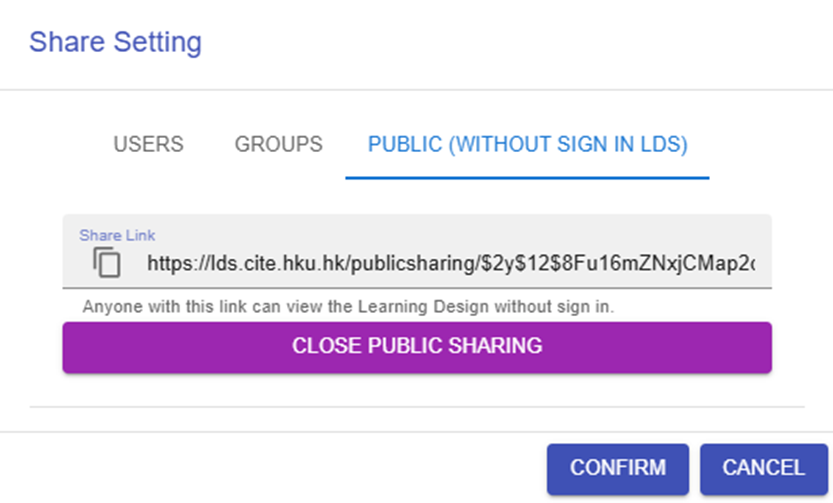 Figure 10.3: Enabling the Link for Public Sharing - Select **"PUBLIC (WITHOUT SIGN IN LDS)"** and click the **"GENERATE THE LINK"** button to obtain the shareable link. - You can disable the link at anytime by clicking the "**CLOSE PUBLIC SHARING"** button. |
| **3. View the Learning Design** 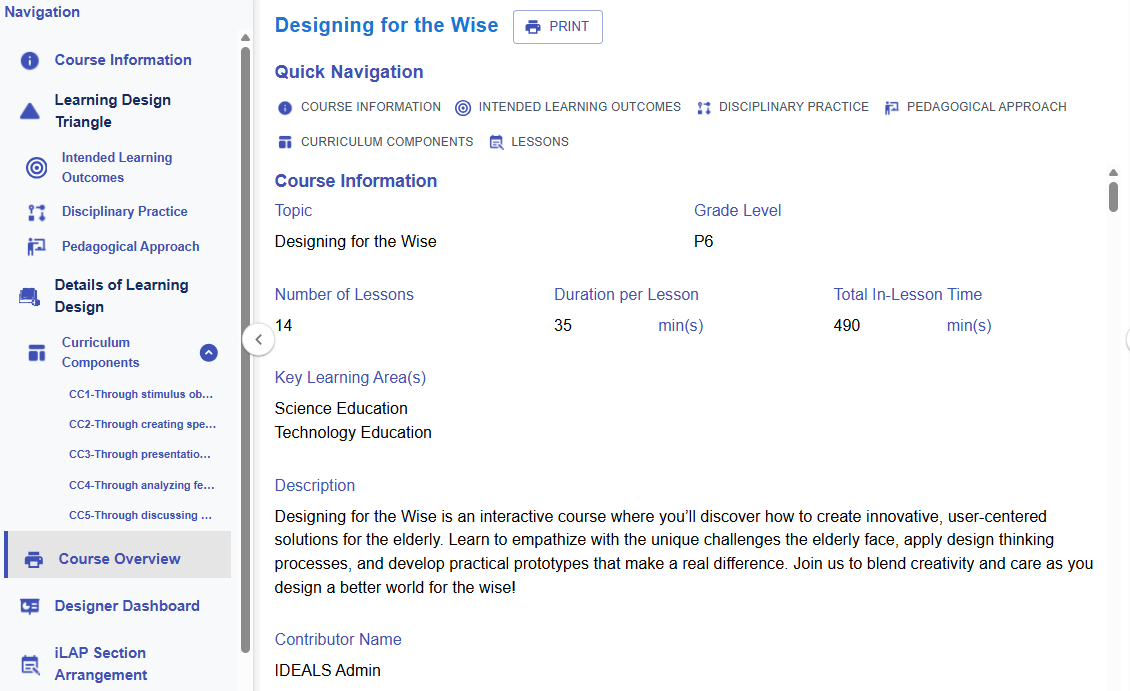 Figure 10.4: Public View of the Shared Design - People with this link can view the design, but cannot make any changes to it. |
| **1. Clicking the Share Button**  Figure 10.5: Sharing the Design - By clicking the [](https://ideals-doc.cite.hku.hk/uploads/images/gallery/2025-09/0O8image.png)button, a pop-up window with several sharing options will appear. |
| **2. Selecting a User** [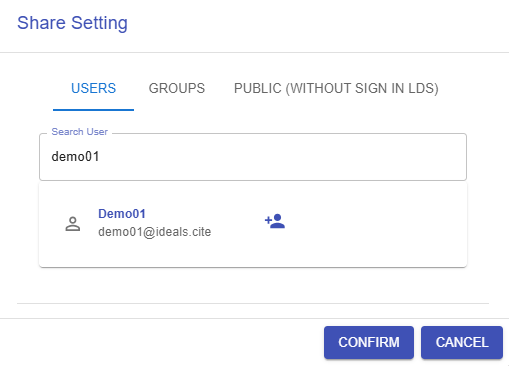](https://ideals-doc.cite.hku.hk/uploads/images/gallery/2025-09/d7aimage.png) Figure 10.6: Searching for the user - Select **"USERS"** and search for the user by their name or email. |
| **3. Visiting the Shared Designs** 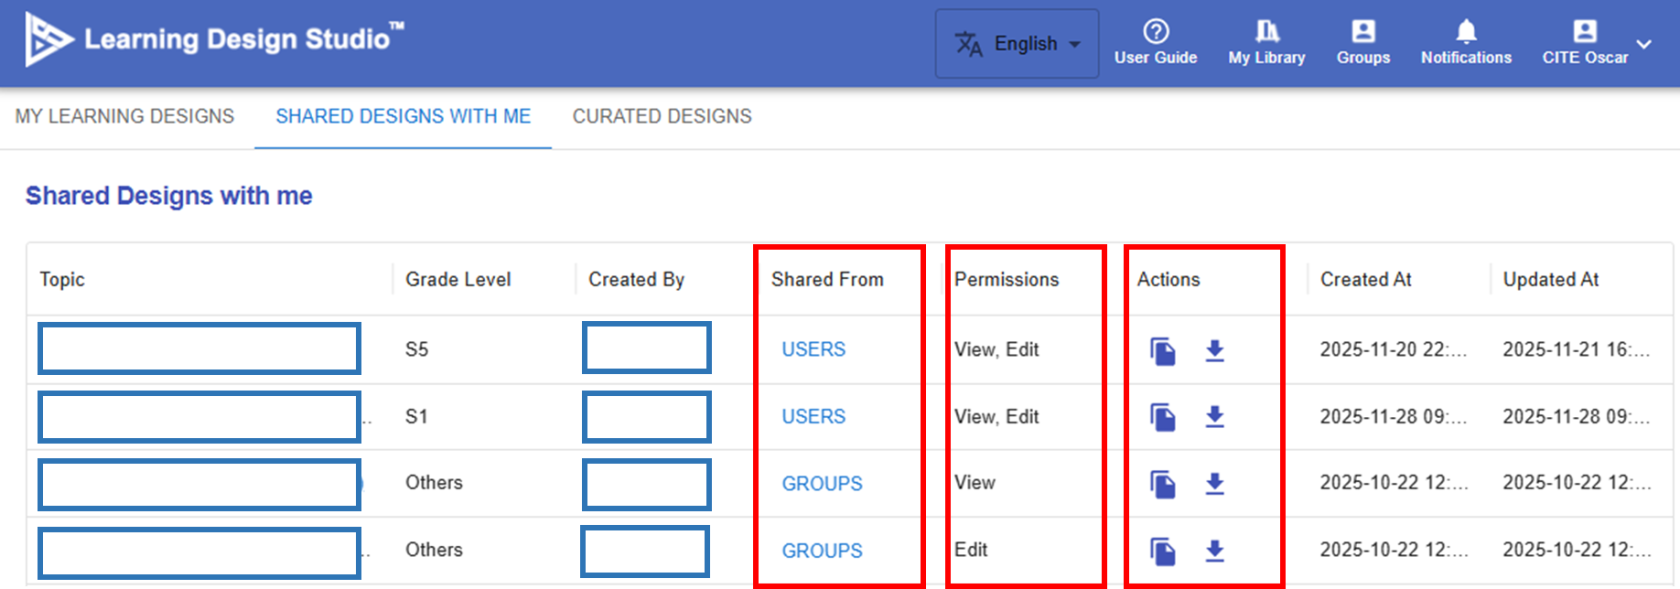 Figure 10.7: The Library of Shared Design - By selecting **"SHARED DESIGNS WITH ME"**, you can view a list of designs that have been shared with you. In the **"Shared From"** column, you will see **"GROUPS"** or **"USERS"**, indicating whether the design was shared by a group or a individual user. - The **"Permissions"** column shows whether you have **"Edit"** or **"View"** access, so you will be able to either modify or only view the design accordingly. - In the **"Actions"** column, you will see  and buttons. You can click the  button to copy the design to your own library. Any edits you make to this copy will not affect the original shared design. You can also click the  button to export the design and use the **import function** (introduced in the previous section) to reuse the design later. |
| 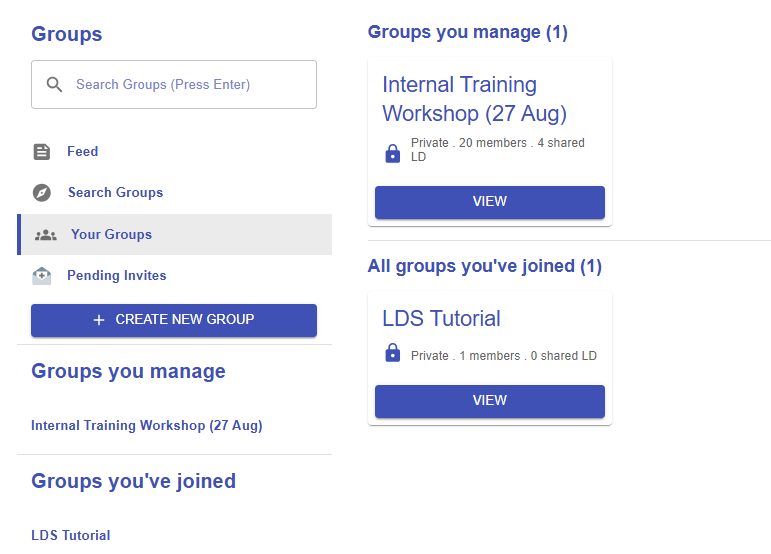 Figure 10.10: Your Groups List | **Groups you manage** - You are the owner of the groups listed here. - As an owner, you can manage design sharing, members, and permissions. **All groups you've joined** - You are the member of the groups listed here. - As a member, you can share your designs within the group. |
| [](https://ideals-doc.cite.hku.hk/uploads/images/gallery/2025-12/0Pximage.png) Figure 10.11: Group Invitation | |
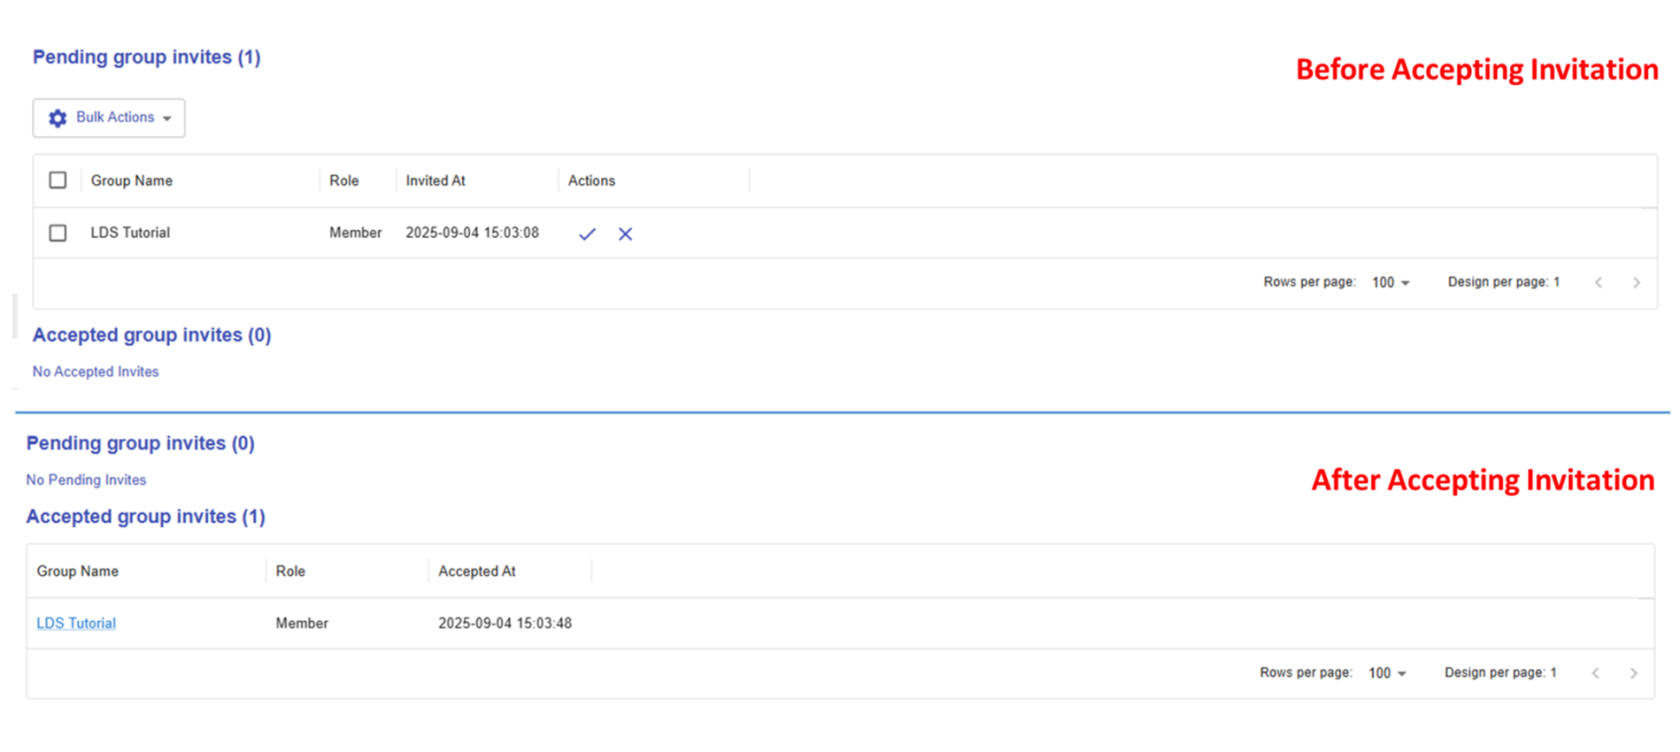
| 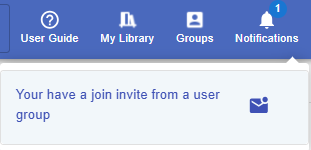 Figure 10.12: Invitation Notification | If you receive a group invitation, you will get a notification from the system. By clicking on it, you will be redirected to the Pending Invites section shown in Figure 9.10 above. You can either accept or decline the invitation. After accepting, the invitation will move from "Pending Group Invites" to "Accepted Group Invites." |
| **2.1 Share a Learning Design**  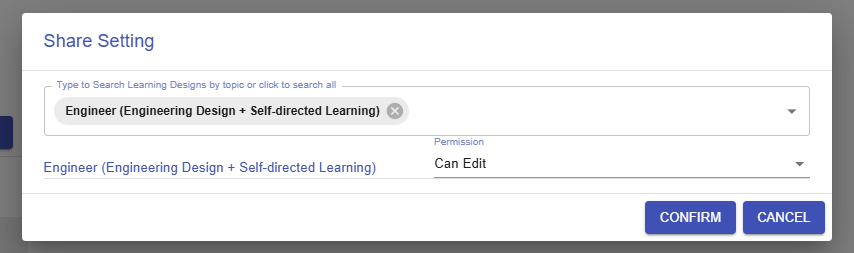 Figure 10.14: Sharing a Design within the Group By clicking the **"SHARE LEARNING DESIGNS"** button, you can select an existing design to share and set permissions to either **"Can Edit"** or **"Can View"**. [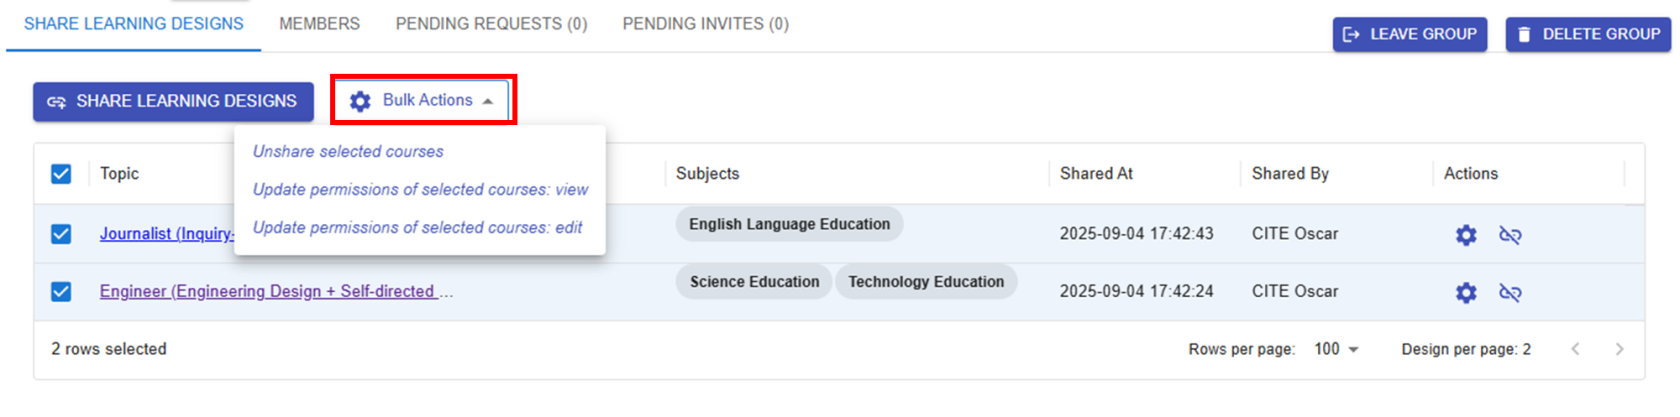](https://ideals-doc.cite.hku.hk/uploads/images/gallery/2025-09/7Jqimage.png) Figure 10.15: Updating the Sharing Conditions of the Designs Once you've shared your designs, they will appear in the group. You can use Bulk Actions to unshare designs or change their permissions at any time. |
| **2.2 Manage Group Members** 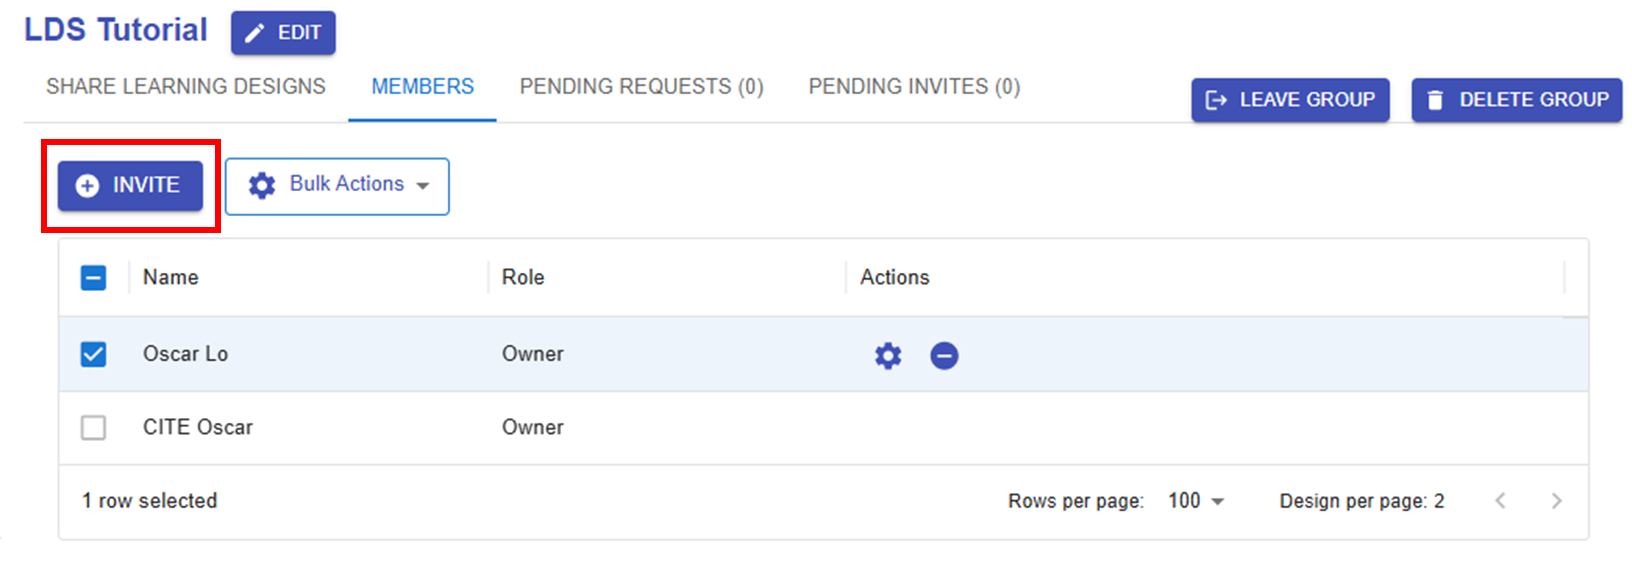 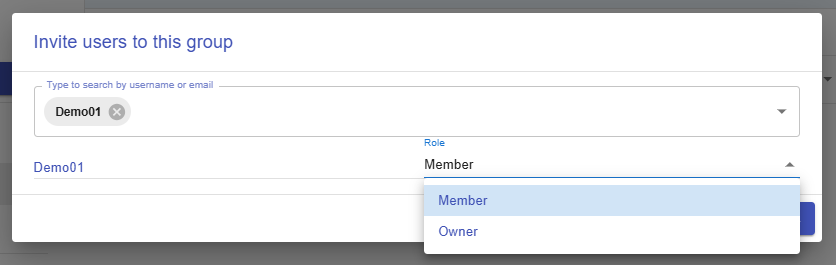 Figure 10.16: Inviting Users to the Group By clicking the  button, you can search for users by username or email and assign them the role of either **"Member"** or **"Owner"**. 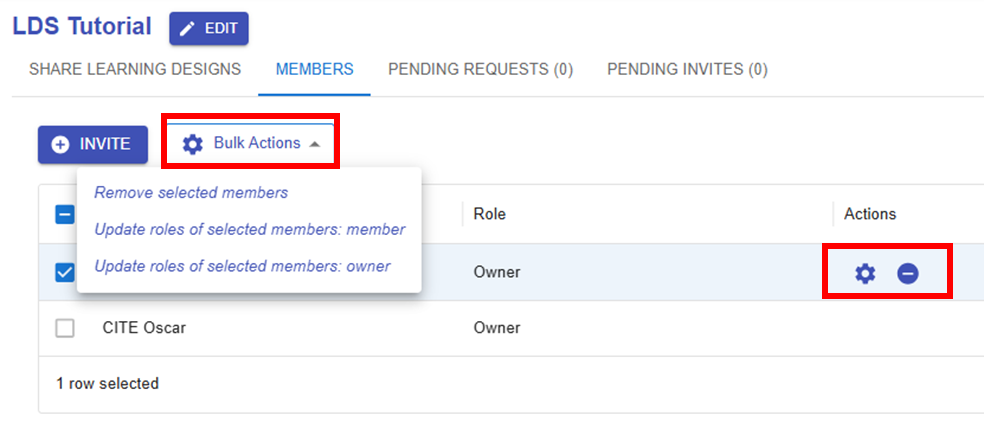 Figure 10.17: Managing a User - By clicking the button, you can change a user's role or remove them from the group. 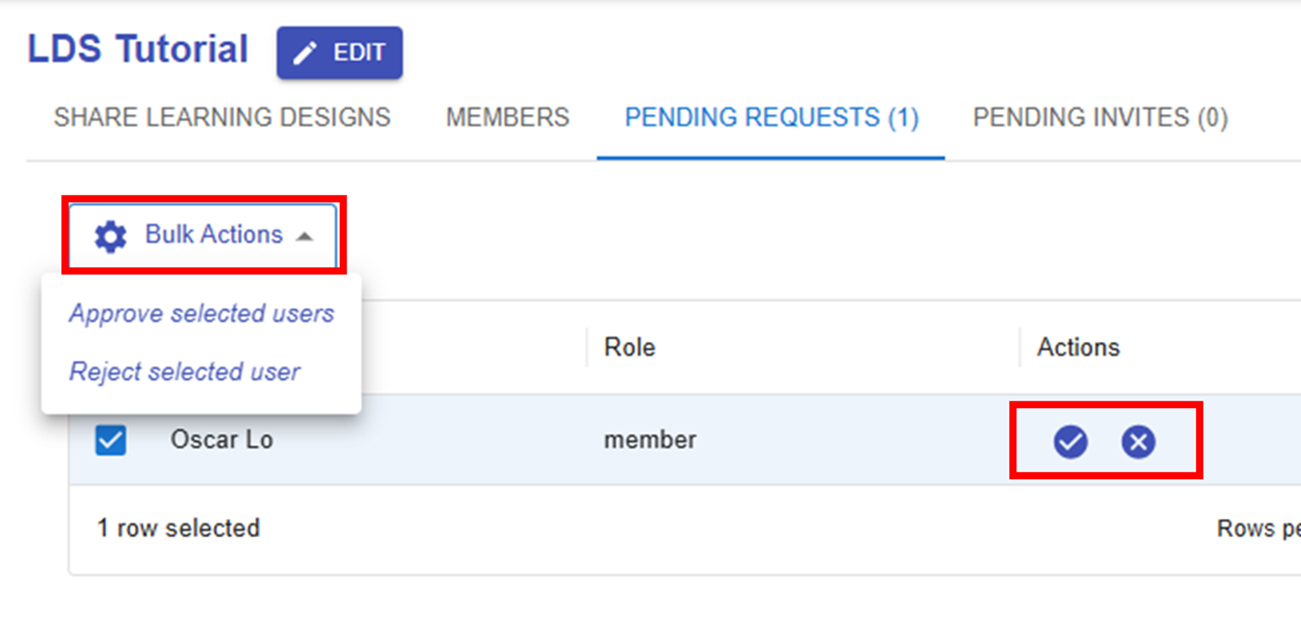 Figure 10.18: Pending Requests - If a user requests to join the group, the group owner has the option to approve or reject their request. 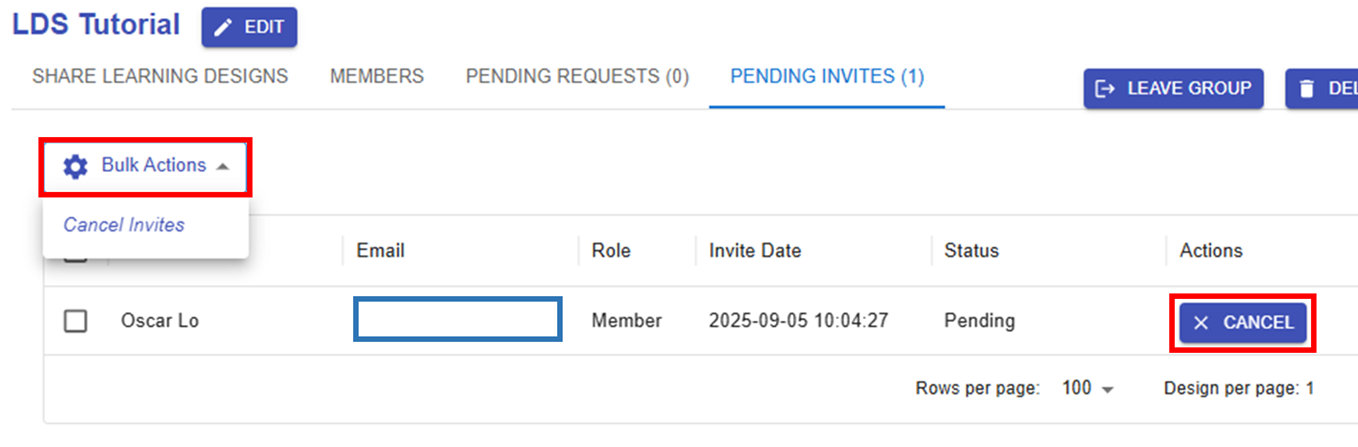 Figure 10.19: Pending Invites - The group owner can view the sent invitations here and choose to cancel them at any time. |