| **Item** | **Content** |
|---|---|
| Title | Designing for the Wise |
| Description | Designing for the Wise is an interactive course where you’ll discover how to create innovative, user-centered solutions for the elderly. Learn to empathize with the unique challenges the elderly face, apply design thinking processes, and develop practical prototypes that make a real difference. Join us to blend creativity and care as you design a better world for the wise! |
| Key Learning Area(s) | Science Education, Technology Education |
| Grade Level | P6 |
| No. of Lesson | 6 |
| Duration per Lesson | 35 |
| Total In-Lesson Time | 210 |
| Contributor Name | - |
| Contributor Affiliation | - |
| 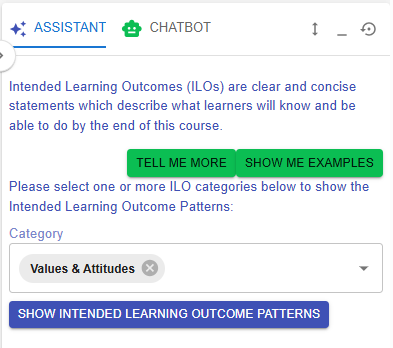 | 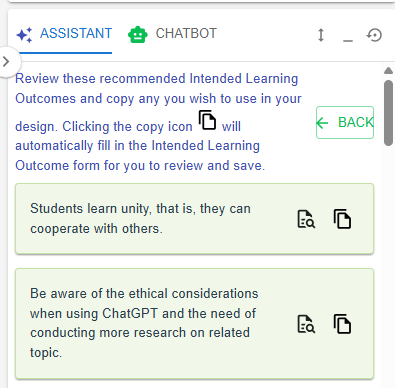 |
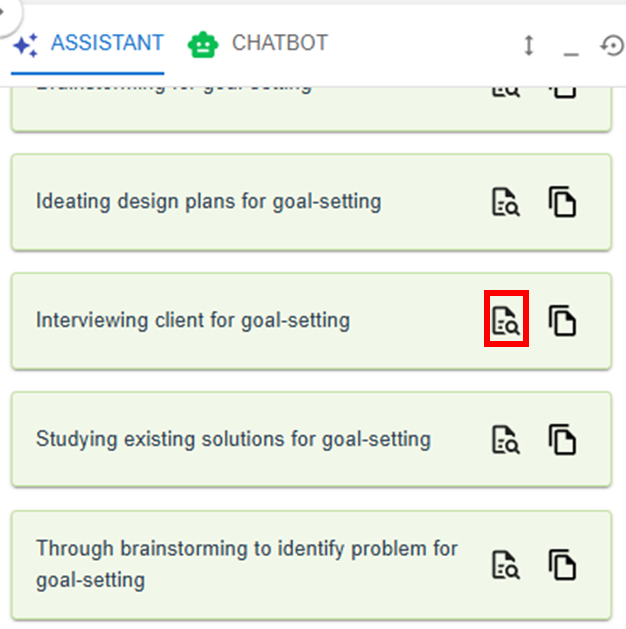
| Figure 6.6: The ILOs Patterns in the LDS Facilitator - After selecting the targeted ILO category in the Learning Design Facilitator, click the **"SHOW INTENDED LEARNING OUTCOME PATTERNS"** button to view suggested patterns. Alternatively, you can click the  button to instantly activate the pattern list. - By clicking the  button, you can explore the details of the targeted ILO. 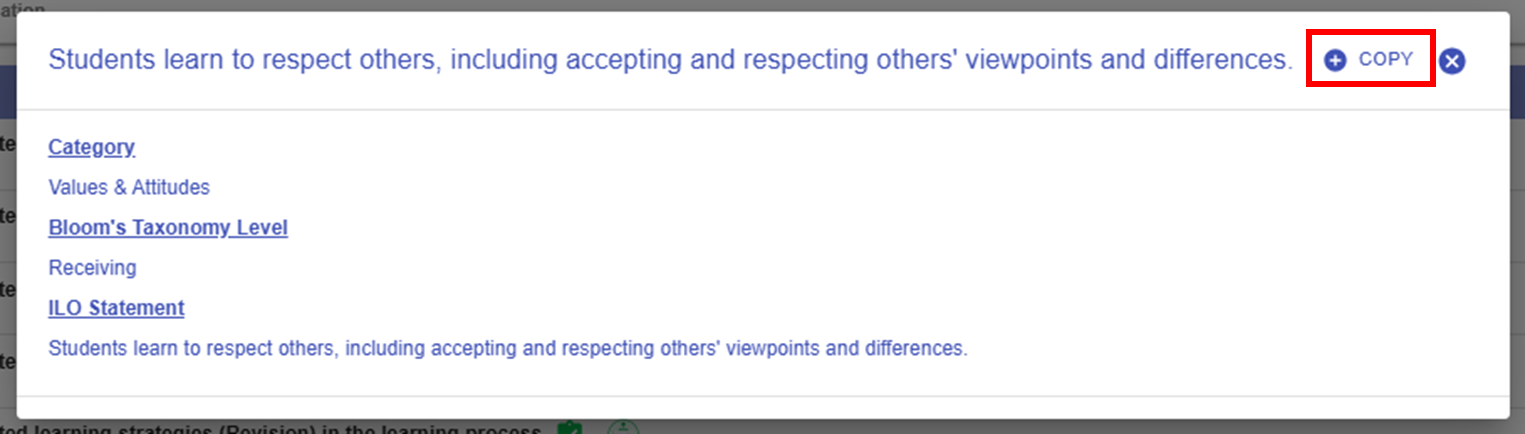 Figure 6.7: Details of the Targeted ILO Pattern (1) - You can use the targeted ILO pattern directly by clicking **"COPY"** button in the new pop-up window, or by clicking the  button in the Learning Design Facilitator. The ILO pattern details will be auto-filled into the LDS.  Figure 6.8: Details of the Targeted ILO Pattern (2) - After copying the ILO pattern, you can see the ILO "Students learn to respect others, including accepting and respecting others' viewpoints and differences." appear in the ILO builder. - To better fit our course context and the Bloom‘s Taxonomy, we can modify it to: “Demonstrate willingness to accept and respect the elderly, including accepting and respecting their viewpoints and differences.” | |
| **1. Subject/Discipline(s)**  Figure 6.11: Interface of the ILO Builder (2) - Select the appropriate discipline(s) for each ILO as needed. |
| **2. Category** 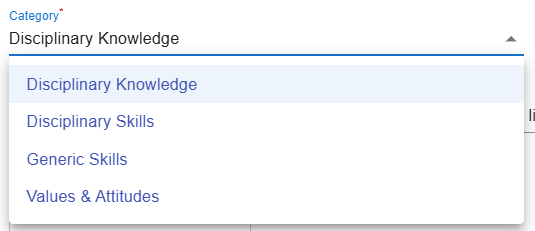 Figure 6.12: Interface of the ILO Builder (3) - Select the category of ILO: **Disciplinary Knowledge, Disciplinary Skills, Generic Skills, or Values & Attitudes**. |
| **3. Bloom's Taxonomy Level** 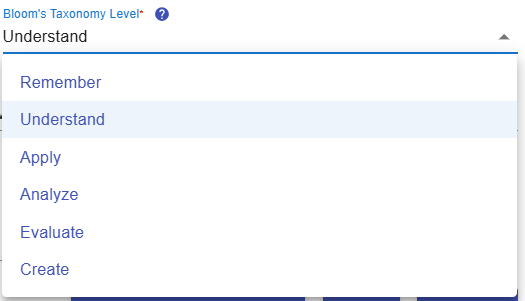 Figure 6.13: Interface of the ILO Builder (4) - Select the Bloom’s Taxonomy level that best reflects the intended skill, knowledge, or value for this outcome (e.g., Remember, Apply, Evaluate). 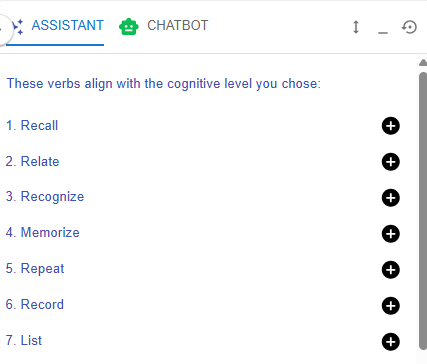 Figure 6.14: Writing a ILO with the Learning Design Facilitator - After selecting the Bloom’s Taxonomy level, the Learning Design Facilitator will recommend suitable action verbs to help you formulate your ILOs. - Choose the appropriate action verb that best reflects the skill, knowledge, or value targeted by your ILO. |
| **4. ILO and Learning Design Facilitator**  Figure 6.15: Interface of the ILO Builder (5) - Click the Learning Design Facilitator buttonto request feedback from the chatbot on your ILO. 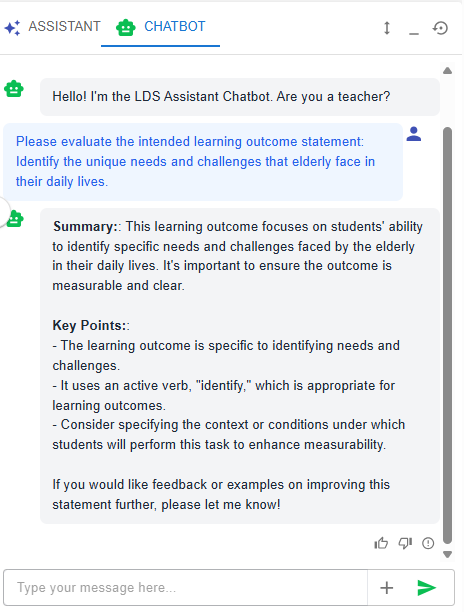 Figure 6.16: Writing a ILO with the Chatbot |
| **5. Sub-ILO(s)**  Figure 6.17: Interface of the ILO Builder (6) - To provide greater clarity, an ILO can be subdivided into more detailed sub-ILOs as needed. |
| **1. Editing or Creating a DP** - By clicking the  or  button, you can access the DP builder to modify the DP information. 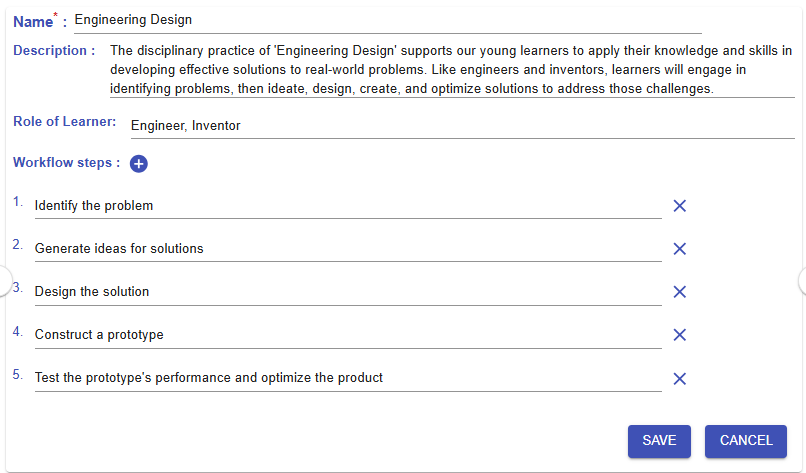 Figure 6.20: Editing/Creating a DP | ||||
**2. Learning Design Facilitator**
- In the Learning Design Facilitator, there are DP Patterns that we have designed for you to copy and use in your own design.
| ||||
| **1. Editing or Creating a pedagogical approach** - By clicking the  or button, you can access the area to modify the pedagogical approach information. 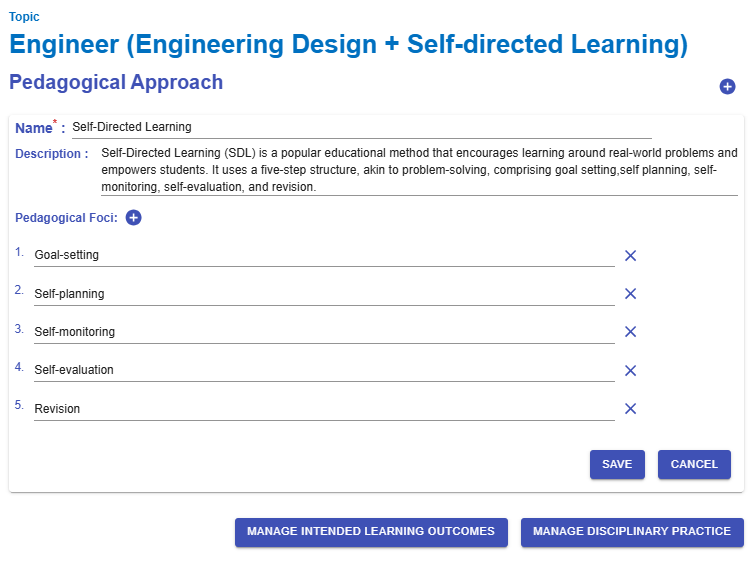 Figure 6.25: Editing/Creating the Pedagogical Approach | ||||
**2. Learning Design Facilitator**
- In the Learning Design Facilitator, there are Pedagogical Approach Patterns that we have designed for you to copy and use in your own design.
|
| **Name** | Through brainstorming to identify problem for goal-setting |
| **Intended Learning Outcomes** | - Apply design thinking process - Empathize with users - Apply design thinking process - Define design problems - Apply self-directed learning strategies (Goal setting) in the learning process |
| **Disciplinary Practice / Pedagogical Approach** | Identify problem / Goal-setting |
| **Learning Task(s)** | - Students observe the scenario of the design problem through stimulus - Students discuss the needs of users - Students work on identifying the most prominent problem needed to be addressed - Students present their findings on user needs to the whole class |
| **1. CC Name**
- |
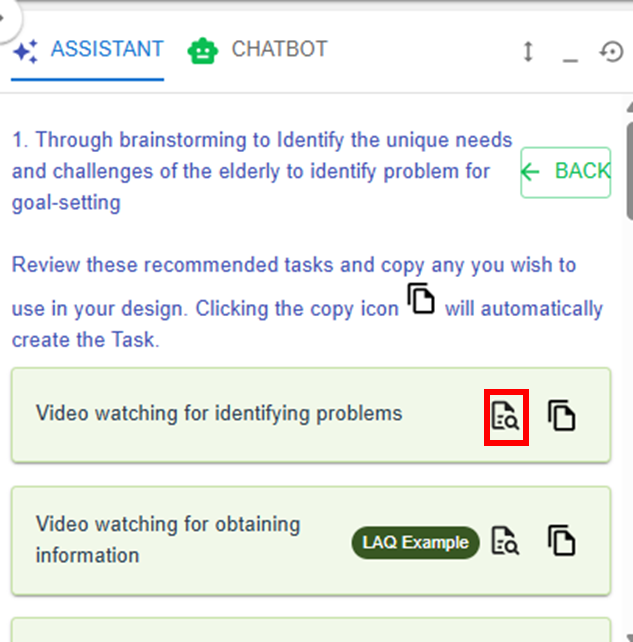
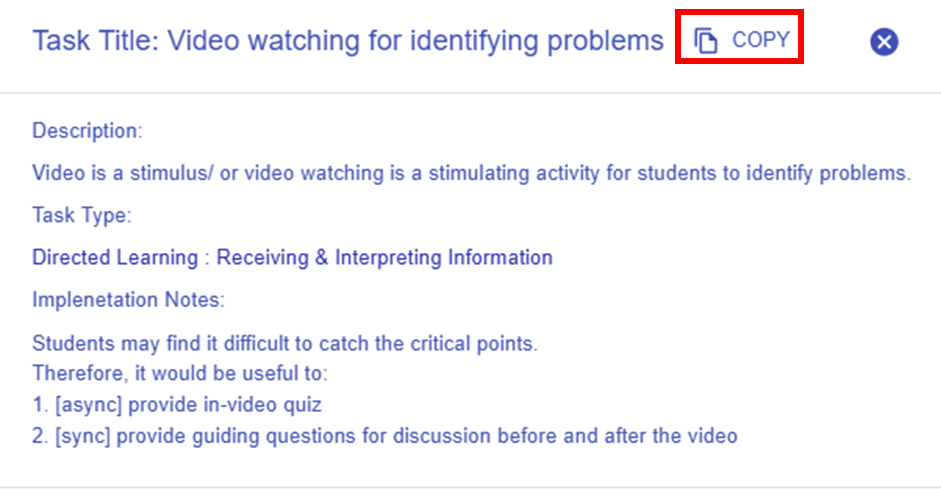
| **2. Workflow steps** 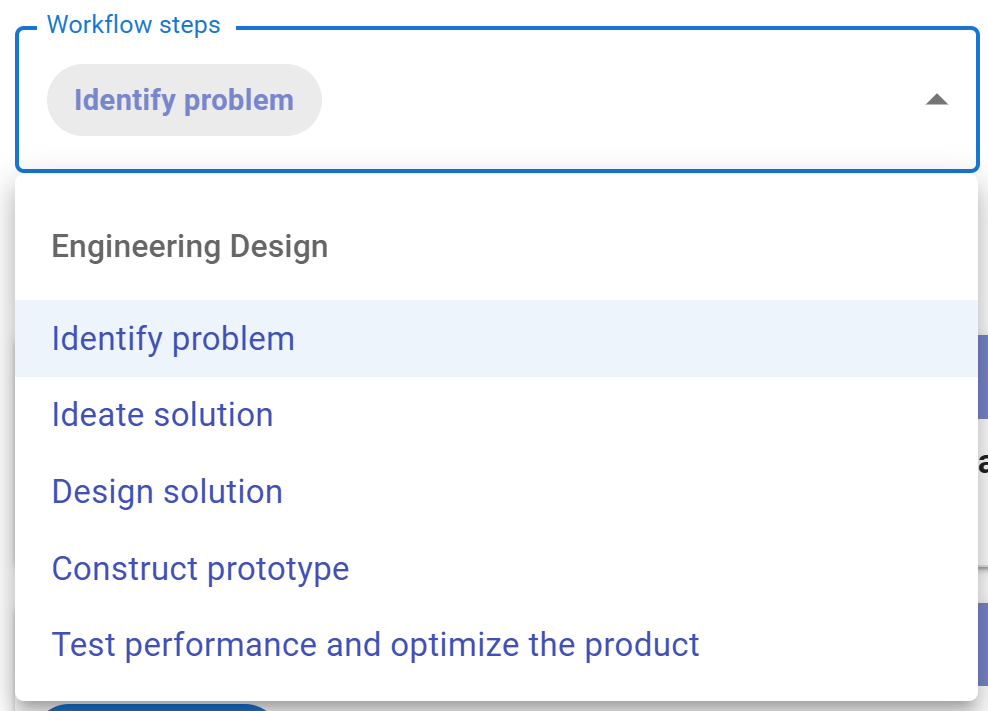 Figure 6.32: The Workflow Steps of Engineering Design - The workflow steps of Engineering Design are drawn from the Disciplinary Practice (DP) section you completed previously. - In this case, we do not need to make changes to **"Identify problem"**. |
| **3. Pedagogical foci** 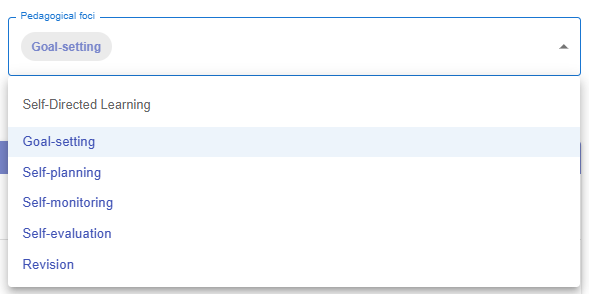 Figure 6.33: The Pedagogical Foci of Self-directed Learning - The pedagogical foci of Self-directed Learning are drawn from the Pedagogical Approach section you completed previously. - In this case, we do not need to make changes to **"Goal-setting"**. |
| **4. Linked Intended Learning Outcomes (ILOs)** - We need to link the intended learning outcomes **"Identify the unique needs and challenges of the elderly face in their daily lives"** to the CC 4.1. The Link Button  Figure 6.34: Linking the ILOs to a CC (1) - You can view all the Intended Learning Outcomes (ILOs) entered in the LDT section by clicking the [](https://ideals-doc.cite.hku.hk/uploads/images/gallery/2025-09/EXKimage.png) button. 4.2 Selecting the Appropriate ILOs [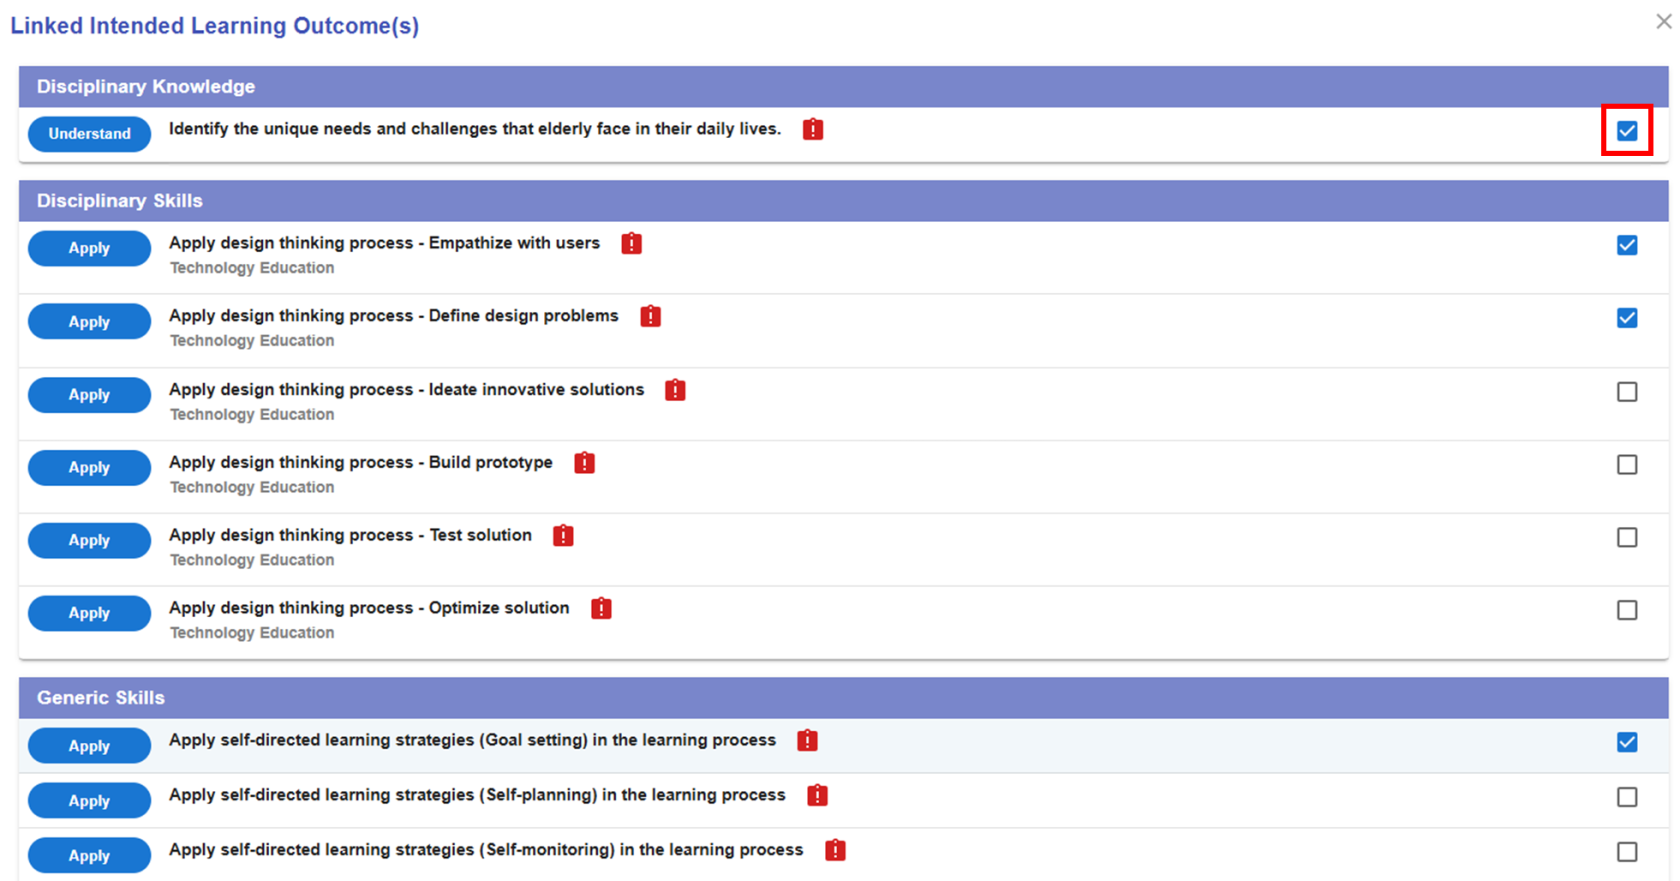](https://ideals-doc.cite.hku.hk/uploads/images/gallery/2025-09/scaled-1680-/bMOimage.png) Figure 6.35: Linking the ILOs to a CC (2) - Select the intended learning outcomes we want to link to the CC. 4.3 The Alert Icon and Complete Icon 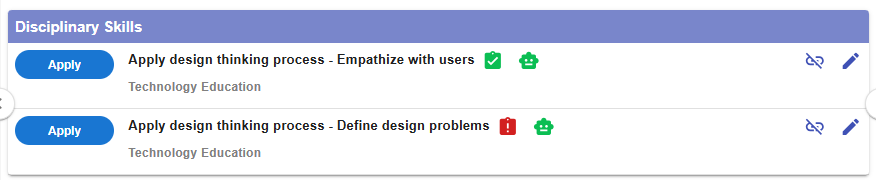 Figure 6.36: Unassessed ILOs in a CC - For each learning outcome, you should add an assessment to evaluate student performance. If an assessment has not been added to a learning outcome, an alert icon  will appear as a reminder. Once an assessment is assigned, this will be replaced with a complete icon . We will discuss how to assign an assessment soon. 4.4 The Unlink Button  Figure 6.37: Dissociating the ILOs from the CC - You can dissociate a specific ILO from the CC by clicking the [](https://ideals-doc.cite.hku.hk/uploads/images/gallery/2025-09/r6ximage.png) button. |
|  |  |
| **Item** | **Example** |
|---|---|
| **1. Task Information** - Provide a clear task title and description for a learning task.  Figure 6.42: Task Information | **Task title:** Students work on identifying the most prominent problem needed to be addressed. **Description**: You may update the task information to make it more meaningful for the learning design. **Task title:** Students work on identifying the most prominent problem faced by the elderly that needs to be addressed. **Description**: Students will analyse the needs of the elderly based on the previous brainstorming learning tasks. |
| **2. Stage** - Is this a pre-class, in-class, or after-class task? [](https://ideals-doc.cite.hku.hk/uploads/images/gallery/2025-12/STcimage.png) Figure 6.43: Stage | Select In-class |
| **3. Task Type** - Please refer to **[Chapter 2.6 - Task Taxonomy](https://ideals-doc.cite.hku.hk/books/learning-design-studio-user-guide/page/26-task-taxonomy)** for more details.  Figure 6.44: Task Type | Construction: Conceptual / Visual Artefacts |
| **4. Duration** - How long is the task?  Figure 6.45: Duration | Update to an appropriate duration, such as 30 minutes. |
| **5. Delivery Mode** - Possible Options: - Face-to-Face (Inside Classroom, Outside Classroom) - Online (Synchronous, Asynchronous) - Hybrid  Figure 6.46: Delivery Mode | Inside Classroom |
| **6. Social Organization** - Possible Options: - Whole Class - Group - Individual - Peer  Figure 6.47: Social Organization | Group, Size: 5 |
| **7. Feedback Provider** - You can select more than one feedback providers. - Teacher - Peer - Self - Others  Figure 6.48: Feedback Provider | Select Teacher |
| **8. Assessment** 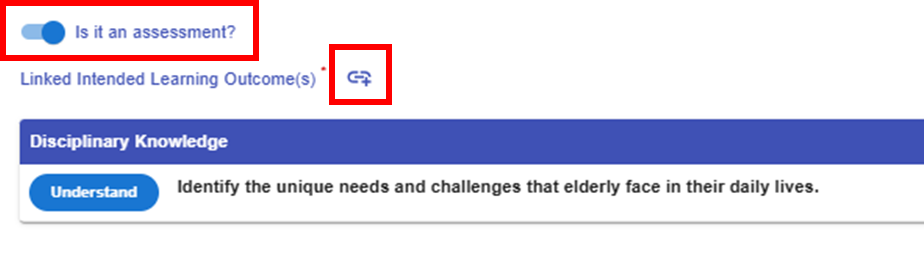 Figure 6.49: Triggering the Assessment Option in a Task | A learning task can also serve as an assessment. If you select the assessment option, you will need to - assign the feedback provider(s), and - specify the targeted learning outcomes for this task to be assessed - - Identify the unique needs and challenges that elderly face in their daily lives. |
| **9. E-learning Tool** 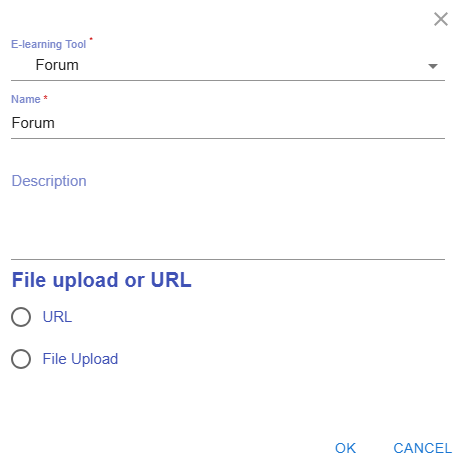 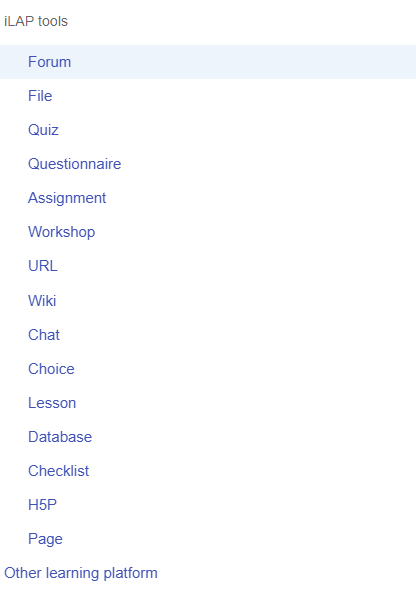 Figure 6.50: Interface for Adding E-learning Tool(s) to a Task | The e-learning tools section allows you to select the type of tool you want to use to implement the task. For example, to encourage idea sharing in class, you can use the Forum tool. You can remove the suggested e-learning tools that are not appropriate for your use. |
| **10. Resources** 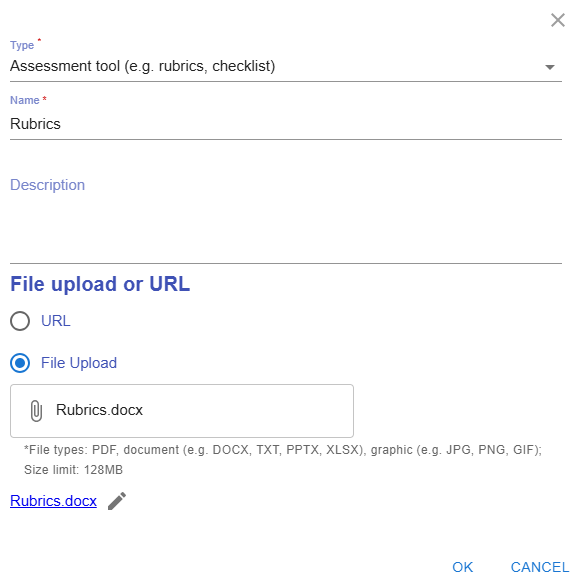 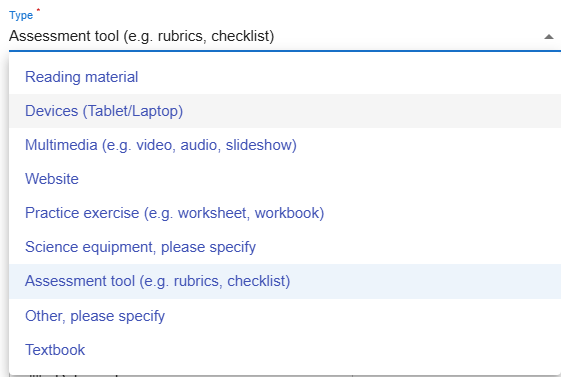 Figure 6.51: Interface for Adding Resource(s) to a Task | The resource section allows you to select the type of resource or tool you want to use to support the learning process. For example, you can upload rubrics for grading the assessment. You can remove the suggested resources that are not appropriate for your use. |
|  |  |
| Figure 6.56: Adding a New CC from the CC Patterns (1) | |
| **Item** | **Description** | **Example** |
|---|---|---|
| 1. Information Window | 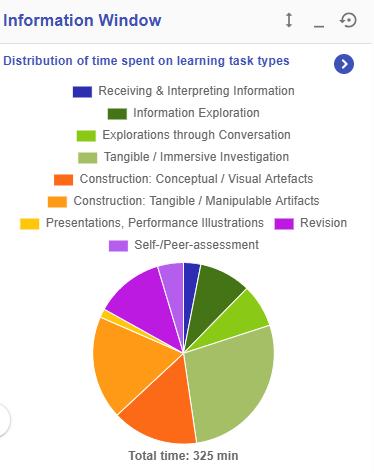 Figure 6.58: Information Window in the CC Section | In the CC section, the information window will visualise your overall CC design with the pie chart - Distribution of time spent on learning task types - Distribution of number of iLAP tools adopted - Distribution of time spent on delivery modes |
| 2. Header | [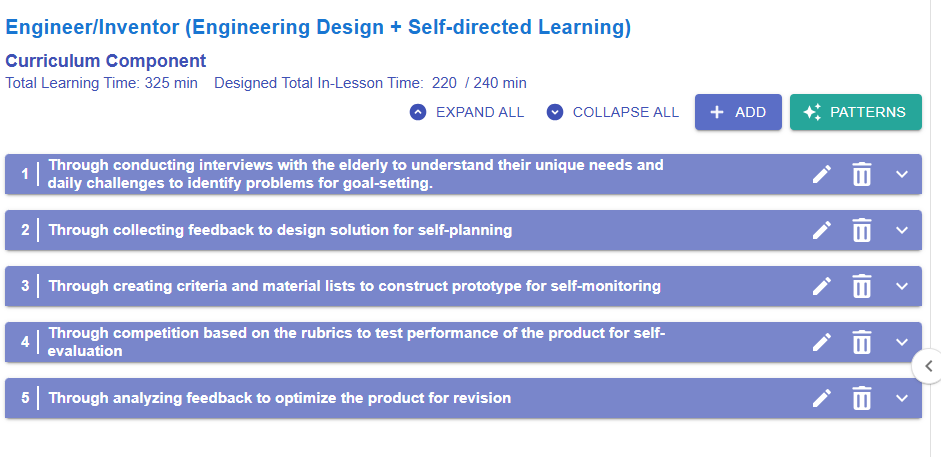](https://ideals-doc.cite.hku.hk/uploads/images/gallery/2025-12/scaled-1680-/OtMimage.png) Figure 6.59: Example of a Curriculum Component Sequence **Total Learning Time: 325 min** - It includes the time spent on all pre-class, in-class, and after-class activities. **Designed Total In-Lesson Time: 220 / 240 min** - 220 min is the time spent on in-class activities. - 240 min is the possible in-class time allocated for this course **Expand all** - Expand all the CC items to see the details **Collapse all** - Collapse all the CC items to hide the details | |